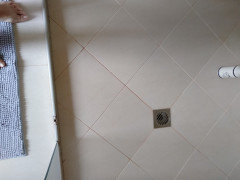
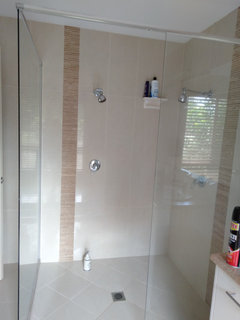
Tile over, microcement or sheeting to cover shower walls and floor?
Lorraine Cobcroft
3 years ago
Featured Answer
Comments (17)

Kate
3 years agoRelated Discussions
cover strips complicating my paint job!
Comments (11)I'm keeping the window white but adjusting the splash back so the window frame on the left can go all the way down to the vanity. Was planning to keep it white with a white sheer curtain, thought it would be a nice contrast. Yes I'm painting myself. Would have been easier to do between demolishing and putting in new vanity but can't decide yet so I'll wait and then maybe just start with the middle feature wall painted and see if more is needed....See MoreTiles for small laundry area floor that is open plan with pine floors
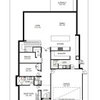
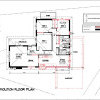
Comments (28)Gorgeous brick pavers, I love that look for the floor! It has a rustic appearance yet you're right- sophisticated, even an elegance. I think this would suit the feeling I'm wanting for the room, the pine boards have a rustic appearance, this would go well with them. We have a 1m square oak table with cross back chairs for the dining section and a La Spezia 3 light pendant (Beacon), farmhouse sink, timber hood cover to give you an idea of the look we're going for. Thanks very much for your thoughts on this. I like the idea you're going with, but yes, we have the window and door in already. Door could be trimmed if necessary. It wasn't until the window was already made and the wall sheets and cladding was removed that we realised the original kitchen layout had the back door next to the window, and the door into the laundry section was a modification. I most likely would have put it back where it was originally or had double doors. It made no logical sense for the back door to be a thoroughfare through the laundry, eliminating valuable storage space. I may have just left the kitchen in the original layout and made an entry into the laundry from the kitchen side for a laundry/butler's pantry with fridge in there. Removed the side window for more wall space for storage and changed the existing door to a window. But it's too late now, the outside of the house has all been newly clad so doors and windows are as is. There's no other possible place in the house for a laundry. It is a very tight space. Plan to build an external laundry studio in the future. The one in the house would be temporary, yet need it to accommodate a washer dryer combo for now, and be suitable for prospective buyers/renters in future if the external laundry doesn't eventuate. This is the original 1960's floor plan. A previous owner made internal access into the laundry and made bench space where the original back door was, the next owners opened up the living to dining room and blocked up the hallway doorway which became the fridge space. The cornice didn't match up in the hallway though where the old doorway was. They had made a shelf from the cut out on the hallway side, and the protruding section in the kitchen side became a kind of bulkhead for the fridge. Old hallway We've rebuilt this so that it could have an upper cabinet on the kitchen side/ hallway later if needed. But the lack of space in the hallway didn't allow us to build a linen cupboard, so that will also be needed to be included somewhere in the house. At this stage, thinking we will have to configure the laundry space to have a linen cupboard/ broom cupboard between the dining room and laundry section. Open to ideas too for storage in that limited laundry area space. I'll add more measurements to the floor plan for reference....See MoreHelp needed on colour ideas for weird kitchen floor/ wall tiles
Comments (11)Hi guys, wow thank you for being such champs with all the great advice! Even my partner, the handyman of the household, is chuffed we found this site with such great community. The room does feel overwhelming as we took over the property (rental so not keen to go full out with ripping things out to replace them) with appliances included. For 3 years we've just been prioritising our career and family (both of ours are overseas) and with The Great Pause of 2020 happening, there is a lot of space to tackle what has been too overwhelming for us. UPDATES! We will slowly shift into kitchen reno gear gradually, but looking forward to share gradual changes to the space. [budget] To be honest, it's a rental property where we don't plan to live in 2 years down. I'd say $500 or below, but knowing most of the $$ is going into organising and new shelving (thinking of new shelves to put 1L airtight jars for all our grains/ pasta/ baking/ nuts - as they are currently all stashed away in the cabinet). So no installers, just me and the old school way of self taught youtube videos and essential (for my sanity) trips to Bunnings! [clutter] Great honest feedback, we do have too much crap lying around. I've cleared out two basket worth of stuff and once I reorganise the cabinets, most of the stuff on the bench will disappear. This will now be a monthly habit + the idea that if something doesn't have its place in the kitchen, it wont even enter the space. [light] The horrendous shade is gone, thanks for helping me convince the man. It feels so good to have the 1/4 top section of the room brightened. Feels like there is more room to utilise. It's quite tall as our already considered tall step ladder can only let us reach the top of the upper cabinets. What should we do with all the extra space near the ceiling/ We are thinking to install some floating shelves and just put plants, which wouldn't require us to check in every 4-5 days so occasionally climbing the heights is fine. I can anticipate accidental drops already, but no kids at home so can deal with cleaning up shards. @Kate fantastic call on the light in the dining area, hoping to extend space as best I can. Tbh, would love to take off the wall, but don't want to damage the wiring and also can't be bothered as above point on rental. [painting] Yes! Colour was definitely one of the biggest road block I've had. White is definitely going up first, it works as a great base and if we want to change up the tone we can just paint over it. Glad to hear advice on working with the existing colours, i love a good vintage, but whenever there is more than 4 colour in a room (green from plants don't count), it gets a bit too much for me. (Happy to hear blush and charcoal are approved). Perhaps let's revisit the colour brainstorm once I've done a white paint on. It will help you guys visualise what better as I gradually clean up the space. I won't be retiling. Probably won't even be doing a tile paint. I've heard horror stories on tile paint and how they decided to just retile afterwards. Partner is keen though, open to ideas after the white paint is on. @siriuskey i love the idea of soft green, it looks wonderful in a friend's kitchen where there wasn't much light. She actually paired white ceiling light with a soft 24/7 tabletop warm light, it somehow worked quite well. If anyone has any advice on colour pairing, I'm all ears. Atm I'm relying on https://coolors.co/ Great color visualisation tips btw @Kate totally would have missed the testing on back of door bit, great reminder. @User partner laid down a verdict that the timber bench top and the black bench top is staying unfortunately, but I will lobby again once the white paint is on. I think I will weigh in on what I would like to tackle between the bench tops or the fridge/ stove as these are quite dominant (as pointed out by @brizcs). Will call on advice for tile painting if we get to that stage. If I am to start with the floor tiles there are bits to fix too, 1-2 tiles have somehow loosened up and one's even broken.. trying to tackle small bits with big changes first like @Kate suggested! @siriuskey the 70s cabinet timber definitely has its own style, I may try to paint that massive board above it white first, then decide if I'd still like to go ahead with the cabinet timber painting. Will look into transforming the fridge and stove, but also aligning w budget. @brizcs actually think i'll have a look into this rather than the paneling, thanks for the tips on where i can start my research on. Definitely not a fan of the colours of the fridge and stove. Unsure about a new stovetop bc our current one is broken (oven don't work but stove does), however landlord is being a prick and would rather get her friend (uncertified) in to try fixing it. They popped over to try to figure it out themselves but we put a plug to it as we don't want them both to explode in our kitchen. So the stovetop is unfortunately stuck, heck I probably have to check to see if I can even do any work on it as there may be some restrictions to prevent bad gas fire x the paint/finish combo. [under bench lights] This is where I'll need some advice. I've never installed this before and am stuck with power source options. Without getting tradies in to rewire into the walls, my only options seems like batteries. We do have a power socket of four (on the other end of the bench, prefer to not drag wires all over the place), however 2 are taken permanently and the remaining two I would like to keep free. Don't mind changing out chargeable batteries now and then. I'm envisioning it being a simple task of stick LED light strip + stick battery box (maybe paint it to 'hide' it), please advise if I'm being too naive here. NEW IDEAS [Theme: open access design] This means shelves with all our jars out. Mainly to see all the food we already have so we use them up before we hoard too much. Same goes for things like knives (magnet strips), spatula (hung up to rail with grids), pots/ pans, wine etc. I very much like a functional retro vibe for my kitchen I don't need things to be glossy and full marble. I like the industrial practical way of seeing where things are and knowing what tools i have immediately. Thoughts? Will send through photos of the side I didn't show, it's where the sink is. And the sink will be a whole new category itself which I'm not touching till a later stage. [floating shelves on tiles] I have forgotten to mention that I'm hoping to install this below my cabinets on the left for spices. For the right cabinet I will either install mug hooks or move the mugs entirely to previously mentioned shelving option. Will definitely add LED lights under the cabinets and under the spice shelf. Again, thank you for letting me tickle your brain on this, the project has just got a lot less stressful thanks to you guys :)...See MoreCovered Deck Design Issue
Comments (30)i use a laptop and couldn't manage without being able to edit all my misspelling... and Rose, we think of minimum ceiling height being 2.4m but you also need to allow for the thickness of the frame so first measure from the bottom of the upstairs windows to the ground to see how much space is available...the frame will need to be 15 -30cm thick depending on the length of each beam so there needs to be enough space for the frame, ceiling height and then maybe dig down for a level space and. as siruskey asked, why a deck when a gravel or pavers could be easier if you don't want the structure to obstruct the upstairs windows to allow for enough height...See More
Lorraine Cobcroft
3 years agoLorraine Cobcroft
3 years agoKate
3 years agoLorraine Cobcroft
3 years agoLorraine Cobcroft
2 years ago
Kim Miller
2 years agoRobyn Buckland
2 years agoKim Miller
2 years agoRobyn Buckland
2 years agoKim Miller
2 years ago- PRO
User
2 years ago Kim Miller
2 years agokarincarter
2 years agoastrogirl77
last year


Dr Retro House Calls