


The Power of Ply: 10 Stylish Uses for Plywood From Floors to Furniture
If you still think of plywood as cheap and cheerful, think again. Plywood is strong, powerful and can look amazing
Liz Durnan
29 August 2014
Houzz Australia Contributor. Previously a freelance writer and editor at a variety of magazines and websites in London, New York and Sydney. Now I live in the Blue Mountains bush in a strawbale house that we built from scratch. I write about my passions – mainly books and sustainable housing – while writing a book and attempting a permaculture garden.
Houzz Australia Contributor. Previously a freelance writer and editor at a variety... More
When building a house not too long ago, I suggested using plywood to the kitchen designer. He looked up from his glossy brochure and seemed a little upset. “Why would anyone want to use a waste product for their kitchen?” he said. Undeterred, I found someone else to design my kitchen, so stuck was I on the idea of plywood.
Love it or hate, it seems like plywood is everywhere. Being a waste product is entirely the point for someone like me who finds it painful to throw out a cardboard box. It’s what gives it a reputation for being relatively inexpensive (not always true) and gives it green credentials (again, not always true – depends where it comes from and how it is made). Of course, it’s not new – the iconic plywood Eames chair was conceived in 1946. It’s just that now we’re seeing so much exposed plywood in the most stylish of homes. Being strong and pliable, plywood has a multitude of uses. Here are some of our favourites.
Love it or hate, it seems like plywood is everywhere. Being a waste product is entirely the point for someone like me who finds it painful to throw out a cardboard box. It’s what gives it a reputation for being relatively inexpensive (not always true) and gives it green credentials (again, not always true – depends where it comes from and how it is made). Of course, it’s not new – the iconic plywood Eames chair was conceived in 1946. It’s just that now we’re seeing so much exposed plywood in the most stylish of homes. Being strong and pliable, plywood has a multitude of uses. Here are some of our favourites.
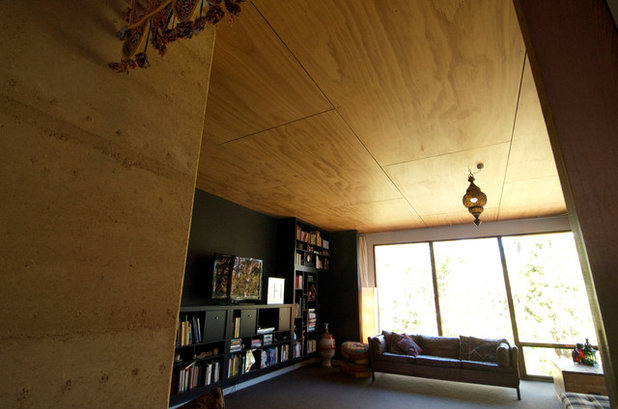
1. Ceilings
It’s a refreshing change from a white plasterboard ceiling, especially in a contemporary home. A ceiling lined in plywood can give off a lovely warm glow in your home. You can decide on the size and arrangement of the plywood panels according to your taste and the shape of your ceilings. The ceiling here is pine ply.
It’s a refreshing change from a white plasterboard ceiling, especially in a contemporary home. A ceiling lined in plywood can give off a lovely warm glow in your home. You can decide on the size and arrangement of the plywood panels according to your taste and the shape of your ceilings. The ceiling here is pine ply.
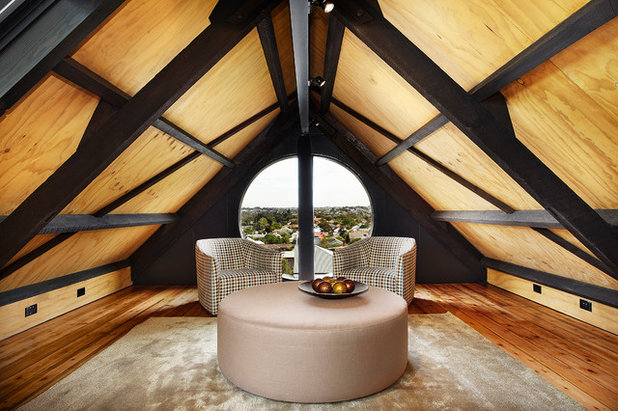
Plywood is made by glueing many thin layers of wood together at right angles to each other. With each new layer, the ply becomes stronger – this is what gives ply the reputation as a strong and durable material. Some of the glues used had traditionally been high in formaldehyde but there are now plywoods made only with low-formaldehyde glues.
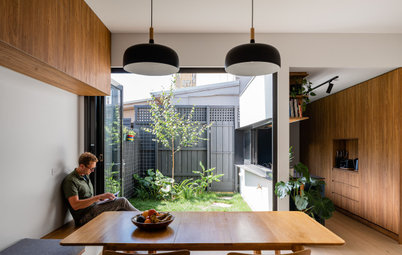
See more of this church renovation
See more of this church renovation
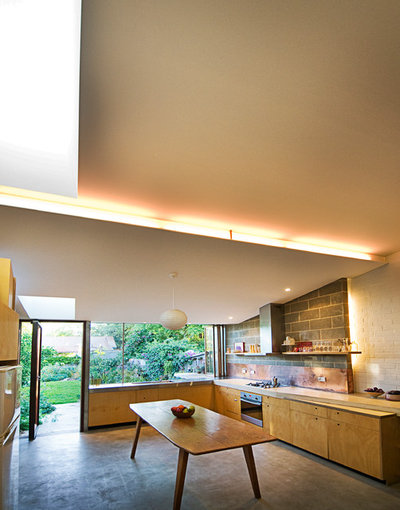
2. Kitchens
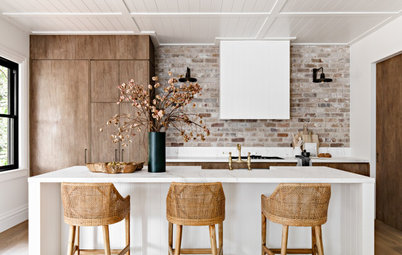
Plywood can be a beautiful and practical material for a kitchen and, as with ceilings, can create a lovely warm glow in the heart of the home. The type of plywood used in this kitchen is hoop pine, which is frequently used in Australia.
Plywood can be a beautiful and practical material for a kitchen and, as with ceilings, can create a lovely warm glow in the heart of the home. The type of plywood used in this kitchen is hoop pine, which is frequently used in Australia.
In this photograph, a poplar timber veneer on a plywood substrate has been used and finished in clear satin polyurethane. Different plywoods have different looks and grains to choose from. The varying types depend on the wood from which they are made. Birch is another beautiful ply, known for its strength, but much of it is imported from Scandinavia and Russia, so is potentially more expensive.

All plywood comes in different grades. The plywood that you’ve seen for sale at the local hardware shop is a different product from what you might buy from a specialist plywood supplier. There are structural grades of plywood used behind the scenes which are different to the plywood you see on display in kitchens and bathrooms. The surface look, the thickness and strength all depends on what it’s being used for.
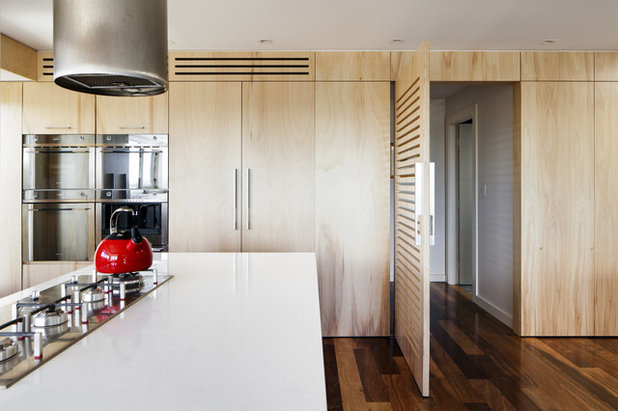
3. Storage
Sleek and strong, plywood is great for cupboards, bookshelves, wardrobes and other types of storage. Be aware that plywood can warp and bow so talk to your builder or cabinetmaker about choosing the correct grade and thickness of product for the application.
Sleek and strong, plywood is great for cupboards, bookshelves, wardrobes and other types of storage. Be aware that plywood can warp and bow so talk to your builder or cabinetmaker about choosing the correct grade and thickness of product for the application.
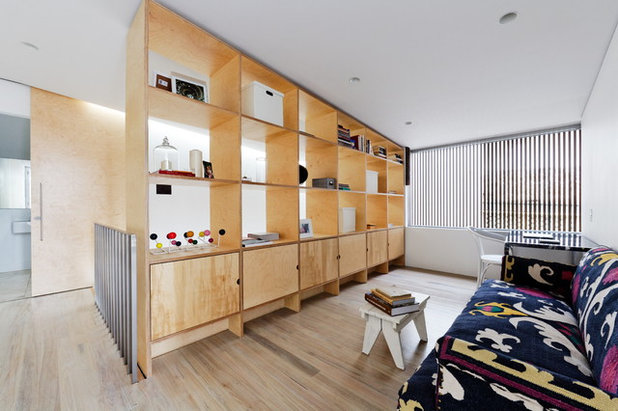
Plywood for shelving can be less expensive and more durable than some timbers commonly used for shelves, such as pine. Some people like to add a trim to the rough plywood edge but I personally think it looks good smoothed down and left exposed.
You can paint the finished product or leave the beautiful grains on show. Finishes include oils such as tung oil, or water-based and oil-based polyurethane finishes (available in low-VOC), which allow the beauty of the grain to shine through.
More: Stylish Storage: Show-Stopping Shelving Suggestions
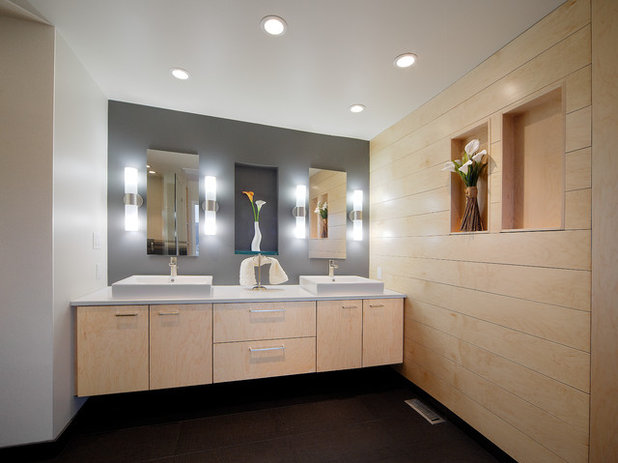
4. Bathrooms
There’s an idea that plywood can’t be used around water but, of course, plywood can even be used to make boats. You don’t even need to use marine-grade for high-moisture areas; you just need to specify to the supplier that the plywood be appropriate for high-moisture areas and then ensure it’s finished with the right product.
There’s an idea that plywood can’t be used around water but, of course, plywood can even be used to make boats. You don’t even need to use marine-grade for high-moisture areas; you just need to specify to the supplier that the plywood be appropriate for high-moisture areas and then ensure it’s finished with the right product.
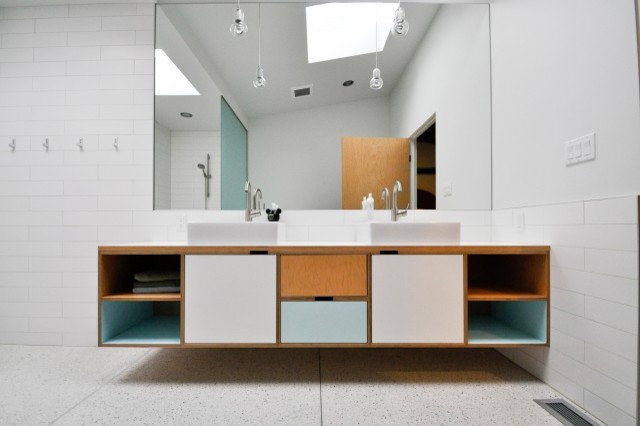
Plywood can be coated with any colour paint. Using lots of different colours in the same cabinet, like this one, can really inject life and colour into your bathroom space.
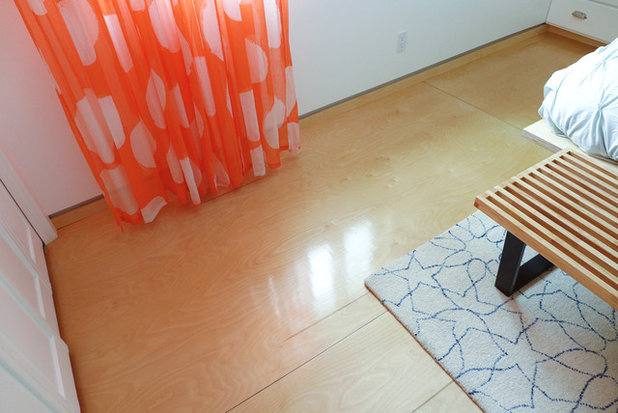
5. Floors
An alternative to traditional timber flooring, plywood is potentially less expensive than many kinds of flooring. Here, the sheets of plywood were sanded down before installation and a few coats of polyurethane were applied for a protective layer to counteract wear.
An alternative to traditional timber flooring, plywood is potentially less expensive than many kinds of flooring. Here, the sheets of plywood were sanded down before installation and a few coats of polyurethane were applied for a protective layer to counteract wear.
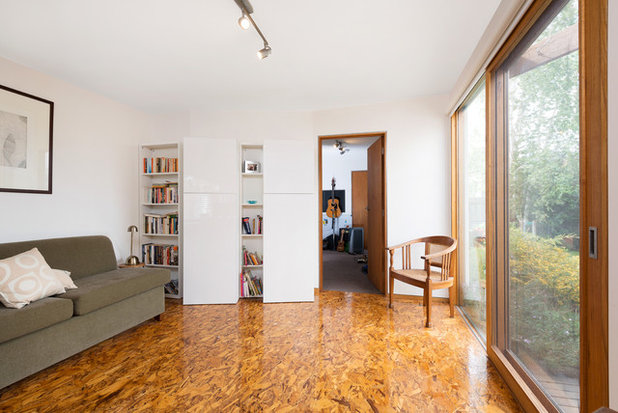
Ok, so this floor isn’t technically plywood; it is another engineered wood panel product, OSB (Oriented Strand Board), which is more often used for bracing or temporary hoarding. According to architect Ben Statkus of Statkus Architecture, it is “an inexpensive product and has a great finish when properly sealed and polished; two of its advantages. It also has a lovely, warm character.”
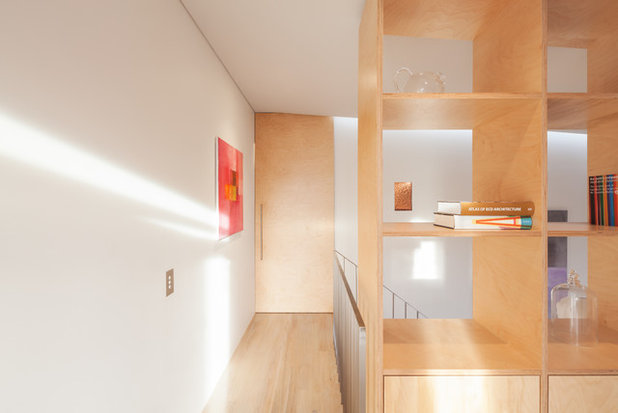
6. Room dividers
Because it has a light, airy feel as opposed to darker, heavier timbers, ply can be used to make excellent room dividers, especially in areas where you are after a subtle division, as in an open-plan space.
Because it has a light, airy feel as opposed to darker, heavier timbers, ply can be used to make excellent room dividers, especially in areas where you are after a subtle division, as in an open-plan space.
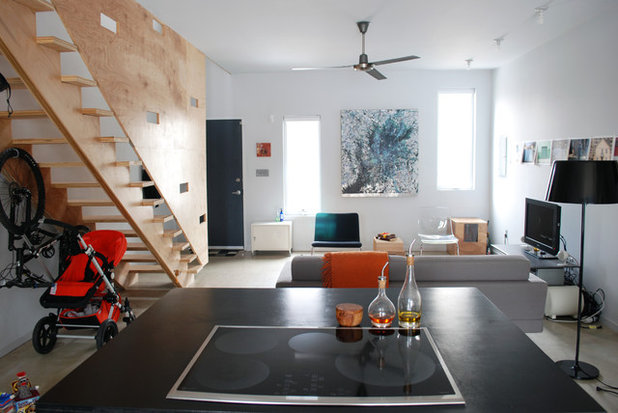
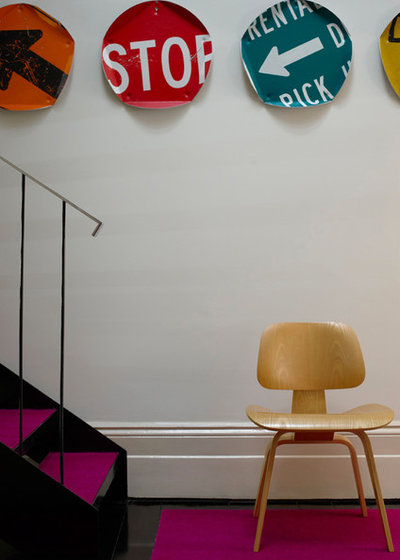
7. Stairs
Look how light and beautiful these stairs are. The plywood creates both a safety barrier and a screen (complete with peek holes) from the lounge area. There’s even a space to put the family’s bicycles.
Look how light and beautiful these stairs are. The plywood creates both a safety barrier and a screen (complete with peek holes) from the lounge area. There’s even a space to put the family’s bicycles.
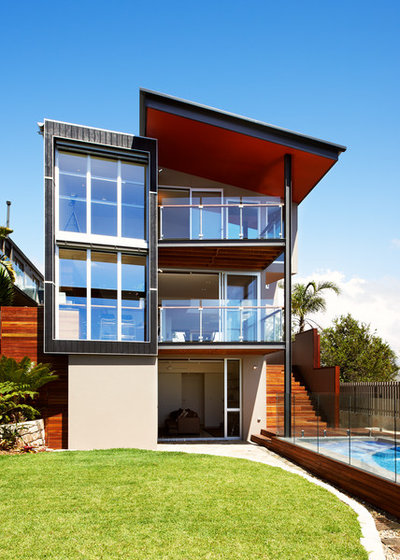
8. Outdoors
Plywood can also be used outdoors. The dark cladding of this beach house is 12mm ‘Shadowclad’ plywood panels, textured and grooved with Shadowclad natural anodised horizontal flashings and 90-degree box angle corners. It’s finished with ‘Timber plus’ Quantum transparent stain.
Architect Heidi Pronk of McKenzie Pronk Architects says: “This sheet cladding gives both a lively natural timber texture and grain (it is slightly rough with a visible timber grain when stained) and also doubles as structural bracing.”
9. Iconic furniture
The original moulded plywood Eames chair was first conceived by Charles and Ray Eames in 1946. It became popular in the 1950s and is still being reproduced today. Being pliable and strong, plywood is an excellent medium for furniture.
The original moulded plywood Eames chair was first conceived by Charles and Ray Eames in 1946. It became popular in the 1950s and is still being reproduced today. Being pliable and strong, plywood is an excellent medium for furniture.
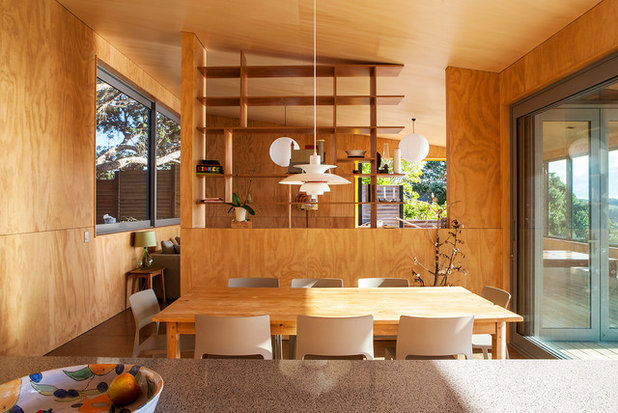
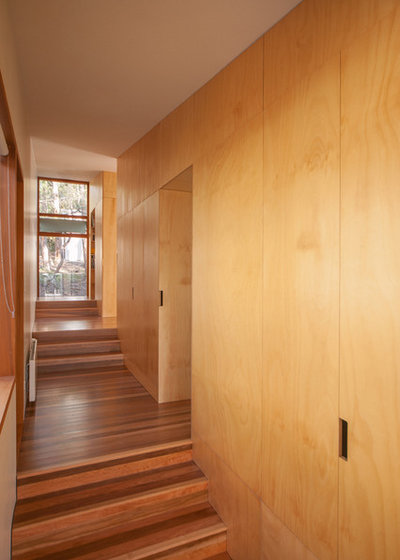
10. Everywhere!
In this New Zealand home, plywood was used throughout. Even the walls are lined with plywood. This build was on an island so the use of plywood made it more economical because ‘wet trades’ such as plasterers and painters weren’t required.
See more of this home
TELL US
Do you love or loathe the look of plywood? Would you consider using it in your home? Share your thoughts in the comments section below.
MORE
Kitchen Aid: 10 Ways Natural Timber Can Warm Up the Heart of Your Home
Everything You Need to Know About Bamboo Flooring
7 Space-Friendly Ways to Store Your Bicycle
Related Stories
Renovation Guides
Room by Room: Experts on Ways to Avoid Common Renovation Blunders
From the kitchen to the garden, and all areas in between, experts identify common mistakes and share priceless insights
Full Story
Most Popular
How to Control the Cost of Your Renovation, Room by Room
Where to save, where to spend (and all the tricks in between) for keeping the cost of your renovation on track
Full Story

Before & After
Before & After: Once Hidden, a Victorian Home's Beauty Unmasked
Peeling back the layers of a series of modernisations and then adding a sympathetic new extension revitalised this home
Full Story
Project Of The Week
An Inspired Solution for a Dark & Disjointed Californian Bungalow
See how an architect opened up a light-starved, closed-in Melbourne home, and connected it with the neighbouring park
Full Story

Most Popular
How to Work With Each Professional in Your Renovation Journey
Here's how to collaborate effectively, and get your money's worth, from each renovation professional
Full Story
Most Popular
Removing a Wall? What to Consider Before You Get Started
Thinking about getting rid of a wall at home to create more open space? Here's what you need to consider first
Full Story
Interior Design
What's Next in Homes? 4 Design Experts Reveal
Do you know which colours, shapes and styles we'll be coveting in the year ahead? Four design pros give the inside scoop
Full Story
Most Popular
Uh-Oh, You Bought a Cave: 7 Ways to Lighten Up a Dark Home
How one homeowner used windows, doors, mirrors and skylights to bring light into her dark, dark home
Full Story
Storage
Renovation Insight: How to Choose & Work With a Cabinet Maker
Custom joinery allows you to tailor a space to suit your needs – here's how to choose the right firm for the job
Full Story

Kitchens
Before & After: A Scandi-Style Kitchen in NZ That's Light & Airy
See this sweet, bright kitchen and dining space in Wellington, which had environmental concerns at the heart of its plan
Full Story
I love plywood. I have a fairly large area that I want to re-cover.
My floors are concrete, do I lay tongue and groove chipboard
sheets first, then glue sone of that ripples rubber underlay before glueing ply boards down? Not sure how to go about it
How much will this raise the floor height as I already have new carpet in the bedrooms. I was hoping to use the ply sheets in
the size 600 x 900mm, so it was like large tiles, and maybe a light stain as well. Did you ever use any pre stained varnish?
Hi barbmolly I just shared some of the amateur DIY that I've done in my 1900s old cottage...don't have to comply with any new build reno rules...I just went with what I felt would work in this old house. I had no prior experience. Don't know what to tell you about laying ply on concrete floors...mine were 100yr old VJ pine floor boards and the cottage is on 3ft piers so plenty of ventilation underneath. I live in rural Auatralia in Queensland in a river valley with lots of underground water and people make good use of it by constructing wells...so the climate would make a difference. Under my house can be quite humid at times...hence the elevation off the ground and the ventilation. Apart from these factors I would not go near tongue and groove chipboard for anything I wanted to last......in my opinion and little experience its a man made product stuck together with glue and is prone to moisture damage and does react to moisture in the atmosphere.
I see a couple of problems even though I am a simple DIYr. Firstly....I think if you want to cover a concrete floor with anything I'd consult a professional especially if floor levels in adjoining rooms will come into play. Was watching a TV programme called The Block...amateurs doing up an apartment building as a competition project employing tradies for the technical work.
One duo put down a framework of timber over a concrete floor, installed underfloor heating, laid ply sheeting over that and finished with what appeared to be "click clack" wooden floorboards....something to consider. They encountered a problem with the level of the whole floor when compared to that of the common hallway outside the doors of the rooms where they did that floor. The doors had already been installed so hey had to pull up a section of the floor close to the door, grind down the concrete, replace the wooden framework and the heating and the floorboards.... all for a few milimetres discrepancy...so apparently levels are really important.
MY DIY job was not regulated at all...its a very old cottage in a remote rural area and I could do what I wanted a bit at a time...no tradies but I did ask a lot of advice.
Firstly, I was working on 100yr well seasoned floorboards that were tinder dry and not likely to suck up moisture. I had the whole floor sanded since some of the floorboards were not level.
Then I gave the whole floor a couple of coats of sealer, lightly sanded it all to give it "grab" then glued down genuine rubber backed carpet...(probably not available today. It had a very low close pile much like carpet tiles today....and these could probably be used today....you'd need something with a bit of "give" when you walked on it and so it wouls soak up whatever glue you used over it.
Over the rubber backed carpet I glued 5 ply "tiles" I'd cut to shape to fit together . I then stained each tile individually giving it a decorative woodgrain design...just stain, no varnish at this stage....for decorative purposes. The varnish was then applied to each tile individually and when all dry...to the whole floor with a woollen covered spatula on a broom handle. I keep this floor in good nick with an occasional rub with a mixture of good quality Linseed Oil and Kero.
Not at any stage did I use tongue and groove chipboard on the floors .....
but found large particle chip board good for kitchen benchtops.
Sorry barbmolly if this is not explicit enough...but I think you should consult a professional as this RENO was a totally "hit and miss" exercise driven by my lack of funds at the time and my enthusiasm for having an old house to play with.
What I did was very time consuming hard work on my knees most of the time. Its not something you can do by "cutting corners". Good for smaller areas and is by no mean a professional job....but it look great!
P.S To barbmolly...why don't you consider consulting a professional about laying Oriented Strandboard on your concrete floor...depicted and described above.