


10 Wash-and-Wear Laundry Ideas That Go Easy on Your Back
Ergonomics, clever storage and innovative tricks will make washing, drying and ironing a breeze
Karen Egly-Thompson
2 November 2014
Houzz Contributor
While kitchens command prime real estate and design attention in a home, the laundry, if you’re lucky to have one, is often carved out of awkward, leftover room. Most laundries seem like large cupboards just for a washer and dryer and rarely take into account a work space, storage or ergonomics. Don’t despair. Here are 10 ways to make your laundry work better for you.
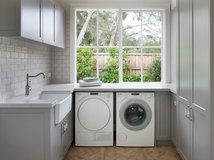
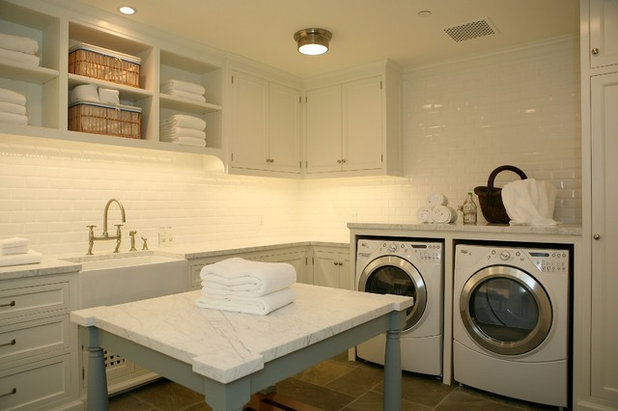
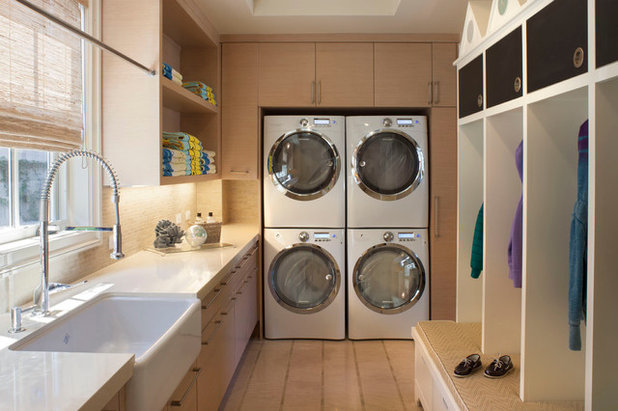
1. Raise your washer and dryer
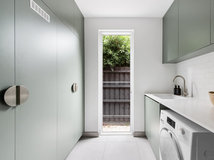
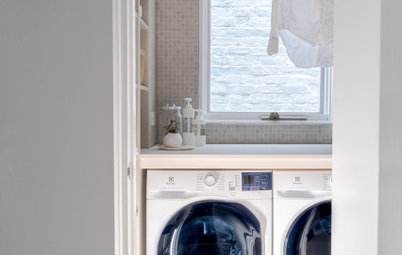
Front-loading washers and dryers have become more prevalent than top-loading types, due to higher energy efficiency and their capacity to fit more dirty clothes.
However, most front-loaders are quite low to the ground, requiring you to kneel or crouch down to load and unload the clothes. Aside from the uncomfortable position, remember the clothes will be even heavier when wet. Some front-loading machines, like this pair are constructed with drums located at a higher height, which makes reach into them while standing much easier.
Generally, a comfortable height is 75 to 90cm for women and 85 to 100cm for men. Plus, you can fit a sizable laundry basket below the drum to catch wet laundry instead of holding it sideways and upward. Raised drum designs can help save your back.
For this project, designer Shane D. Inman created a custom cabinetry base to raise the front-loaders even higher, to what is mid-chest level for many people – certainly an easy reach in. Inman says the cabinet pedestal was designed to accommodate the weight of the two laundry units and the stone countertop material.
2. Get a lower folding table
Most standard benchtops are about 90cm high and are comfortable for the average person. Folding laundry, though, requires different body movement than, say, chopping an onion. When we fold large pieces, such as sheets and pants, our body twists, bends and leans over and forward as needed to get the job done. A folding table that’s a bit lower than standard height lets you lean into the job and is better for your back and shoulders.
Keeping in mind your own height, shoot for a table in the range of 75 to 85 inches high or whatever is comfortable for you.
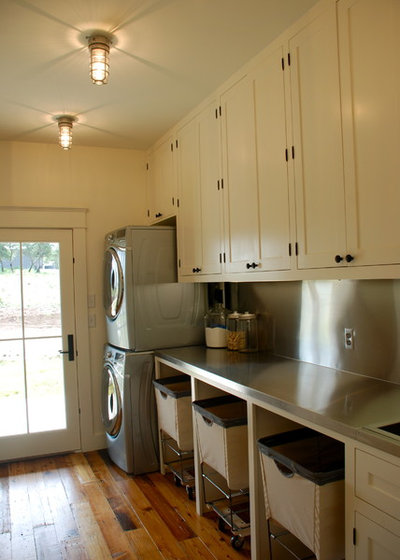
3. Use rolling laundry bins
Why lift a heavy basket when you can roll your laundry where it needs to go? Most rolling bins are heavy duty and commercial grade, and have edges that are typically cushioned with a rubber-like material so they won’t ding and scuff your walls.
One thing to keep in mind is your flooring. If you have uneven tile or stone floors with a rustic or cleft-cut finish, rolling might be a bit more challenging. The rolling bins seen here fit easily underneath cabinetry with room to spare for piled-up clothes.

4. Embrace open shelving
Open shelving makes any quick reach easier. You’ll also likely find you’ll keep things neater too, since things are on display. For frequently used items, a shelf height of about 157cm is the most comfortable dimension for most people in a standing position. Reserve higher shelves for occasionally used items.
Open shelving makes any quick reach easier. You’ll also likely find you’ll keep things neater too, since things are on display. For frequently used items, a shelf height of about 157cm is the most comfortable dimension for most people in a standing position. Reserve higher shelves for occasionally used items.
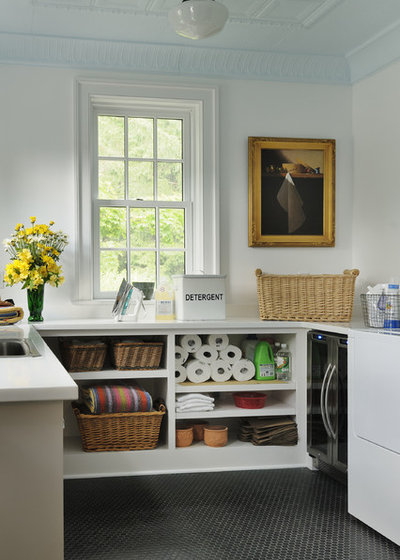
Don’t think that open shelving is reserved for just above the benchtop. Lower open shelving is great for quick access. Plus, you won’t have to push full laundry baskets out of the way to open cabinet doors.
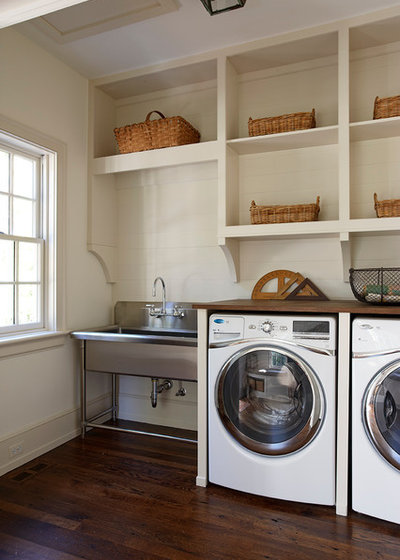
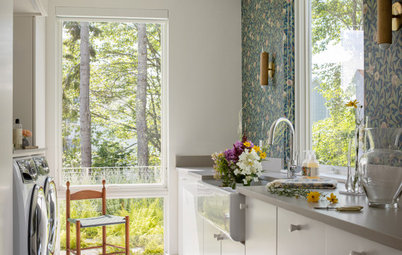
5. Install a deep, elevated sink
A deep sink comes in handy in the laundry room. The deeper-than-usual bowl depth in this laundry room allows for scrubbing and spraying to minimise splashing water. (These sinks can also do double duty as pet bathing stations.)
The problem with a deep sink installed in a standard benchtop relates to ergonomics. It causes you to stoop over to reach the sink bottom. If you’re going to install a deep sink, make sure it’s elevated. The one shown here was designed with a height of 107cm, making its interior bottom surface 74cm, about the comfortable height of a dining table.
6. Tap into a pre-rinse sprayer
Surely at one point you’ve bordered on doing acrobatics just to wash and rinse something under a meager-size spout. Generously sized with a high-arc, high-pressure nozzle, pre-rinse sprayers are typically used in commercial kitchens to force food off plates before they’re washed. However, in the laundry room, the easy pull-down nozzle makes fighting muddy boots and food stains easier. The large size can interfere with cabinets or shelving above your sink, so be sure you have enough clearance.
Surely at one point you’ve bordered on doing acrobatics just to wash and rinse something under a meager-size spout. Generously sized with a high-arc, high-pressure nozzle, pre-rinse sprayers are typically used in commercial kitchens to force food off plates before they’re washed. However, in the laundry room, the easy pull-down nozzle makes fighting muddy boots and food stains easier. The large size can interfere with cabinets or shelving above your sink, so be sure you have enough clearance.
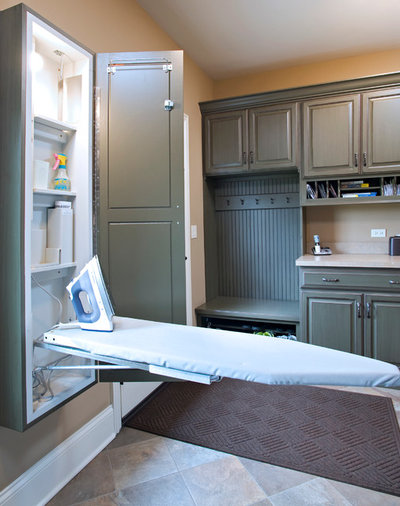
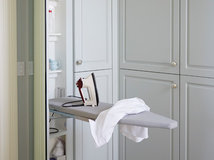
7. Integrate an ironing centre
Many older homes have nifty recessed ironing boards, and it’s perplexing why they went out of style. Everyone hates dragging a heavy ironing board out of some closet or corner and setting it up, and then there’s the tippiness and cord combat that usually ensues. With a wall-mounted system, like the one shown here, you can install it to your desired height, and there are also swiveling models for tight spaces that turn the board right or left by 90 degrees. There are also great sit-down options.
Wall-mounted units can hold only a hinged ironing board, so you still have to store your iron elsewhere. And they don’t come with electrical capabilities, so you’ll need to install the system near an outlet. Plus, they must be attached externally to wall studs for support, and they protrude from walls quite a bit, so consider how that will affect your overall space.
If you have the luxury of planning ahead, you can easily incorporate a recessed system that fits in the space right between your wall studs. These allow more space so you can store your iron or even include a garment hanger. Plus, an electrician can run electricity right into the unit for an iron and/or a work light.
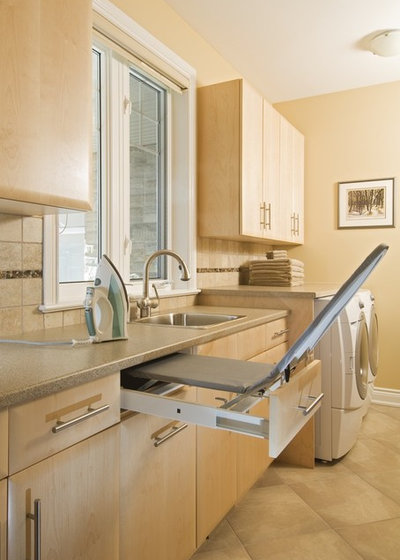
If you don’t have the wall space available for a wall-mounted or recessed ironing centre, consider one that’s drawer-recessed. The Ironfix by Hafele, shown here, fits into a 61cm-wide, 16cm-deep space and, once extended, rotates 180 degrees.
Two cons are that you’ll still need to store your iron somewhere, and the drawer unit will need to be installed near an outlet. Also, you’ll need to be content with the ironing board’s height, which will be close to 90cm if installed in a standard-height cabinet.
Two cons are that you’ll still need to store your iron somewhere, and the drawer unit will need to be installed near an outlet. Also, you’ll need to be content with the ironing board’s height, which will be close to 90cm if installed in a standard-height cabinet.
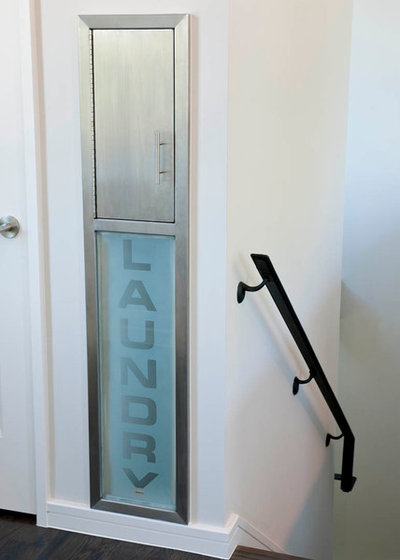
8. Plan for a laundry chute
If your laundry is on your ground floor or in the basement, you’ve likely cursed a few times while lugging a full laundry basket – or three – down the stairs. Instead, let gravity do the work. A laundry chute doesn’t require much room, so if you’re building a new house or planning a renovation, it’s a design element worth considering.
You’ll also want to consider where the clothes will fall to. This laundry chute is located on the second floor and is directly above a cabinet in the laundry, so instead of making a messy pile in the laundry, dirty clothes and linens end up in a contained space next to the washer-dryer.
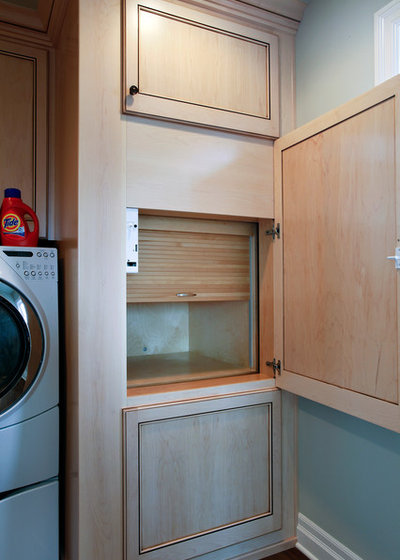
Here’s an example that incorporates a tambour door to catch falling laundry.
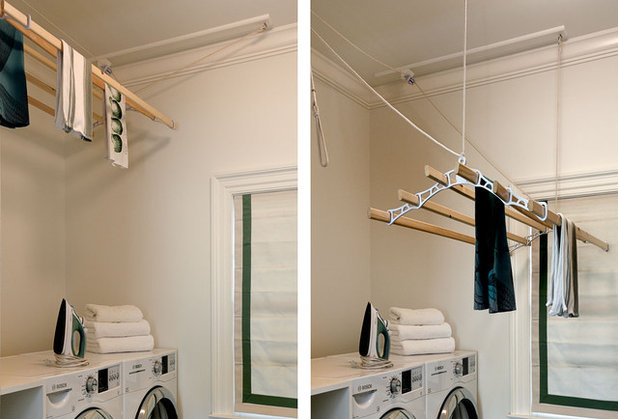
9. Don’t overlook air-drying systems
For clothes that are destined to be air-dried, here’s a great feature the British have been using for centuries: a ceiling-mounted pulley system. The rack is composed of either four or six laths suspended between two cast-iron ends and anchored to a marine-style wall cleat. To load and unload, lower the pulley to your desired height by pulling on the cord. Raising it upward keeps longer articles from brushing the floor and also makes use of warmer air at the ceiling level. When not in use, it’s out of the way.
Just make sure you have adequate support in the ceiling. By itself, a system weighs between 3 and 4.5kg. You’ll need about 23cm of clearance from the ceiling to clear any encroaching door swings.
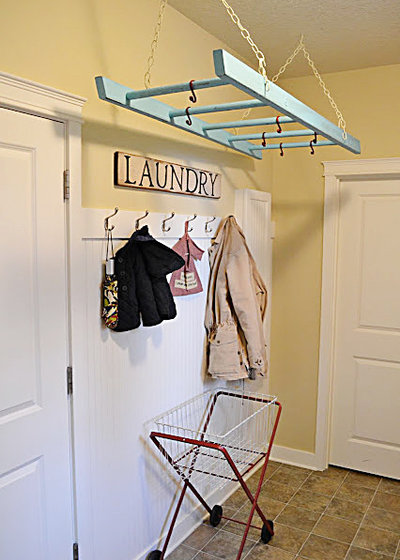
If operating a pulley isn’t appealing, and you have the space, a suspended ladder with hooks will work just fine. This one is hung at door level, approximately 203cm, an easy reach for most with a hanger in hand. Larger, longer S-hooks could also be used for shorter people for an even easier reach.
Often seen in hotels, retractable drying lines are also great for drying delicate items. Unlike ceiling-mounted options, they take little force to draw out and can be hung at any height desired.
Often seen in hotels, retractable drying lines are also great for drying delicate items. Unlike ceiling-mounted options, they take little force to draw out and can be hung at any height desired.
10. Get a step stool
It might sound surprisingly basic, but a one- or two-step stool is invaluable in the laundry room. Because it’s so lightweight and easy to grab, you’re more likely to actually use it versus getting out a heavier, more cumbersome three-step ladder – or worse, attempting to reach something too high without the help of anything. Just make sure the stool you select has a nonslip surface; spilled bleach and liquid detergents can make it mighty slippery.
YOUR SAY
Tell us what your dream laundry would look like in the comments section.
MORE
Designs for Living: Cheerful Laundries
Hung Out to Dry: Fresh Ideas for Your Clothes Line
Designs for Living: 10 Drying Rack Solutions for Your Laundry
Related Stories

Most Popular
Key Measurements for Designing Your Dream Laundry
By Houzz AU
Get the right layout and dimensions to help you wash, dry and fold – and maybe do much more – happily and efficiently
Full Story
Laundries
Experts Reveal: 8 Laundry Must-Haves That Come Highly Recommended
Four laundry-design experts reveal the eight essential inclusions that will take a laundry from so-so to spectacular
Full Story
Picture Perfect
16 of the Most Stylish Solutions for Drying Laundry
Our coffee-break escape offers you five minutes' worth of images to inspire and delight. Jump right in...
Full Story
Renovating
10 Great Little Ideas for Your Next Laundry Makeover
Sometimes it's the thoughtful inclusions that make a laundry the jewel of a home – don't miss 10 of the best
Full Story
Houzz Around The World
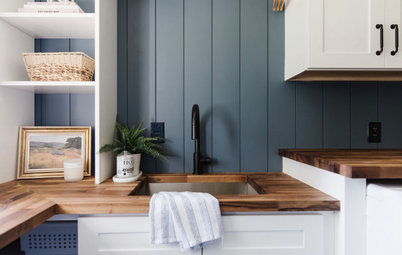
USA Before & After: An "Eyesore" Laundry Gets a Moody Makeover
Smoky blue walls, fresh white cabinetry and butcher's-block benchtops star in this stylish new Seattle laundry redesign
Full Story
Room Of The Week
Before & After: From Dark Cave to Light Contemporary Laundry
See how an interior designer transformed a dark timber laundry into a contemporary green farmhouse-style delight
Full Story
Bathrooms
Before & After: A Modern Bathroom-Laundry Makeover Story
An inveterate traveller took the pause of Covid-19 to remodel her bathroom in the memory of overseas destinations
Full Story
Laundry Renovations
6 Unbreakable Design Rules for Planning a Laundry
An interior designer reveals how to create the perfect washing space, with insights from her own small-laundry reno
Full Story
Picture Perfect
25 of the Most Beautiful Colour & Pattern Schemes for Laundries
Our coffee-break escape offers you five minutes' worth of images to inspire and delight. Jump right in...
Full Story
Kitchens
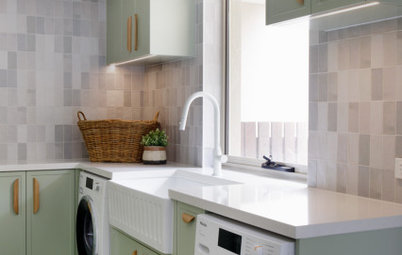
Room of the Week: A Budget-Smart Kitchen and Laundry in Sage
Warm, characterful and sophisticated – see how a designer worked magic with a AU$45k budget for a kitchen and laundry
Full Story
I would love to see examples of before and after laundry rooms for small spaces. My laundry room currently has the washer and sink located on a short wall by the door and the dryer located in front of the door. I can't figure out how to update the space with the current layout and would love examples of rooms that were updated with a similar layout.
Here's our before of a small laundry room. It's just wide enough for washer, dryer, and utility sink. The space in front of the machines is just enough to set a rectangular laundry basket in front (but not enough to actually stand in front when the basket is there - you have to stand to the side). The door to the room is a pocket door.
Expanding the size of the room unfortunately was not an option so we added storage. We opted for shelves (a) because cabinets are expensive, and (b) because my husband is an "out of sight, out of mind" type, so he needs some things to be out in the open. The wire shelving you see closer to the ceiling was already installed when we bought the house. On the wall opposite the utility sink, not pictured, is a rack for the iron and ironing board and a rack for brooms and mops.