
3 Easy DIY Gift and Wrapping Ideas
With the holidays just around the corner, consider these creative ideas for presents and gift wrapping this season

If you find yourself out of wrapping paper, need an activity for your kids, are looking for a last-minute gift for your neighbour or simply want to add a few handmade items to the presents under your tree, here are three simple and cost-friendly ideas to decorate your home and gifts with this Christmas.
Materials and tools:
- Card stock or watercolour paper (150gsm or heavier)
- 5 x 7.5 centimetre business card
- Pencil or permanent marker
- Watercolour paints
- Scissors
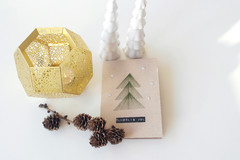
STEP 1: To create the tags, trace a 5 x 7.5 centimetre business card onto your paper in rows, using a pencil or permanent marker.
Add watercolour paint (I used light aqua), to cover about a third of each tag, making the shape freeform and letting the edges fade. Add a second colour if you want.
Add watercolour paint (I used light aqua), to cover about a third of each tag, making the shape freeform and letting the edges fade. Add a second colour if you want.
STEP 2: Carefully cut inside the lines to create the tags.
2. DIY potato stamp gift wrap
Many of us have done this DIY project as a primary school or youth-group activity. But there’s no reason it can’t also be a fabulous activity to do with family members or even by yourself.
Materials and tools:
Many of us have done this DIY project as a primary school or youth-group activity. But there’s no reason it can’t also be a fabulous activity to do with family members or even by yourself.
Materials and tools:
- Potato
- Blank wrapping paper
- Knife
- Paint (tempera or acrylic)
STEP 1: Split the potato in two with a knife and carefully carve out a shape. Create your own shape or use cookie cutters to form your stamp, then carve away the background. Adults should help children with carving. Make the cut deep enough to keep the edges of the potato base from picking up extra paint.
TIP: Dry all the cut edges of the potato with a napkin prior to adding paint. This will help keep the paint from getting too thin from any added moisture, and will also help prevent the potato from slipping.
TIP: Dry all the cut edges of the potato with a napkin prior to adding paint. This will help keep the paint from getting too thin from any added moisture, and will also help prevent the potato from slipping.
STEP 2: Add paint to the potato design and stamp a pattern of your choice. Re-apply paint after every two stamps.
Try this technique on cloth napkins, table runners, stockings, throw pillows, burlap or, if you’re brave, a feature wall in your home.
3. DIY string napkin ring and bracelet
Use a simple weaving technique with string or rope to quickly create custom napkin rings for your table, or bracelets to use as gifts.
Materials and tools:
Use a simple weaving technique with string or rope to quickly create custom napkin rings for your table, or bracelets to use as gifts.
Materials and tools:
- Thick string or thin rope (I used parachute rope)
- Ribbon clamps
- Split jump rings
- Lobster clasps
Cut two pieces of string that are 68 centimetres long (34 centimetres doubled). The string’s length will vary depending on the object’s dimensions, but this size is good for both napkin rings and bracelets. You can adjust the finished size later if needed.
STEP 1: Lay the first string flat and form a loose loop at the doubled end.
STEP 2: Lay the second string under the first loop, with the doubled end of that string to the left.
STEP 3: Weave the doubled end of the second string over the doubled end of the first string, then bring it under the tail of the first string.
STEP 4: Bring the doubled end of the second string back over the bottom edge of the loop, under the tail of the second string and over the top edge of the loop. Adjust so the lengths of the doubled ends are even.
STEP 5: When finished, gently tighten the rope by pulling on all four ends.
Prior to clamping the ends together, measure the folded napkin (or wrist) and adjust the length accordingly.
TIP: Lightly burn any frayed string or rope ends with a match to keep them from unraveling. If you’re doing this activity with young ones, make sure an adult handles this step.
Then add the ribbon clamps, split jump rings and the clasp.
TIP: Lightly burn any frayed string or rope ends with a match to keep them from unraveling. If you’re doing this activity with young ones, make sure an adult handles this step.
Then add the ribbon clamps, split jump rings and the clasp.
As a napkin ring, this piece is a quick way to update your table and can be used year-round.
It can also be turned into a bracelet. Either way, this is an easy last-minute gift idea for the fans of handmade items on your list.
TELL US
Have you done any Christmas DIY this year? Share your ideas and upload photos of your masterpieces in the Comments section below.
MORE
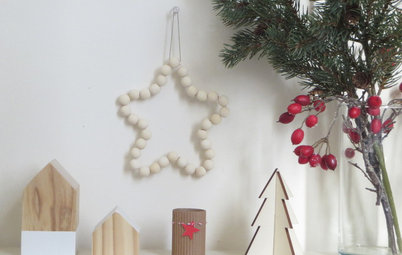
Easy Christmas DIY: Beaded Star Decoration
Christmas DIY: Mini Advent Village
12 Simple Christmas Decorating Ideas
TELL US
Have you done any Christmas DIY this year? Share your ideas and upload photos of your masterpieces in the Comments section below.
MORE
Easy Christmas DIY: Beaded Star Decoration
Christmas DIY: Mini Advent Village
12 Simple Christmas Decorating Ideas


These simple watercolour tags are perfect if you want to add a more personal touch, or a bit of colour to your gifts this year … or if you’ve found yourself out of wrapping supplies and dread a return trip to the shops.
You can use this technique to easily make several gift tags for yourself to use, or to decorate blank postcards or notecards.