


DIY Project: A Cinnamony Twist for Your Christmas Wreath
This DIY geometric ‘himmeli’ decoration will spice up your home with fragrance for the festive season
Corynne Pless
6 December 2016
Houzz Contributor. Los Angeles, California.
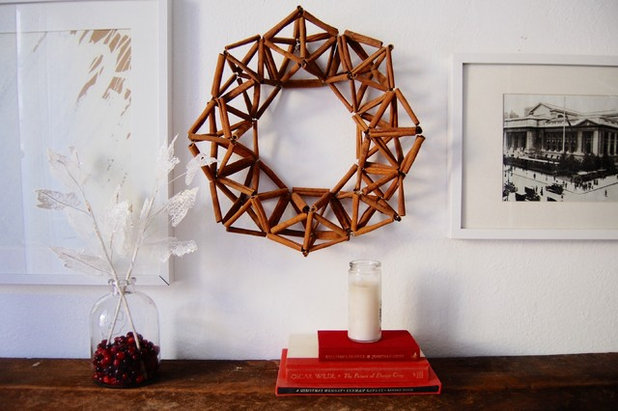
This unusual and traditional handmade Finnish himmeli wreath smells amazing and lasts into the new year. Himmeli, from the Swedish word himmel, meaning sky or heaven, are geometric decorations. You may have seen himmeli wall decor or hanging planters. They’re often crafted from straw, but other materials, including metal pipes, are used as well.
Inspired by the beauty of traditional himmeli designs, I made this wreath out of cinnamon sticks, which give it a seasonal scent while preserving its geometric pattern. You can make it too, by following the steps below.
Inspired by the beauty of traditional himmeli designs, I made this wreath out of cinnamon sticks, which give it a seasonal scent while preserving its geometric pattern. You can make it too, by following the steps below.

Cinnamon Himmeli Wreath
What you’ll need
What you’ll need
- 120 cinnamon sticks, each about 6 to 7.5 centimetres long
- Wire (I bought 110 grams of 24-gauge gold wire)
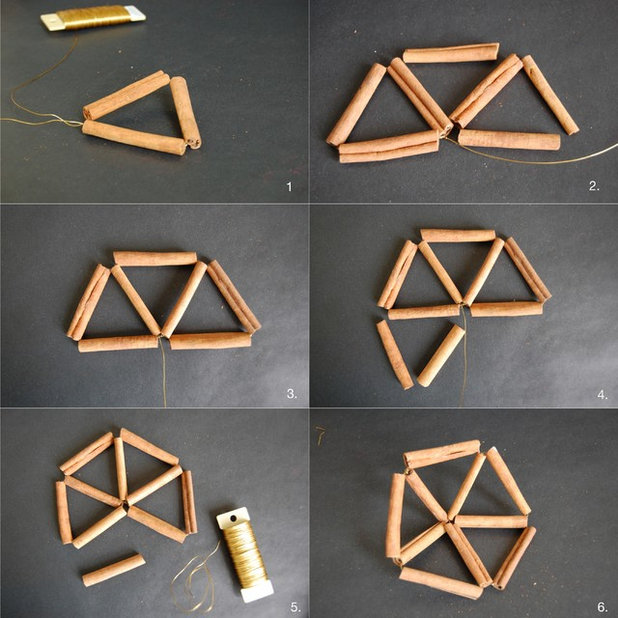
Step 1: Lay three cinnamon sticks in the shape of a triangle. Cut a long piece of wire, about 60 centimetres to start, and run it through each stick. Twist the wire back on itself when you reach the starting point, keeping the triangle shape.
Note: As you run out of wire, cut a new piece, twist the ends together and continue creating the wreath.
Step 2: Lay four more sticks in the shape shown above and continue running the wire through the sticks to connect them. At this step, you’ll run your wire through more than one stick to connect all sides.
Step 3: Tighten the wire pieces to hold the shape.
Step 4: Add two more sticks as shown above and secure them to the original sticks with the wire.
Step 5: Connect the last stick to the two bottom corners as shown so that it lifts the pentagon, making it more three-dimensional.
At this point, all sticks should be attached and the wire tightly secured.
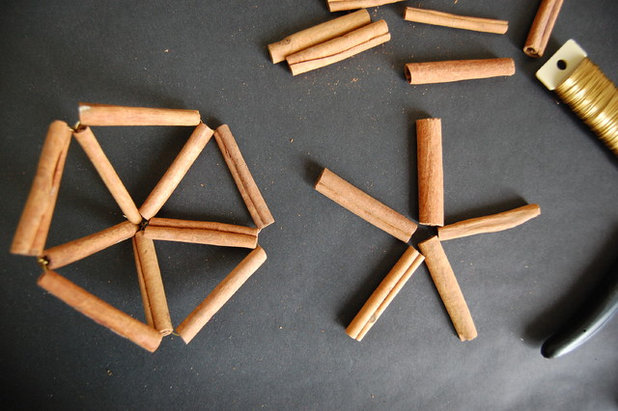
Step 6: Lay five sticks in the shape of a star next to your pentagon. You’ll be adding these sticks to the joints or corners of the pentagon.
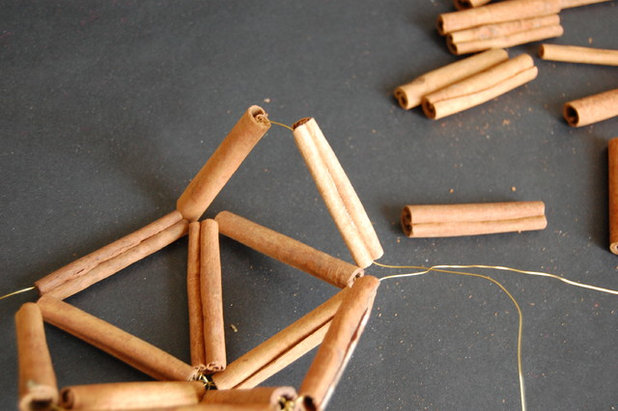
Step 7: Cut a piece of wire 75 to 90 centimetres long and begin attaching the sticks one at a time to each corner, creating a three-dimensional structure as shown.
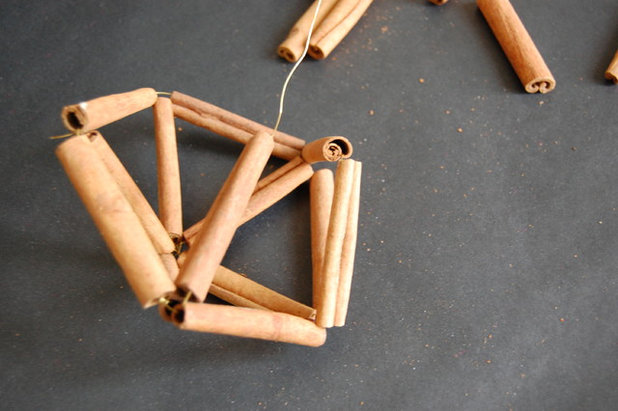
Step 8: Continue adding each stick, securing them one at a time.

Step 9: Once you’ve added all five sticks, you’re done with the hardest part! Repeat the process until you’ve made eight pieces.
Lay the pieces side by side to begin to form your wreath.
Lay the pieces side by side to begin to form your wreath.
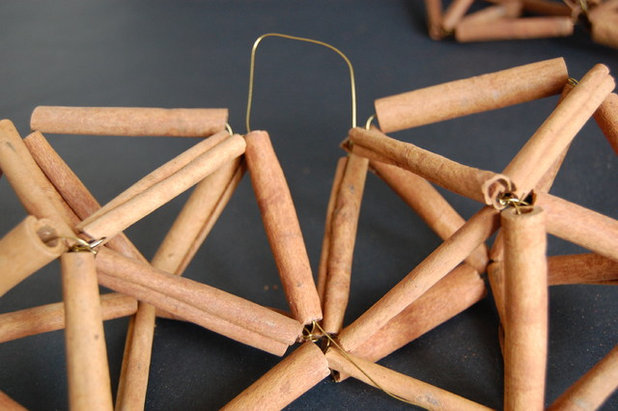
Step 10: Cut a piece of wire about 50 centimetres long and fasten the individual pieces together. Twist the ends of the wire together and trim any extra length.
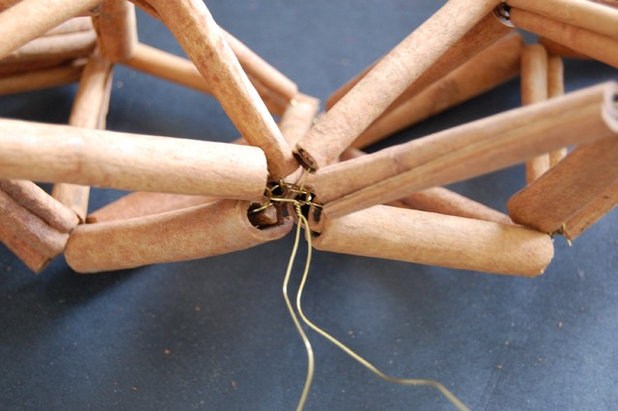
Step 11: Once you’ve completely fastened your wreath, secure any loose edges.The key to keeping your wreath strong and sturdy is tightly fastening all the connecting pieces.
The tighter the wire, the more polished the piece will look and the more securely it will hang on your wall or door.
The tighter the wire, the more polished the piece will look and the more securely it will hang on your wall or door.
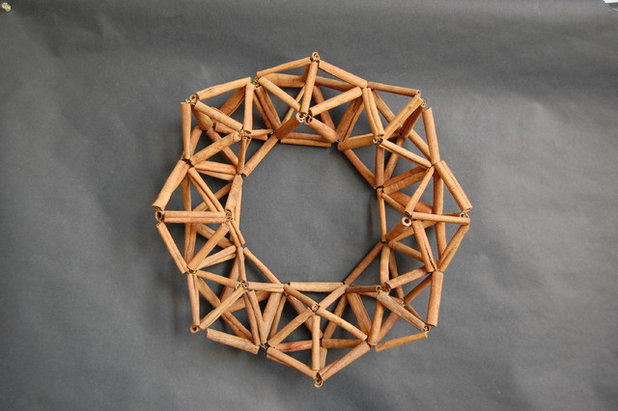
My completed wreath measured about 40 by 38 centimetres.
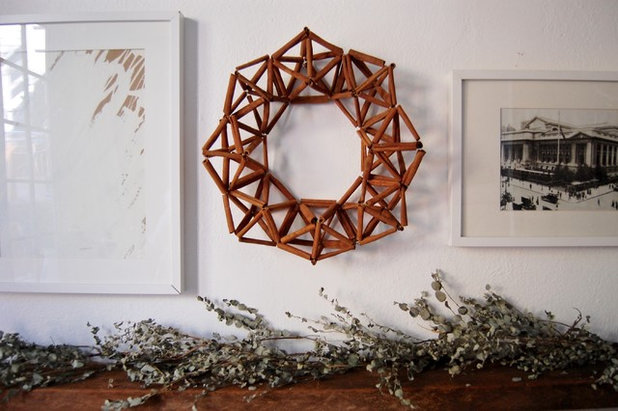
Hang your new wreath over the mantel or on your door.
TELL US
What do you think of this fragrantly festive wreath? Have a go at making it yourself, and upload images of your efforts in the Comments.
MORE
Browse more fun DIY projects
TELL US
What do you think of this fragrantly festive wreath? Have a go at making it yourself, and upload images of your efforts in the Comments.
MORE
Browse more fun DIY projects

Related Stories
Christmas
DIY: Three Blooming Amazing Christmas Flower Arrangements
Florist Jodie McGregor shows us how to make a vase arrangement, coffee table display and a wreath for Christmas
Full Story

DIY
DIY Display for Staghorn Ferns
By Kayla Stark
Get a step-by-step guide to turning a shade-loving staghorn fern into a piece of living wall art
Full Story

DIY Projects
How to Make Thoughtful Homeware Gifts for Those You Love
A personal, bespoke gift brings the joy back into giving and leaves minimal environmental footprint
Full Story

DIY Projects
DIY Project: Natural Lavender and Rosemary Moisturiser
Ditch the chemicals and make your own rich moisturiser out of natural ingredients
Full Story

Bathrooms
7 Good-Looking Ways to Arrange Stacked Tiles
Wondering which layout to use for your tiles? Check out these straight or stack-bond patterns for inspiration
Full Story

DIY
DIY Project: Garden Chair Makeover
Give dated and weathered garden chairs a contemporary upgrade this long weekend with these easy tips from a DIY expert
Full Story
DIY Projects
DIY Project: Rattan Cabinet Makeover
Here's how to revamp that classic piece of Australian furniture, the rattan cabinet
Full Story

DIY
DIY Project: String Art Christmas Cards
Cardboard, a needle and thread is all it takes to make gorgeous Christmas tree cards with a personal touch
Full Story

Renovating
Bring on the Bling... With Specialty Paint Finishes
From liquid gold to instant rust and concrete effect, the latest paint effects add easy character to your home
Full Story
DIY Projects
DIY Sewing Project: A Cute Peekaboo Toy Bag
By Jade Rennie
For the ultimate in toy storage, have a go at making these peek-a-boo bags
Full Story
AMAZING! Beautifully done! I made 2 (much simpler) cinnamon scented pinecone wreaths.
http://wp.me/p7PFcl-bz