
DIY Project: Make Your Own Living Picture
Add some vertical greenery to your outdoor space with this succulent wall hanging

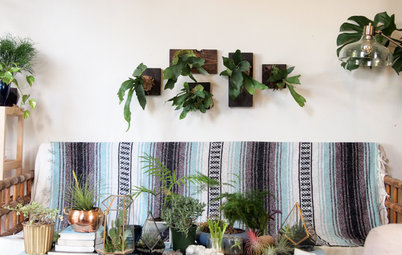
Living pictures are an easy way to add the vibrancy of green plants to a drab wall. They’re perfect in any sunny space, and are a great addition to courtyards and balconies. The best plants to use are succulents, as they look fantastic when massed together, have small root systems and require little watering – try echeverias for their flat growth. They come in a wide range of colours and leaf patterns, which is ideal for creating an interesting living wall hanging.
What you’ll need:
- a wooden frame
- wood oil or varnish
- wooden planting box, with the same width and height as the wooden frame
- ruler
- pencil
- drill
- shade cloth
- scissors
- hammer and small nails
- premium potting mix for succulents
- succulents or other suitable plants with shallow roots
Step 1: Apply a wood oil or varnish to your pre-sanded frame. Leave to dry. Then measure your frame carefully, as it will need to sit flush over the wooden planting box.
Step 2: Measure the planting box to gauge the size of the shade cloth needed. Drill a series of drainage holes in the base (what will be the back once hung) and the side that will become the bottom of the box. I’ve used an old drawer, but any wooden box will do. You may need to construct one to suit your hanging space.
Step 3: Cut the shade cloth to size. You need enough to cover the base and all sides of your planting box, with a few centimetres of overhang for attaching, so take into account the depth of your box when measuring. You’ll also need enough overhang at the top of the box to fold over and encase the front once the soil has been added. See step 6 for more detail.
Step 4: Nail down the back and side edges of the shade cloth, attaching them firmly to your box.
Step 5: Add in your potting medium. For succulents, a potting mix with a few handfuls of sand and perlite or gravel added in is best. This helps with drainage so your plants aren’t waterlogged.
Step 6: Fold over the top flap of the shade cloth to enclose the potting medium, then trim off the excess and nail down the front.
Step 7: Secure the frame on top with a few more nails, then create planting holes in the shade cloth with the scissors, siting them where the plants will go in. You may like to arrange the plants within the frame first, to decide on the pattern you’d like. Then mark out where the roots will be and poke holes through.
Step 8: Poke the blunt end of your pencil through the planting holes and into the potting mix to create pockets for your plants. Now for the fun part: arrange the succulents in your planting box.
Step 9: Water well with a mix of wetting agent and a liquid seaweed added in, to help guard against transplant shock. Allow the box to drain. Add on the appropriate fixtures to the back of the planting frame/box, then hang it up.
To keep your living picture looking wonderful, water it once a week in summer and roughly once a month in winter. Then sit back and enjoy!
TELL US
Have you ever attempted to create a living picture? If so, tell us what sort of plants you used in the Comments.
MORE
Browse more creative DIYs
To keep your living picture looking wonderful, water it once a week in summer and roughly once a month in winter. Then sit back and enjoy!
TELL US
Have you ever attempted to create a living picture? If so, tell us what sort of plants you used in the Comments.
MORE
Browse more creative DIYs


Sponsored