

DIY Project: Rattan Cabinet Makeover
Here's how to revamp that classic piece of Australian furniture, the rattan cabinet
Natasha Dickins
13 January 2018
Houzz Australia contributor. I used to be a lifestyle magazine editor, working on titles from New Idea and Woman's Day to Dolly, Woman's Health, Inside Out and Handyman. But now I run a busy workshop in Sydney's inner west where I create how-to content for brands and media, while designing and building furniture and display solutions. I have a great collection of tools that I know how to use and a headful of DIY knowledge to share.
Houzz Australia contributor. I used to be a lifestyle magazine editor, working on... More
If you’ve ever wanted to learn how to make over a dated basket cabinet, to make it more contemporary while keeping its character and charm, this DIY project with easy before-and-after instructions is for you. See how easily it can be done!
There are many pieces of furniture that have handy DIYers stumped as to how to make them fit into a modern home. Here’s one garage classic that’s relatively easy to find, along with simple steps that can be undertaken to update it.
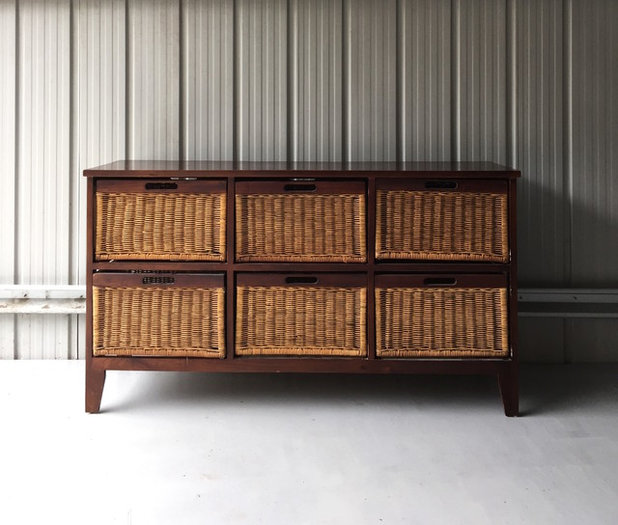
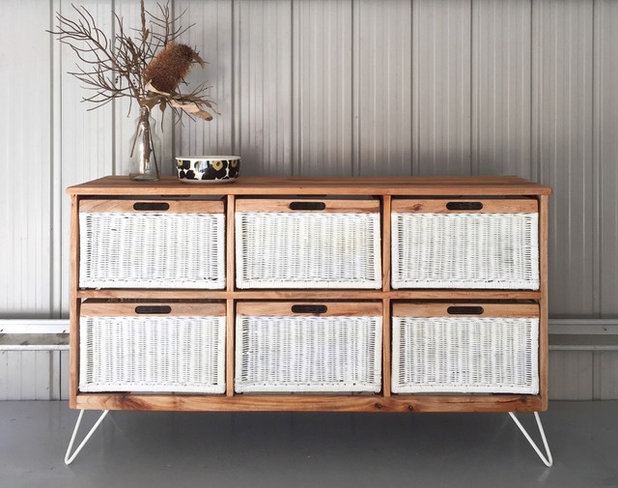
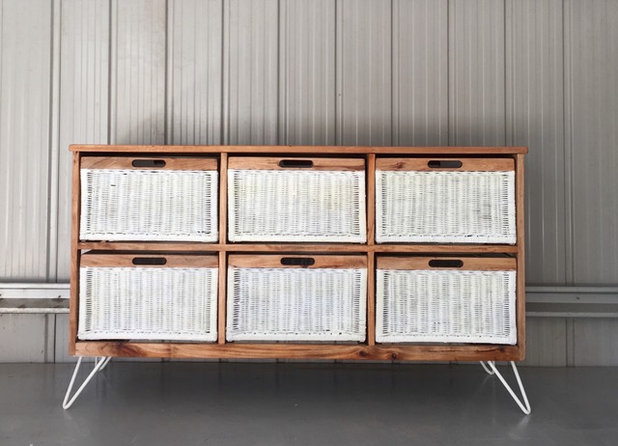
Before
While there’s nothing wrong with this cabinet of rattan boxes, there’s also nothing that catches the eye to make it interesting or give it a designer edge.
While there’s nothing wrong with this cabinet of rattan boxes, there’s also nothing that catches the eye to make it interesting or give it a designer edge.
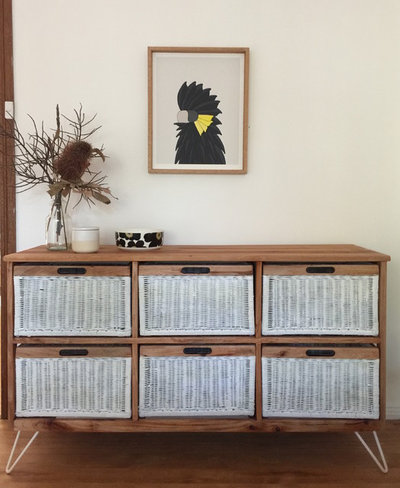
After
So what’s the trick to updating a tired piece such as this? Here’s the formula I work by:
1. Change the one thing that’s the most dated: In this case, the rattan is beyond cleaning so I’m going to paint it, dust and all, and add a shiny finish.
2. Add an element to make it more modern: Attaching metal mid-century-style legs changes the footprint, making the cabinet appear more lightweight. I found these white hairpins online at Modcraft Australia.
3. Improve the experience: Sanding back the dark timber means I can finish it with a lovely oil to highlight the woodgrain, making it feel textured and hand finished.
Tools and materials
- electric sander and sanding block with 80, 180 and 240-grit abrasive paper
- painter’s tape
- white paint (any acrylic paint)
- paintbrush
- mini paint roller with two covers
- Monocel Clear Wood Varnish spray in Ultra Gloss
- Monocel Bench Top Oil
- clean cloth
- saw (handsaw or electric)
- claw hammer
- timber offcuts for the base
- screws to attach the timber and legs
- screwdriver or power drill
- hairpin legs
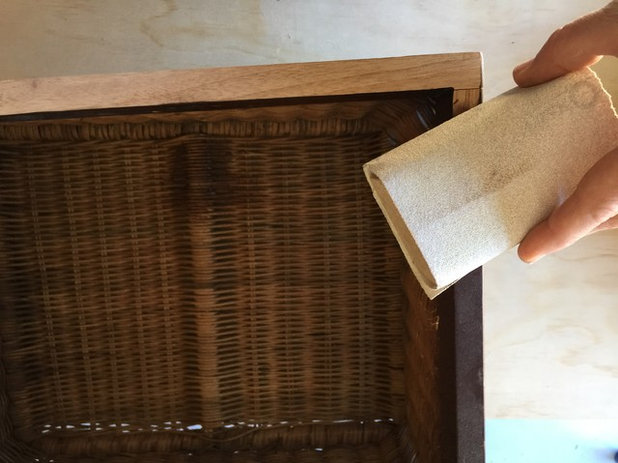
Step 1: Clean up the boxes
Remove the varnish from the timber section of the boxes by sanding with 80 then 180-grit abrasive paper, rounding over the edges slightly to remove any dents.
Tip: It doesn’t compromise the result if you don’t sand the inside timber before painting, so you can just wipe it down a little before getting started.
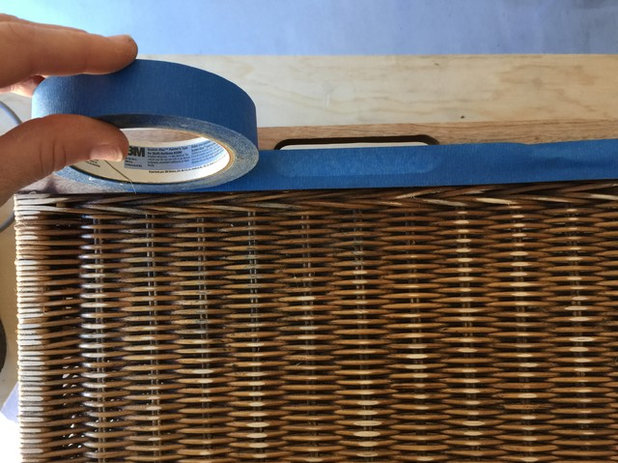
Step 2: Protect the raw timber
Use painter’s tape to mask around the tops of the boxes, leaving it on while painting and applying the varnish.
Use painter’s tape to mask around the tops of the boxes, leaving it on while painting and applying the varnish.
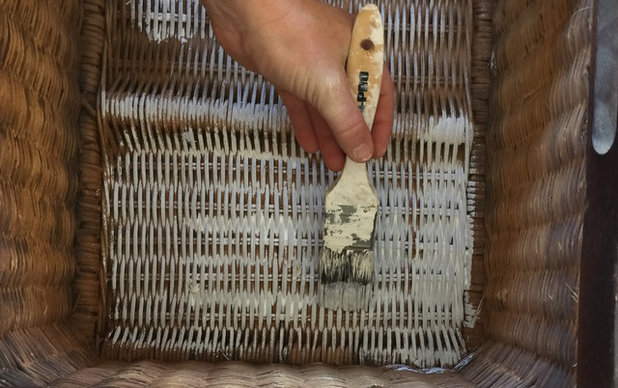
Step 3: Paint the boxes
Use a roller and brush to paint the boxes inside and out, rolling and brushing from different angles to saturate the rattan.
Tip: A light coat is enough to freshen up the insides, but apply two on the outside and an extra, third, coat on the fronts.
Use a roller and brush to paint the boxes inside and out, rolling and brushing from different angles to saturate the rattan.
Tip: A light coat is enough to freshen up the insides, but apply two on the outside and an extra, third, coat on the fronts.
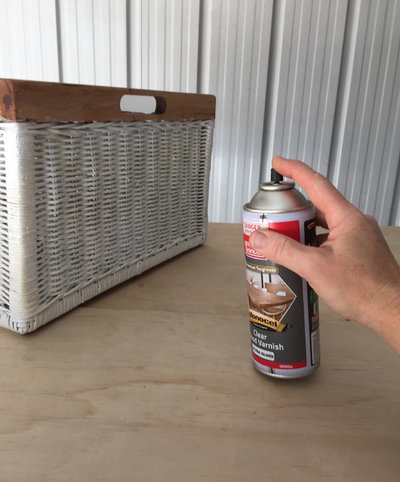
Step 4: Add a glossy finish
Use the varnish spray to coat the outside of the boxes for a modern, shiny finish that complements the glossy hairpin legs.
Tip: Hold the can about 250 millimetres from the surface to lightly spray a couple of coats, leaving to dry between each coat.
Use the varnish spray to coat the outside of the boxes for a modern, shiny finish that complements the glossy hairpin legs.
Tip: Hold the can about 250 millimetres from the surface to lightly spray a couple of coats, leaving to dry between each coat.
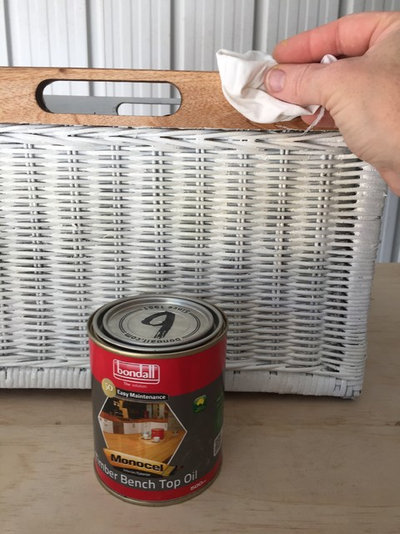
Step 5: Finish the boxes
Use a cloth to apply the bench top oil around the tops of the boxes, applying liberally then wiping away any excess.
Use a cloth to apply the bench top oil around the tops of the boxes, applying liberally then wiping away any excess.
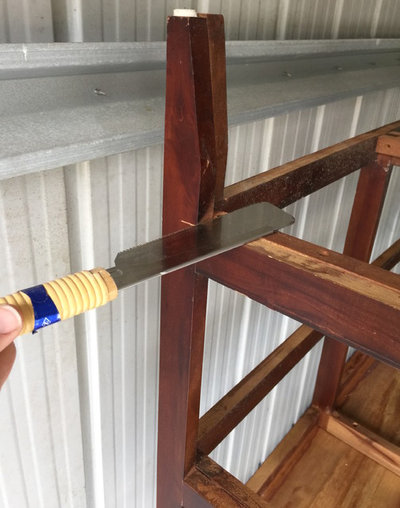
Step 6: Remove the legs
Mark out the best position to cut the legs, making sure the cabinet remains structurally solid. Cut the legs using an electric saw or handsaw, removing any remaining nails with a claw hammer.
Tip: I like using a little Japanese handsaw as it cuts with a pulling motion, which is a more natural cutting action and opposite to Western saws.
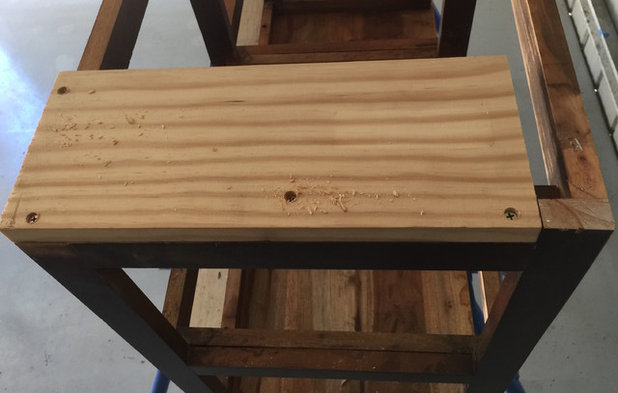
Step 7: Add a base for the legs
If your cabinet needs a base for the hairpin legs, add timber either side, making sure it fits in with the base of the cabinet.
Tip: Countersink the screws to ensure they’re below the surface, so the hairpin leg plates sit flush.
If your cabinet needs a base for the hairpin legs, add timber either side, making sure it fits in with the base of the cabinet.
Tip: Countersink the screws to ensure they’re below the surface, so the hairpin leg plates sit flush.
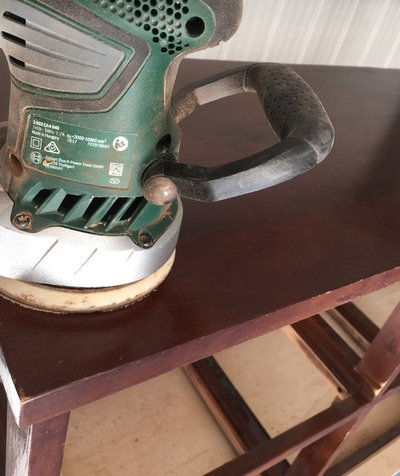
Step 8: Remove the old varnish
Clean up the frame by removing varnish using an electric sander if you have one. Begin with 80-grit abrasive paper, then tidy up with 180, and finish the top with 240.
Tip: Use a hand sanding block to remove dents and smooth over the edges and corners to round them over. This softens the profile of the cabinet and complements the more natural timber finish.
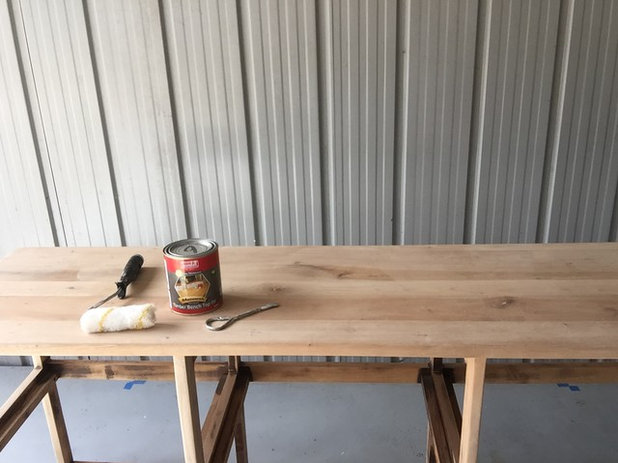
Step 9: Finish the frame
Apply the bench top oil using a roller, starting at the top, working around the edges and down the frame, covering all raw timber, even if it won’t be visible later. Then begin along the top to wipe away any excess and leave to dry thoroughly.
Apply the bench top oil using a roller, starting at the top, working around the edges and down the frame, covering all raw timber, even if it won’t be visible later. Then begin along the top to wipe away any excess and leave to dry thoroughly.
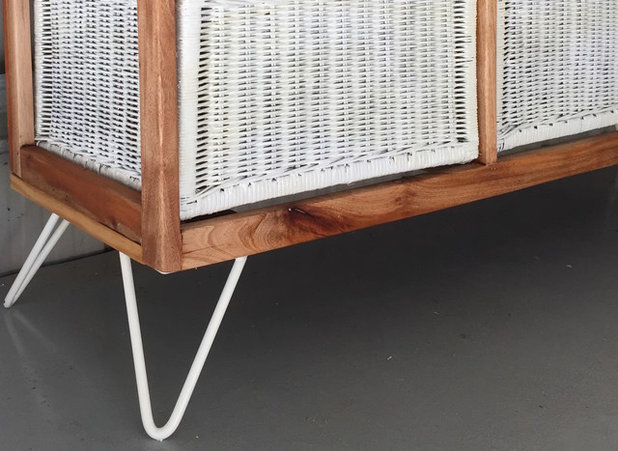
Step 10: Attach the legs
Turn the cabinet upside down on a clean mat to attach the hairpin legs, making sure the screws are short enough not to protrude through the base.
Tip: Position the legs so the back of the cabinet can be pushed against a wall.
Tell us
Are you interested in undertaking – or have you done – this revamp? We’d love hear from you. Please show us your project by uploading photos in the Comments below.
More
See more great DIY projects on Houzz
Related Stories
Christmas
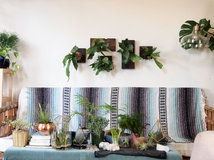
DIY: Three Blooming Amazing Christmas Flower Arrangements
Florist Jodie McGregor shows us how to make a vase arrangement, coffee table display and a wreath for Christmas
Full Story
DIY
DIY Display for Staghorn Ferns
By Kayla Stark
Get a step-by-step guide to turning a shade-loving staghorn fern into a piece of living wall art
Full Story

DIY Projects
How to Make Thoughtful Homeware Gifts for Those You Love
A personal, bespoke gift brings the joy back into giving and leaves minimal environmental footprint
Full Story
DIY Projects
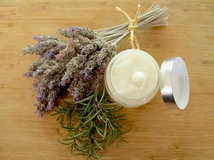
DIY Project: Natural Lavender and Rosemary Moisturiser
Ditch the chemicals and make your own rich moisturiser out of natural ingredients
Full Story
Bathrooms
7 Good-Looking Ways to Arrange Stacked Tiles
Wondering which layout to use for your tiles? Check out these straight or stack-bond patterns for inspiration
Full Story
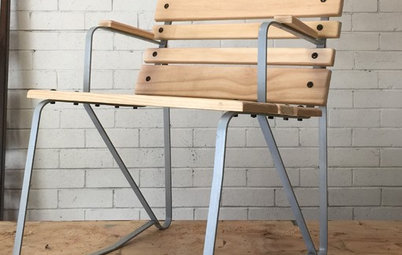
DIY
DIY Project: Garden Chair Makeover
Give dated and weathered garden chairs a contemporary upgrade this long weekend with these easy tips from a DIY expert
Full Story

DIY
DIY Project: String Art Christmas Cards
Cardboard, a needle and thread is all it takes to make gorgeous Christmas tree cards with a personal touch
Full Story
Renovating
Bring on the Bling... With Specialty Paint Finishes
From liquid gold to instant rust and concrete effect, the latest paint effects add easy character to your home
Full Story
DIY Projects
DIY Sewing Project: A Cute Peekaboo Toy Bag
By Jade Rennie
For the ultimate in toy storage, have a go at making these peek-a-boo bags
Full Story
Nooo, the nice, crafted wooden legs sawn off! The piece was a classic, now the new legs will become dated. Btw, I've had good results spraying paint onto a rattan chair rather than hand painting like this. Pretty quick and settles nicely into all the nooks and crannies.
What a fun update for this mass-produced furniture item. Love it.