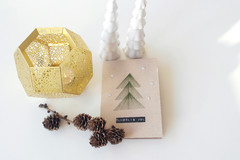


DIY Project: String Art Christmas Cards
Cardboard, a needle and thread is all it takes to make gorgeous Christmas tree cards with a personal touch

Christmas is the time to show the people in your life how much you appreciate them – why not through a nice, personalised Christmas card? Follow these instructions to make your own with a string-art Christmas tree.
Step 1: First, thread the needle. Then, pass it through from the back of the card at the point where you want the top of the Christmas tree to be. Next, bring it down and to the side and pull it to the back through another hole to create the first of the uppermost tree branches. From the back of the card, pull the needle to the front again through the top hole.
Step 2: Repeat step 1 again, this time drawing the thread through a hole opposite the first. As shown in the photo, the two resulting lines should more or less form an equilateral triangle.
Step 3: Repeat steps 1-2 to create more lines of string between the first two. You can vary the distance between the lines, but note that placing them too close to one another may cause the cardboard in between the holes to break.
Step 4: Repeat steps 1-3 to make the next tier of the tree. The top hole of the next tier should be pierced through the exact centre (in terms of both height and width) of the first triangle.
Repeat steps 1-4 for any further tiers of branches.
Repeat steps 1-4 for any further tiers of branches.
Tip: On my Christmas card I have made a three-tiered tree out of triangles that are roughly the same size. However, you can easily vary their sizes and make as many tiers as the dimensions of the card allow.
Step 5: Attach any additional decorations, such as snowflakes or a star.
Step 6: Print out ‘Merry Christmas’ or another greeting using a label maker and attach to the card. Alternatively, if you have nice handwriting, write out your greeting in nice India ink or with a ballpoint pen.
Tell us
If you make your own cards, upload pictures in the Comments below to show off your creative side. And if you enjoyed this story, like it, bookmark it, save the photos and share your thoughts below. Join the conversation.
More
Browse more fun DIY projects
Tell us
If you make your own cards, upload pictures in the Comments below to show off your creative side. And if you enjoyed this story, like it, bookmark it, save the photos and share your thoughts below. Join the conversation.
More
Browse more fun DIY projects


- A sewing needle
- Thread
- A blank card (these can be found at craft stores) or a piece of folded cardboard
- A label maker (optional)
Estimated time: 30 minutes