Decorating
Stylish Ways to Display Your Children's Art
Free your fridge from overflowing magnet-stuffed artworks and display your young Picasso's creations with a little more panache

Let’s face it, children’s artworks multiply quicker than Gremlins. Somewhere along the line the fridge became the universal display area for these creations, but it can end up looking pretty messy very quickly, and the space doesn’t really give the pictures the treatment they deserve. After all, despite the seemingly endless stream of artwork, when you think about throwing away those pieces of paper, you realise how precious they are to you. So here are some alternative ideas for exhibiting your children’s art in a way that will add warmth, character and style to your home – and make your little one feel pretty special to see their work take pride of place.
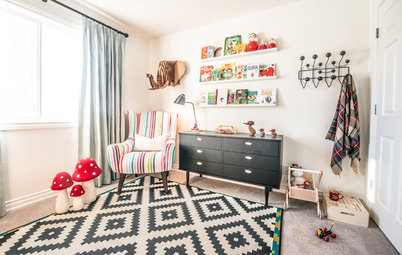
Here’s another example of the same idea and shows how choosing artworks of the same size, with similar colours is key.
BONUS TIP: Take a look around your home and you are sure to find plenty of dead spaces that would be easily livened up simply by adding a few frames of your children’s art. Window seat areas are often overlooked spaces.
BONUS TIP: Take a look around your home and you are sure to find plenty of dead spaces that would be easily livened up simply by adding a few frames of your children’s art. Window seat areas are often overlooked spaces.
You don’t even have to go all-out with the framing. A few favourite pictures in simple white frames looks lovely in this eating nook.
BONUS TIP: Try to choose pictures that complement the colour scheme of where you plan to put them. In this case, the bright greens in the pictures work well with the green-themed eating area, and make the display look more purposeful.
BONUS TIP: Try to choose pictures that complement the colour scheme of where you plan to put them. In this case, the bright greens in the pictures work well with the green-themed eating area, and make the display look more purposeful.
Build a picture wall
In this example, a few of the pictures could be replaced with your favourite children’s artworks. Doing it like this allows you to put their work on display, but the overall look says stylish adult space rather than extension of the kids’ art room. You could also swap the art inside the frames on a regular basis to keep it up to date.
More: Kid-Friendly Living Rooms as Lovable as They Are Livable
Alternatively, create a whole wall of your children’s art. It’s not as easy to rotate, but perhaps you could change the pictures once a year with your new favourites. In this example, the designer also threw a few Andy Warhol paintings into the mix, which just adds that extra dose of interest and style – and perhaps something to aspire to?!
BONUS TIP: To make the artworks easier to switch, remove the glass and backing board (leaving the hanging frame) and use Blu-Tack to adhere the pictures to the wall.
BONUS TIP: To make the artworks easier to switch, remove the glass and backing board (leaving the hanging frame) and use Blu-Tack to adhere the pictures to the wall.
Create a unique display board
Rather than settling for a plain and boring pin board bought from an office supply shop, consider getting creative and making a pin board that suits the style of your home, and becomes a feature in itself. If you’re thoughtful about it, you might not even have to do any work, but simply repurpose an existing item. These wood and wire chicken incubator trays have been transformed into a truly unique display area for art, and couldn’t be more fitting for this farmhouse.
Rather than settling for a plain and boring pin board bought from an office supply shop, consider getting creative and making a pin board that suits the style of your home, and becomes a feature in itself. If you’re thoughtful about it, you might not even have to do any work, but simply repurpose an existing item. These wood and wire chicken incubator trays have been transformed into a truly unique display area for art, and couldn’t be more fitting for this farmhouse.
These wooden circles with small wooden pegs for attaching artworks look very cute against the reclaimed wood wall and are ideal for displaying smaller arts and crafts.
Hang some clipboards
While this is clearly not a selection of children’s artwork, you could easily hang a wall’s worth of vintage clipboards in a similar way for displaying a rotating selection of your kids’ pieces. They look great, especially in traditional or retro homes, and make it a cinch to easily swap the artworks.
GET CRAFTY: It’s easy to make your own unique clipboards to suit the style of your home. Simply have some wood cut into the size you want, sand it, stain it to your desired colour (or alternatively cover it with a fabric of your choice) and glue a clip or two into place at the top.
You could also ditch the boards and just go with the clips, as this family has done. Contained to a small area, the look is still neat, and just as easy to update.
Try wire and pegs
A more modern take on the clipboard idea is to hang some cable wire and attach small pegs. In this example, curtain wire with matching curtain pegs was used. Obviously the look isn’t quite as neat as using frames, so works better in a bedroom or art room, but it could also look good strung along a long, plain hallway, too. Once again, this method is excellent for being able to swap around the pictures quickly and easily.
A more modern take on the clipboard idea is to hang some cable wire and attach small pegs. In this example, curtain wire with matching curtain pegs was used. Obviously the look isn’t quite as neat as using frames, so works better in a bedroom or art room, but it could also look good strung along a long, plain hallway, too. Once again, this method is excellent for being able to swap around the pictures quickly and easily.
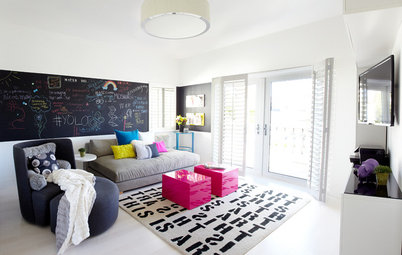
Establish a framed art space
Adding a beautiful frame to a chalkboard makes for a dramatic wall-hanging. It also allows you to stick the kids’ art in one space (that everyone can view), as well as making it easy to rotate the pictures.
Adding a beautiful frame to a chalkboard makes for a dramatic wall-hanging. It also allows you to stick the kids’ art in one space (that everyone can view), as well as making it easy to rotate the pictures.
The white frame around this enormous pin board keeps the look neater, despite the number of artworks that are displayed.
Dedicate a whole wall
Another alternative is to paint a whole wall with chalkboard paint to be used as a display area. Here, adult art and photos are combined with children’s art. Clips have been randomly attached to the wall to make for easy hanging.
More: 10 Brilliant Ways to Use Chalkboard Paint
Another alternative is to paint a whole wall with chalkboard paint to be used as a display area. Here, adult art and photos are combined with children’s art. Clips have been randomly attached to the wall to make for easy hanging.
More: 10 Brilliant Ways to Use Chalkboard Paint
This wall-to-wall corkboard in the children’s study allows plenty of space to keep artworks displayed and contained to one area.
Here, a floor-to-ceiling soft grey pin board has been added to the children’s playroom for easily pinning up of their latest creations.
More: Child’s Play: 18 Cool Ideas for Kids’ Spaces That Will Keep Them Busy
More: Child’s Play: 18 Cool Ideas for Kids’ Spaces That Will Keep Them Busy
Go magnetic
This magnetic door is like an oversized fridge. Obviously, it’s not something you’re likely to go and install simply to store artwork, but if you’re building or renovating and considering a sliding door, especially one leading into the children’s play area, you might want to consider a magnetic one like this, which could be used for displaying artwork.
GET CRAFTY: If you paint the door with chalkboard paint it can become a magnetic blackboard. Alternatively, if you can’t install a magnetic door, consider painting the back of an existing door with magnetic paint for a similar result.
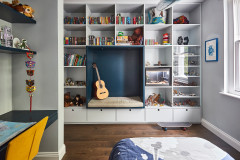
Style an art shelf
Dedicate a couple of shelves around the house – yes, even in the kids’ bathroom – to hold your children’s more solid artworks (such as those on canvas).
Dedicate a couple of shelves around the house – yes, even in the kids’ bathroom – to hold your children’s more solid artworks (such as those on canvas).
Make a family artwork
Yes, it means adding one more piece of art to the already mountainous pile, but this is a lovely way to create something that you’ll love to hang in a prominent area of your home as a reminder of your joint creative effort.
Remember to choose a limited selection of paint colours that suit your interior colour scheme. This splatter painting was created by the children of the house using a teal, orange and green colour palette.
GET CRAFTY: Splatter paintings are messy but fun and not difficult to make. Just buy a stretched canvas from an art supply or bargain store, then get outside on the lawn with some old clothes on and have fun experimenting with paint application using straws, toothbrushes, eyedroppers and funnels, and even popping paint-filled balloons from a height.
5 TIPS FOR KEEPING KIDS’ ART ORGANISED
1. Frame your favourites
Choose your absolute favourites for the year, frame them beautifully and hang them in a prominent place, as shown in the examples above.
2. Create an easy-rotate system for displaying the rest
Whether it’s a magnetic chalkboard, pin board or cable wire with clips, you’ll need a place to display the current batch of art that makes it super quick and easy to rotate as soon as the next lot comes through the door.
3. Create a best-of box
Once the artworks are bumped from display, store them in a box or portfolio. Choose those that are sentimental, favourites or that represent important phases, milestones or cherished memories.
4. Share the love
Send some of the artworks to grandparents and relatives who would appreciate an update of your child’s artistic talents.
5. Bin or recycle
Yes, this is the tough one. If you’re really struggling to say goodbye, take a photo of each artwork before you bin it if it would make you feel better to keep a record. Before you throw the pieces into the bin, consider turning some of them into wrapping paper or a card.
SHARE YOUR THOUGHTS
How do you store your children’s art in your house? And do you have a good system for keeping it organised that you’d like to share? Tell us in the comments section.
MORE
10 Artful Gallery Ideas That’ll Wake Up Your Walls
A Dozen Novel Ways To Display Your Favourite Photos
Curate Your Own Art Gallery At Home


Choose your favourite artworks for the year and have them framed professionally as you would any other artwork. This piece of art was actually painted by Canadian artist Elena Popova, but is done in a naive style so the overall look wouldn’t be entirely different with children’s artworks. You will no doubt be surprised at just how much more stylish and ‘professional’ your child’s art will look if you choose it and frame it well … as opposed to when when it’s hastily stuck to the fridge with a magnet.