Creating your Project Schedule
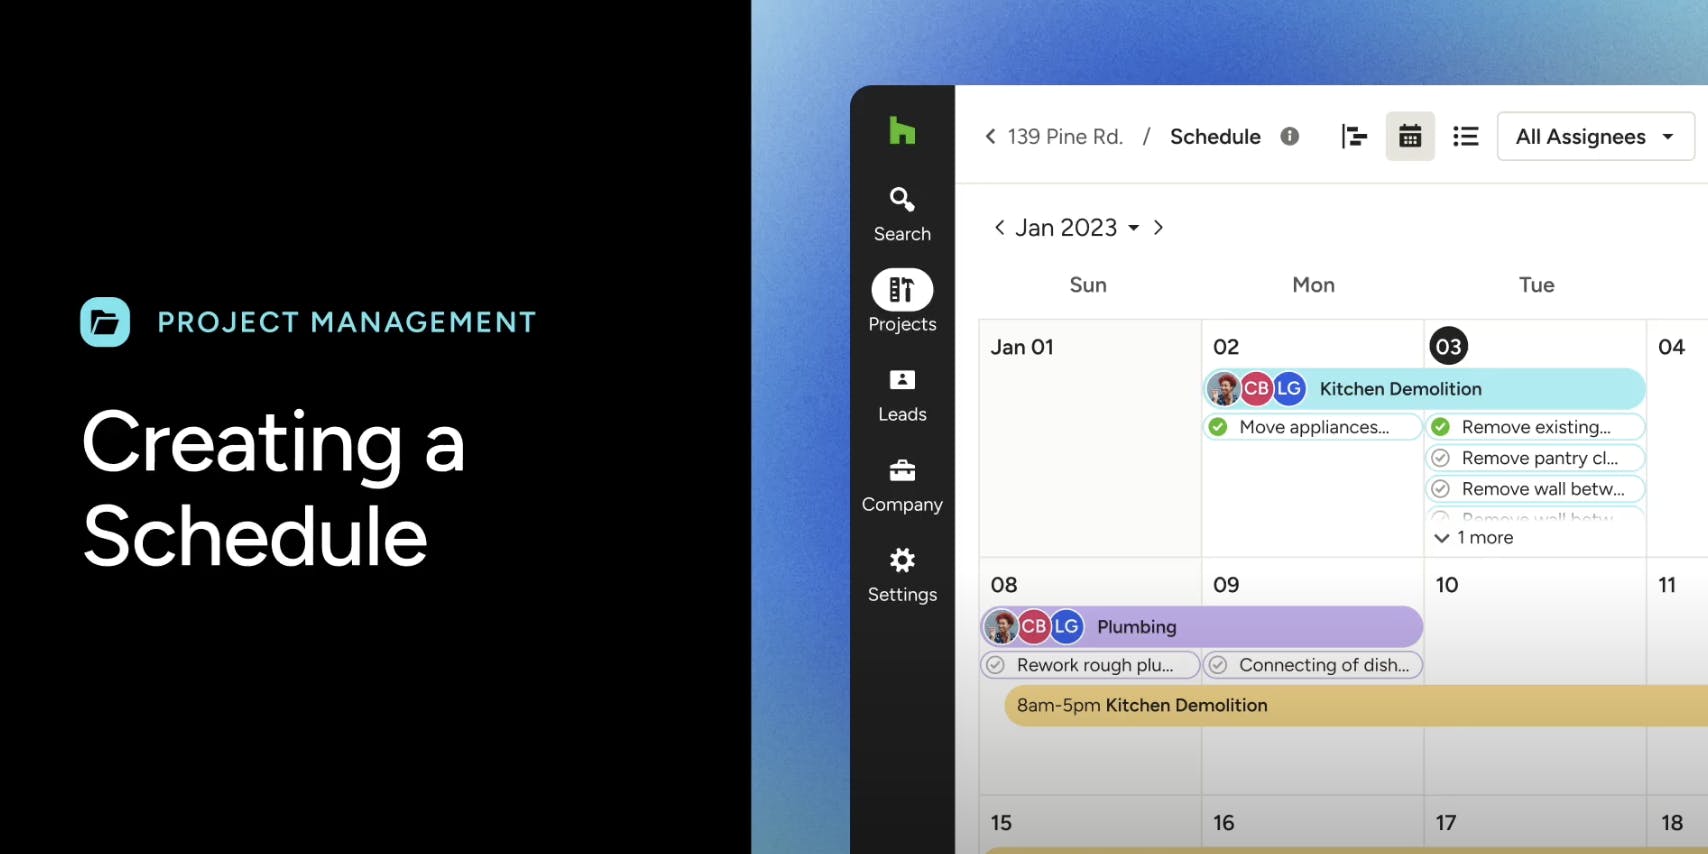
The Houzz Pro Schedule is both a project management and client collaboration tool that helps you make sure everyone — your team, subcontractors, and clients — is on the same page. It’s a place where you can easily see the next steps in your project.
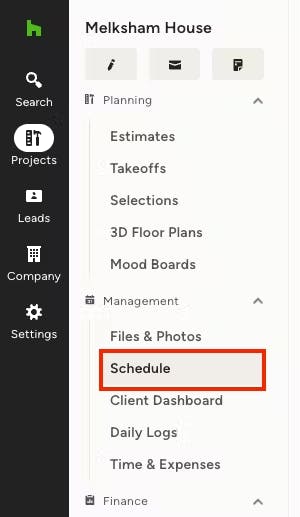
To begin creating your schedule, simply navigate to a project in the left-hand column, and then select Schedule from the left menu.
Once in the schedule, you can either create a schedule from scratch, or you can use preset templates or custom templates.
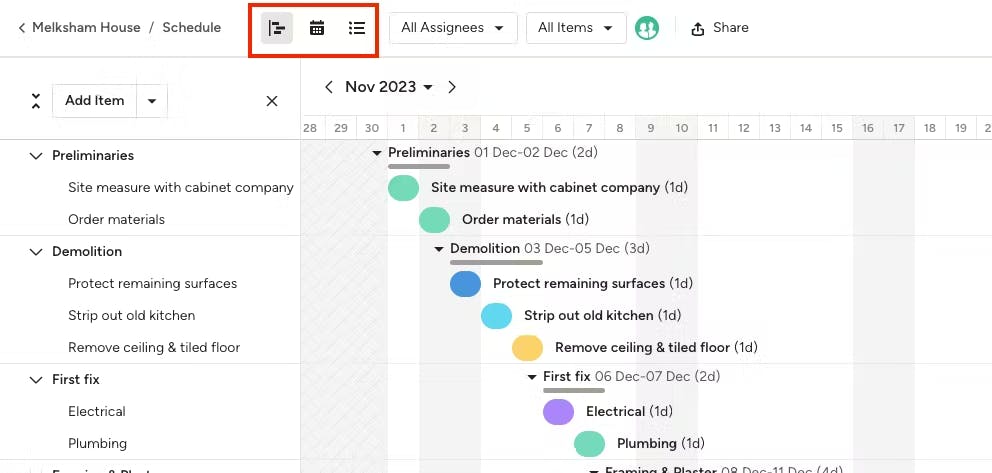
You can choose from the three views available on the top of the page. These are Gantt, Calendar or List view. You can choose the one that works best for you and change back and forth between views depending on what you want to see.
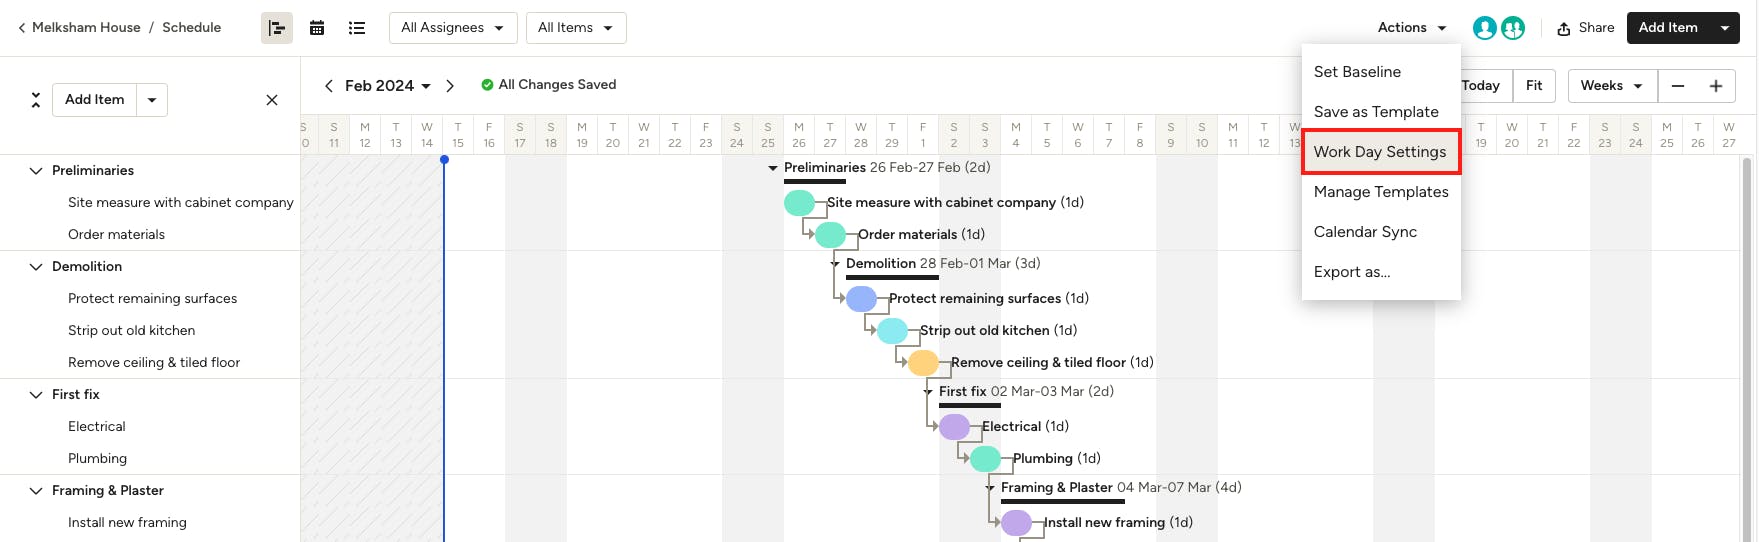
Adjust Workday Settings
As you set up your schedule, you can easily adjust your workday settings to ensure it accurately reflects your availability. To adjust, select Workday Settings from the Actions dropdown.
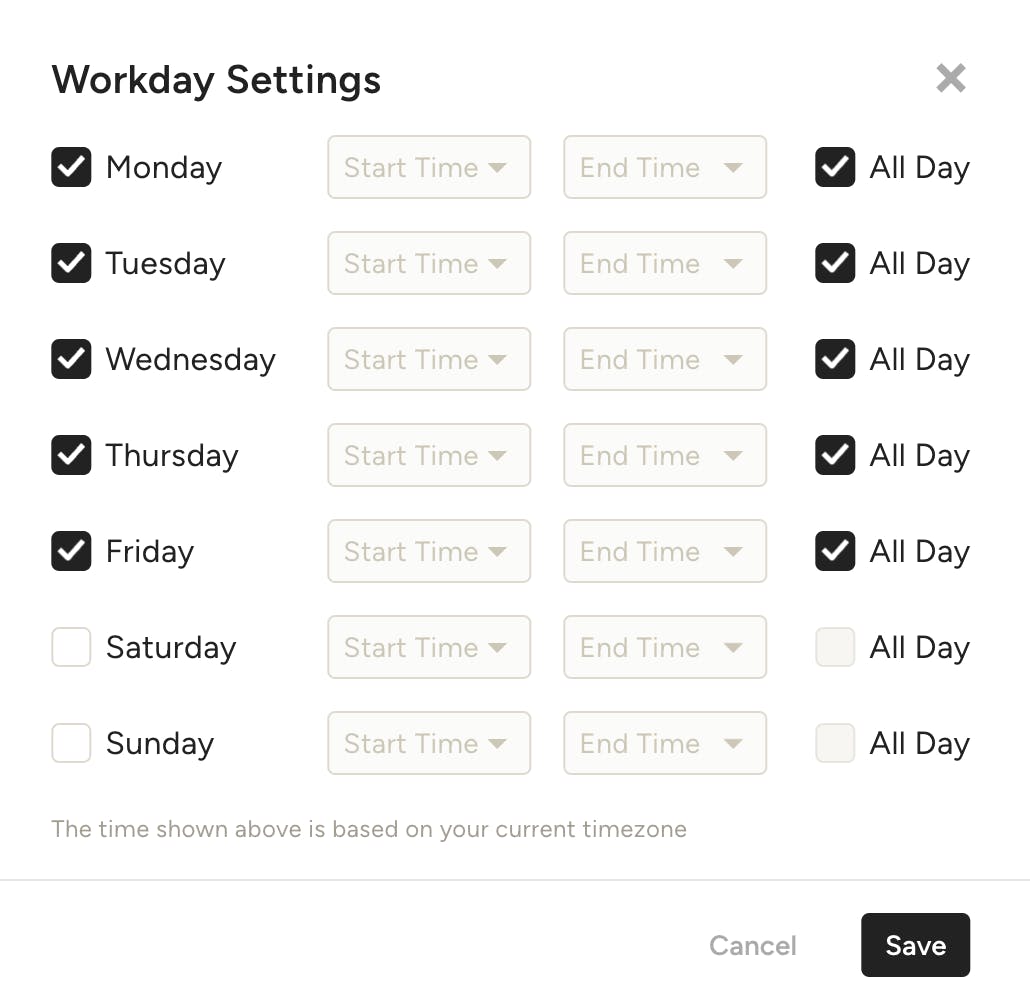
From there, you will be able to select the days you are available to work — you can select all day or adjust to specific times.

Create Phases & Items
The Houzz Pro Schedule is broken into 3 tiers to best reflect your workflow. We have Phases, Items and Tasks.
- Phases — You can group your items into a phase and at a glance see how long that portion of the project is due to take.
- Items — You can create multiple items and group them under a phase. Here you will be able to create multiple dependencies between items.
- Tasks — You can break your items into smaller tasks and assign them to your team.
You can create Items simply by clicking a date on the calendar of the Gantt view. Your Item will appear on the calendar and you will be able to name it accordingly. You can then drag the Item to determine the number of days it will take.
In the left-hand column you can click the menu button to show all of your phases and items you have created for the schedule so far.
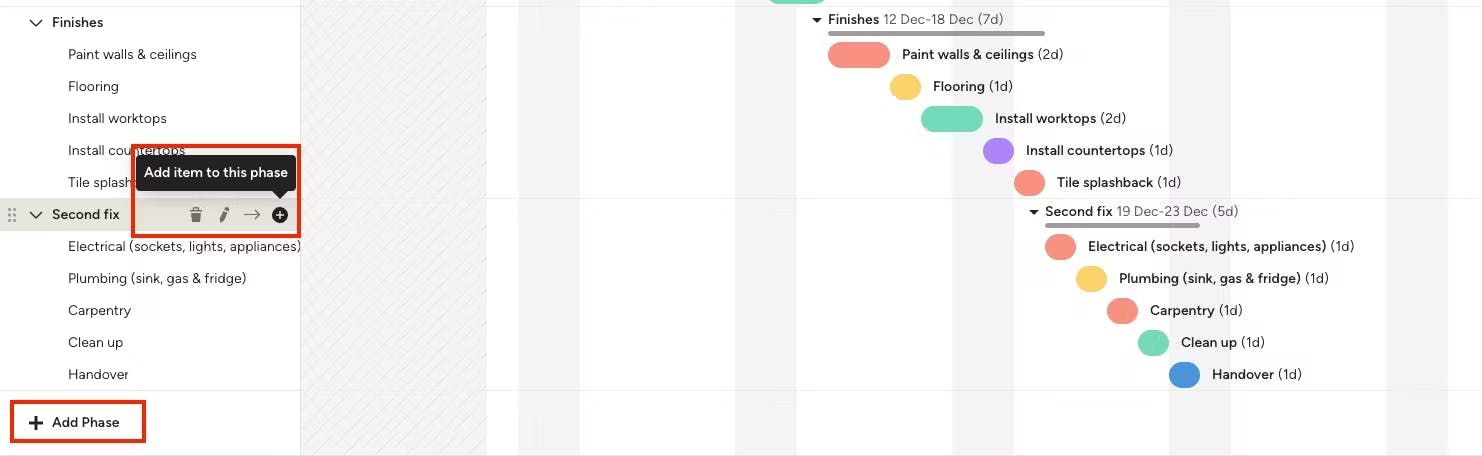
Here you can add phases and items. Hover over a phase for the options to add an item, edit, delete or rename the phase. You can also change the order of phases and items by clicking and dragging the line item and moving it to the preferred spot.
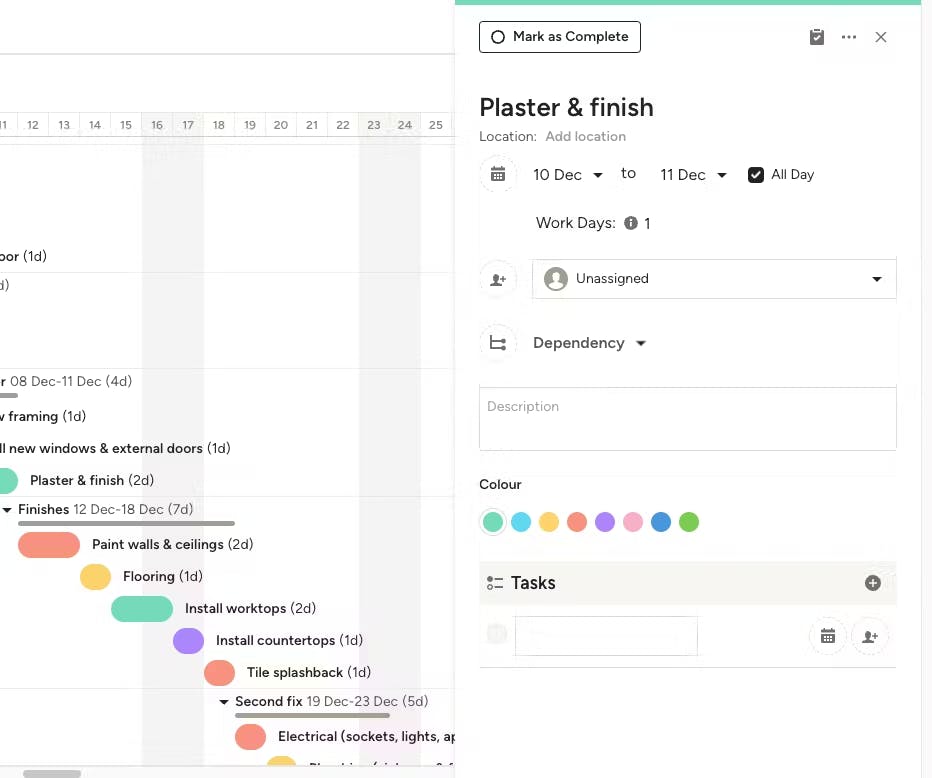
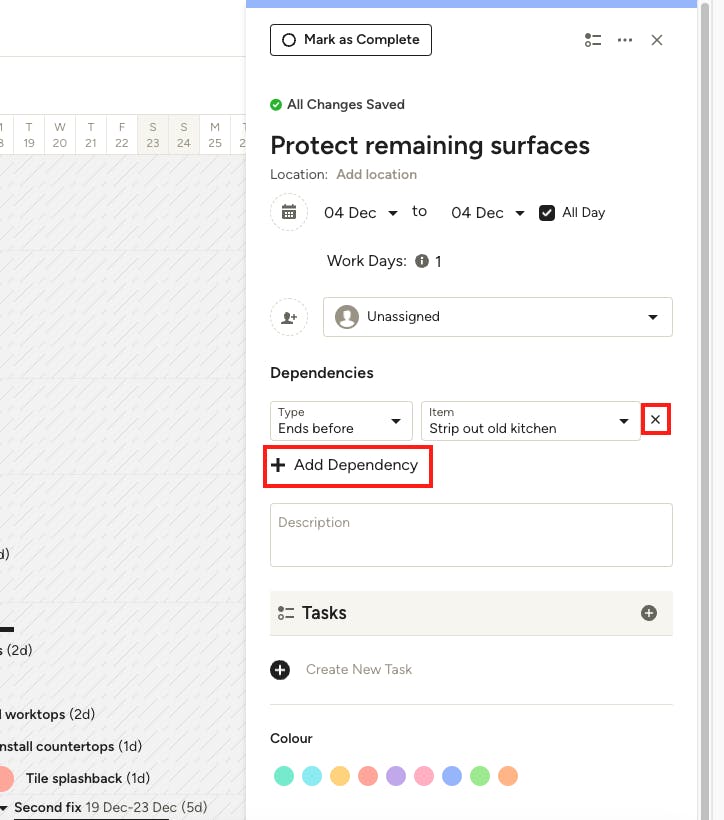
When you click on the item within your schedule, you will see a panel on the right side of your screen where you can make multiple edits including:
- Start & Finish Date
- Assign to stakeholder
- Create a dependency (or multiple dependencies)
- Give a description of the item
- Create a task
- Colour coding
- Attach any documents to a task
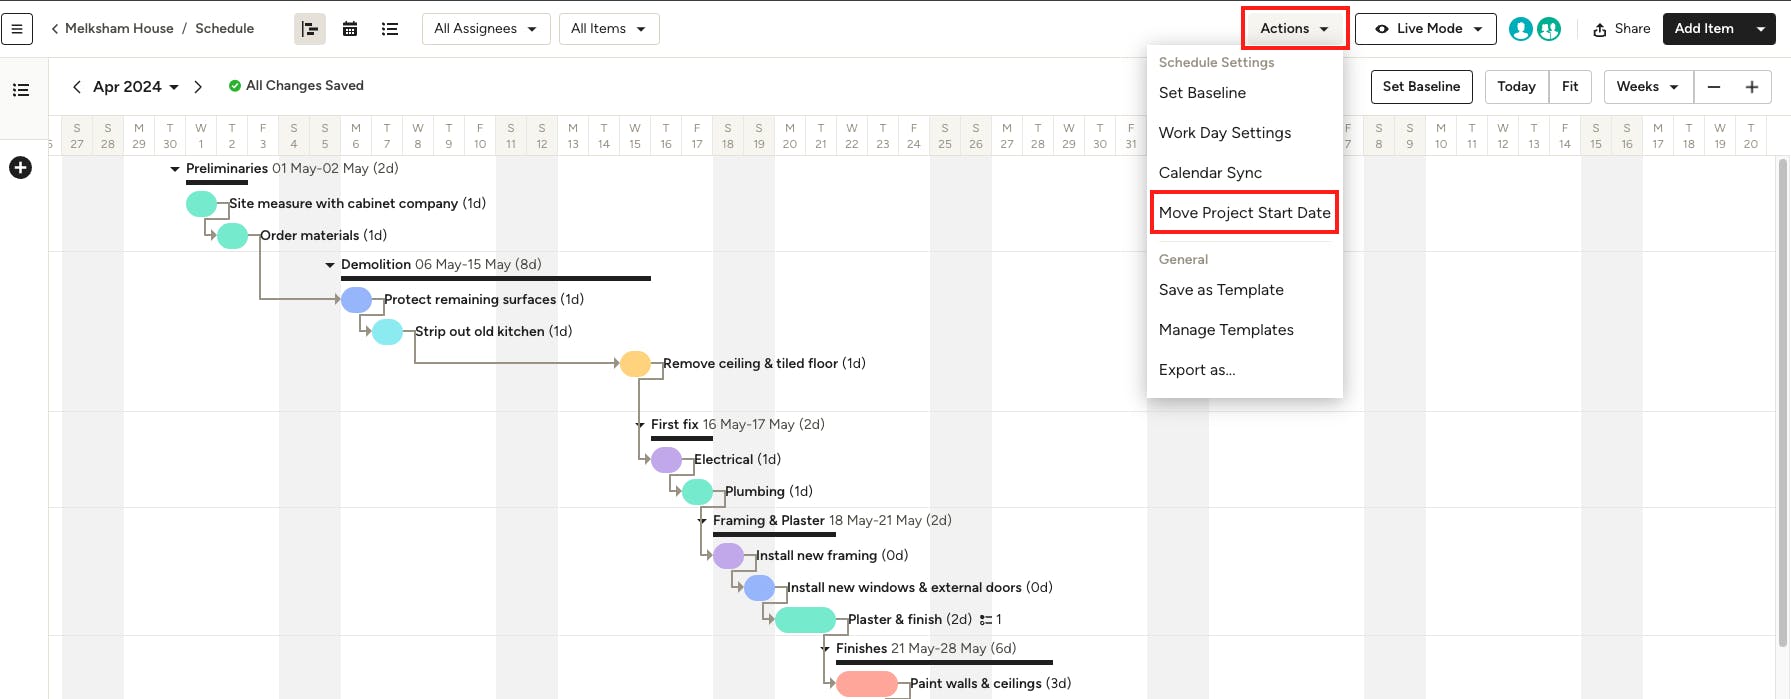
Adjust Schedule Start Date
While you can easily adjust items and phases individually (as mentioned above), you can also adjust the start date for your entire schedule and move everything at once. If your project gets delayed for any reason, you can make this adjustment in just a few short clicks.
To adjust the start date, click on Actions at the top of your schedule, then select Move Project Start Date.
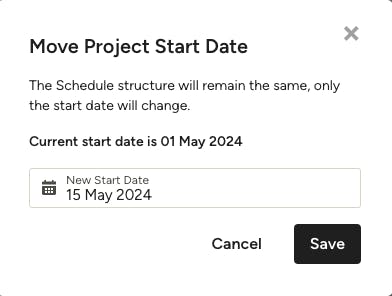
A new screen will appear where you can select the new start date from the calendar. You can also adjust the baseline (more details below on this feature).
Be sure to click Save. All the phases and items in your schedule will now automatically adjust to reflect the new start date.
Create Dependencies
When building out your schedule, you can easily make multiple items dependent on the completion of another item. Creating dependencies in your schedule is useful if there are certain stages of the project that can't move forward until another stage is complete.
To create a dependency:
1. Click on the item you want to edit to open the item details.
2. Within the edit screen on the right-hand side, click on Add Dependency.
3. From there, you can select whether this item should begin after or end before another item. Select the relevant option from the dropdown.
4. Select the item you want to create a dependency on. In this instance, the protecting of remaining surfaces needs to end before the old kitchen strip out begins.
5. You will now see a dependency shown in your schedule. You can add another dependency by clicking the + icon. You can also delete the dependency by clicking the x next to it.
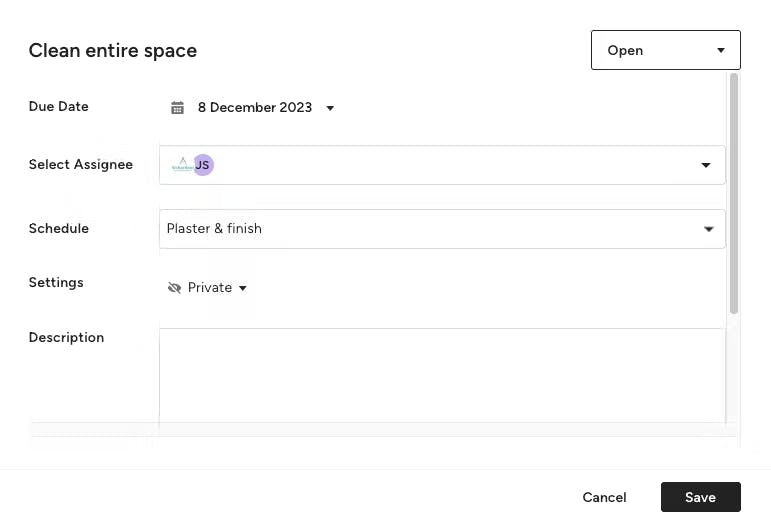
Assign Items and Tasks
Within schedule, you can also assign items to your team members or clients. This will notify the assignee and make sure they are keeping up to speed with the project.
When you click the item and bring up the panel on the right. You will see there is a dropdown automatically selected to Unassigned here you can either invite team members to the system and assign them that way or choose from a list of team members who are already using the system.
When you create a task associated with an item you will be given a screen that allows you to add more detail including setting the due date, a description for more information on the task and you can also attach files if necessary.
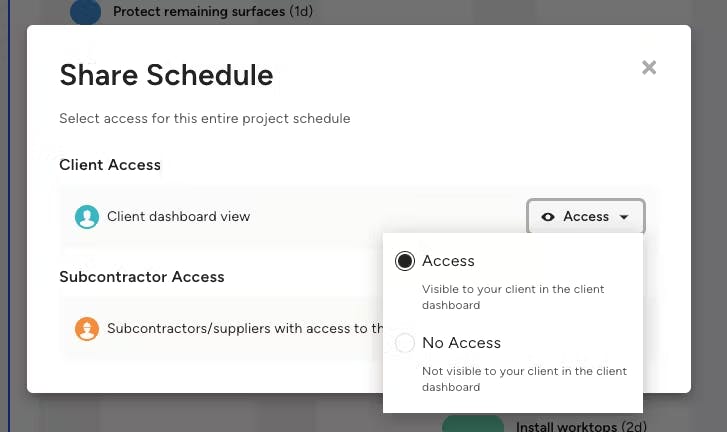
Share Your Schedule
It's easy to share your schedule to keep the whole team informed of changes as they come up. Click the Share button above your schedule — you can then allow clients access in the Client Dashboard, as well as provide access to subcontractors and/or suppliers.
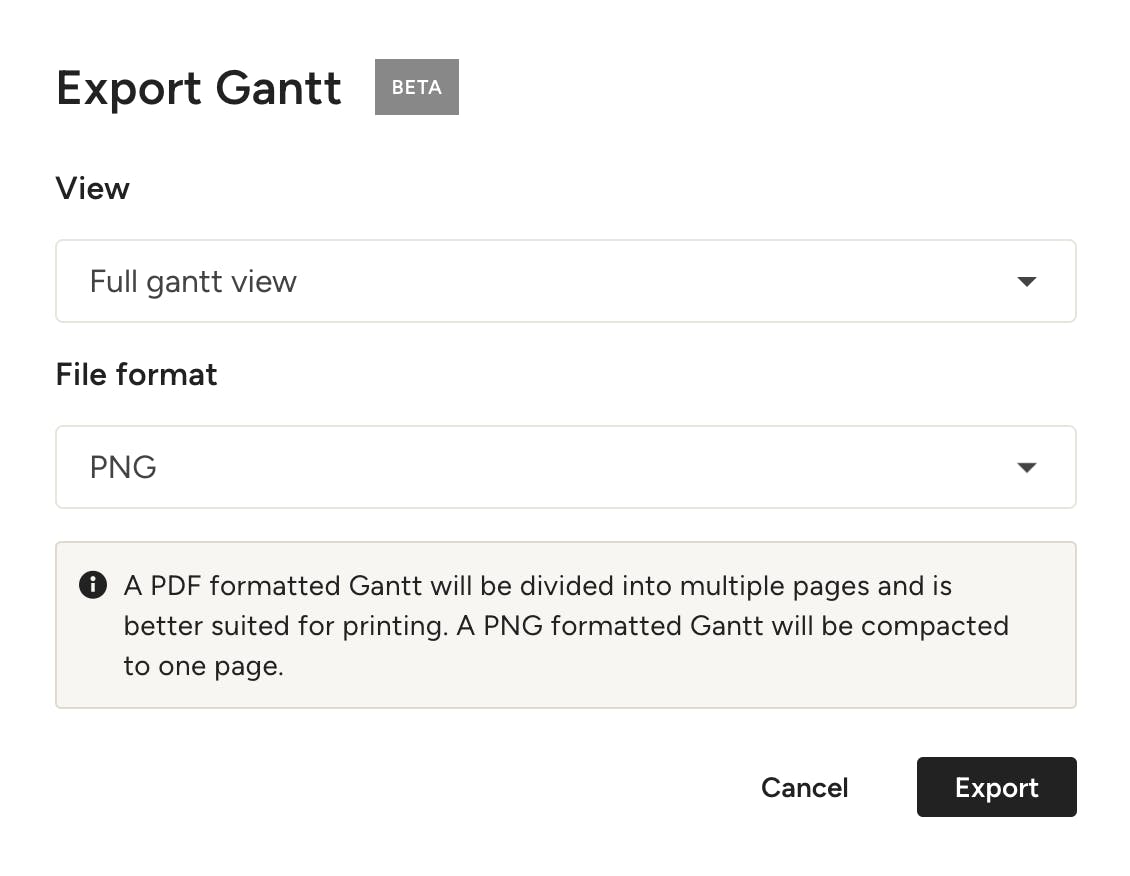
If you prefer to print and share, no problem. You can export your schedule in the Gantt view as a PDF or PNG.
To start, select Actions in the top right of your schedule screen. Select Export As from the dropdown. You can choose to export the schedule in the "current view” to see the schedule as it appears on your screen with filters applied, or in the “full Gantt view” to see the entire schedule.
Click Export to download the file and print from there.

Live/Edit Mode
You can use the live/edit mode feature to make changes to your schedule and adjust what your client and subs can or cannot see as you work. There are two different modes — live mode and edit mode.
Live mode is the default. When you make changes in live mode, clients, subcontractors and your team will be notified. Edits will immediately be visible to clients and subcontractors with the correct permissions.
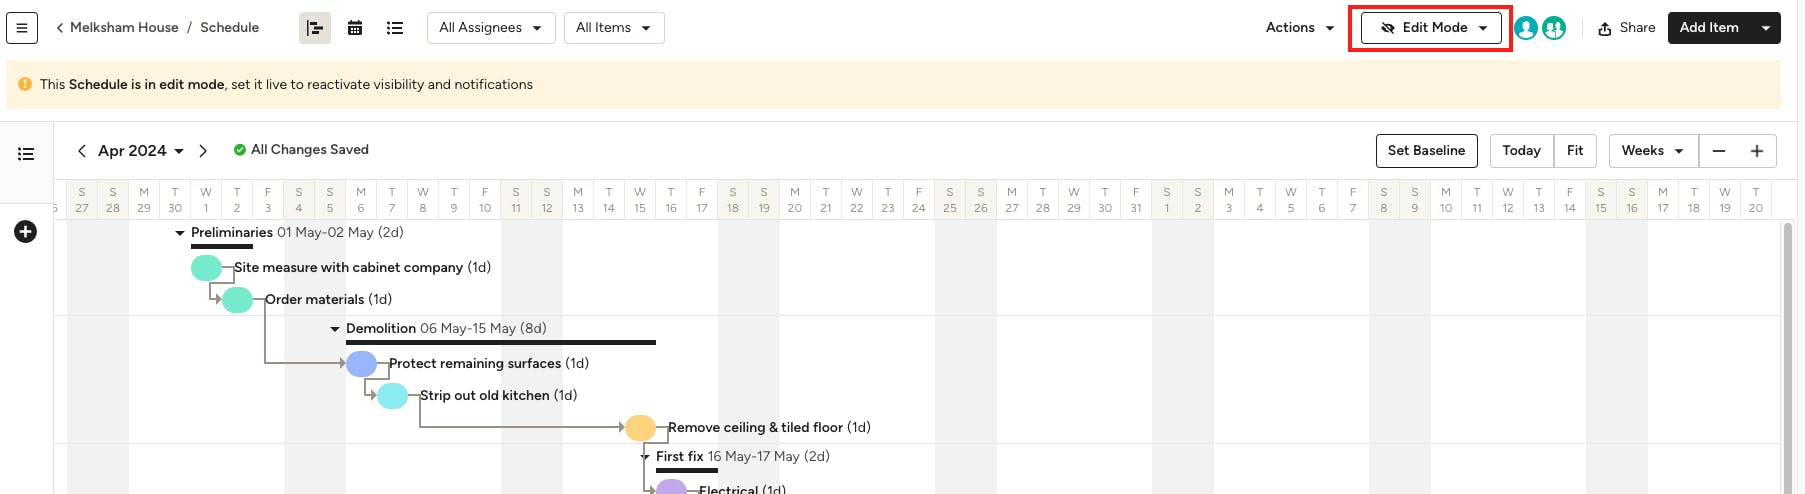
You can use edit mode when you are making a lot of adjustments to your schedule and don't want those changes to be visible yet. In this mode, clients and subcontractors will not be able to view your schedule until you turn it live again, and assignees will not receive notifications about changes. Only you and your team will see the edits you make to the schedule.
To change your mode, click on Live Mode (or Edit Mode) at the top of your schedule, and select the alternative mode from the dropdown.
You will see a confirmation screen that informs you of the difference between edit and live mode notifications and visibility. Select Confirm to adjust.
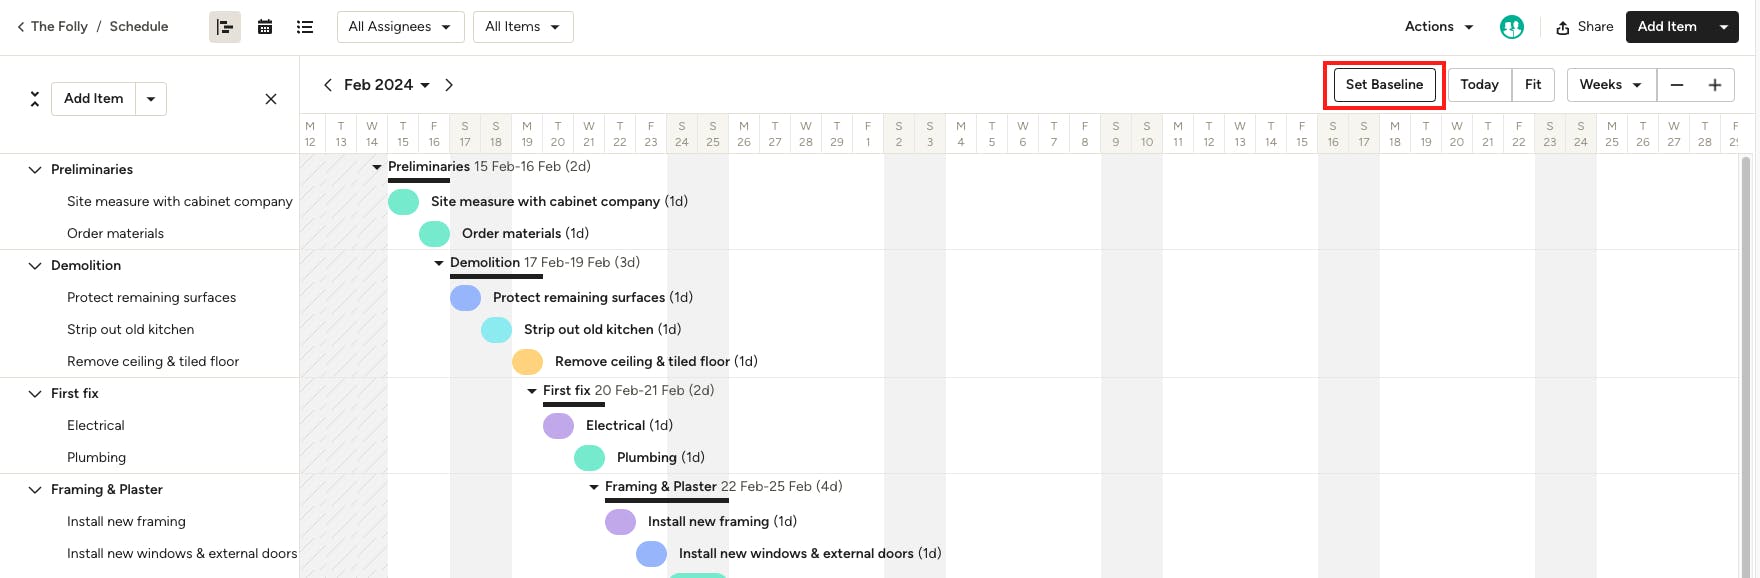
Create a Baseline
Once you set up your project schedule, you can use the baseline feature to take a snapshot of the current schedule. This will log the start and end dates for every item and phase. If the project timeline changes, you can compare the actual dates against the initial plan to help track and manage projects more efficiently in the future.
To create a baseline:
1. Open up your schedule, and select Set Baseline from the top menu.
2. A popup will appear to give you more information about the feature, as well as how to reset it if needed. Click Confirm.
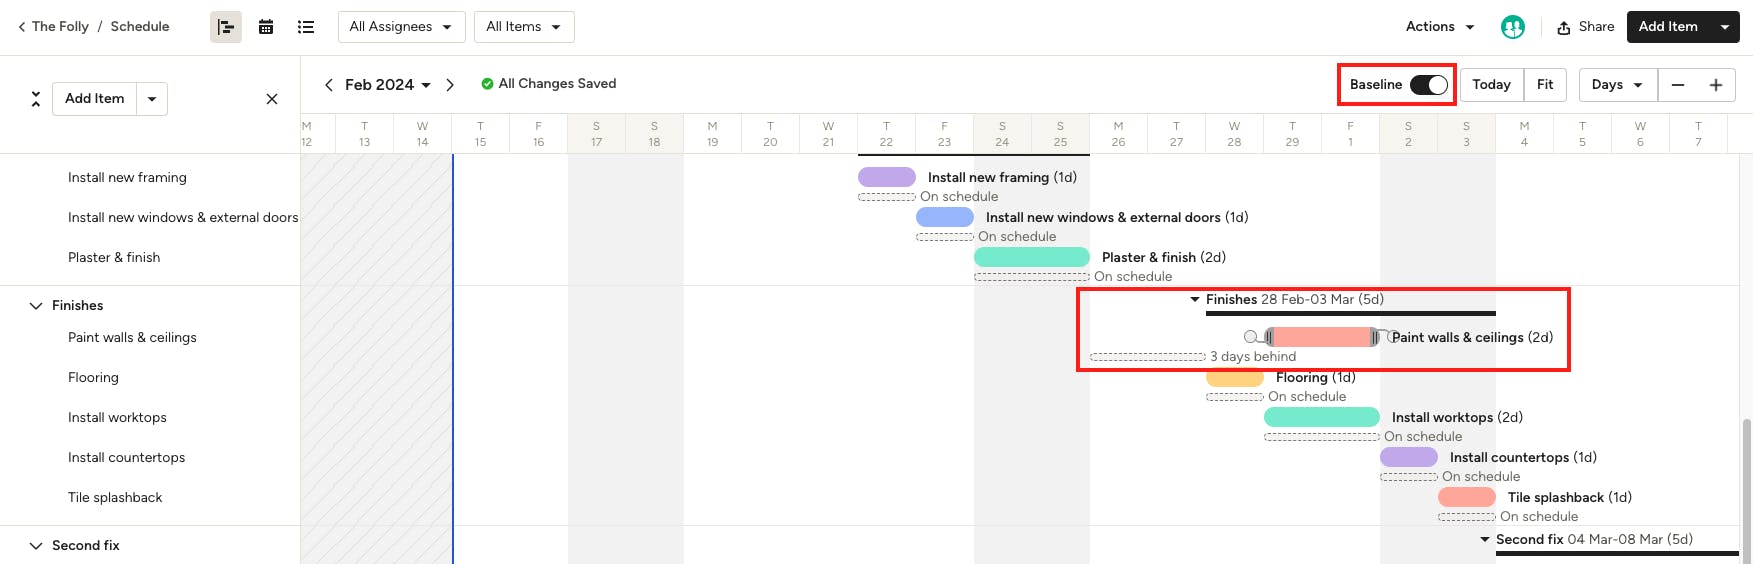
3. Your project dates will now save as an outline within your schedule. If the dates move, it will show the projected timeline as well as the actual timeline. In this example, painting of walls and ceilings was delayed by three days, so adjustments made to the schedule reflect that.
4. You can select the baseline toggle to turn the feature on and off. If you would like to reset your baseline, you can select Reset Baseline from the Actions menu.
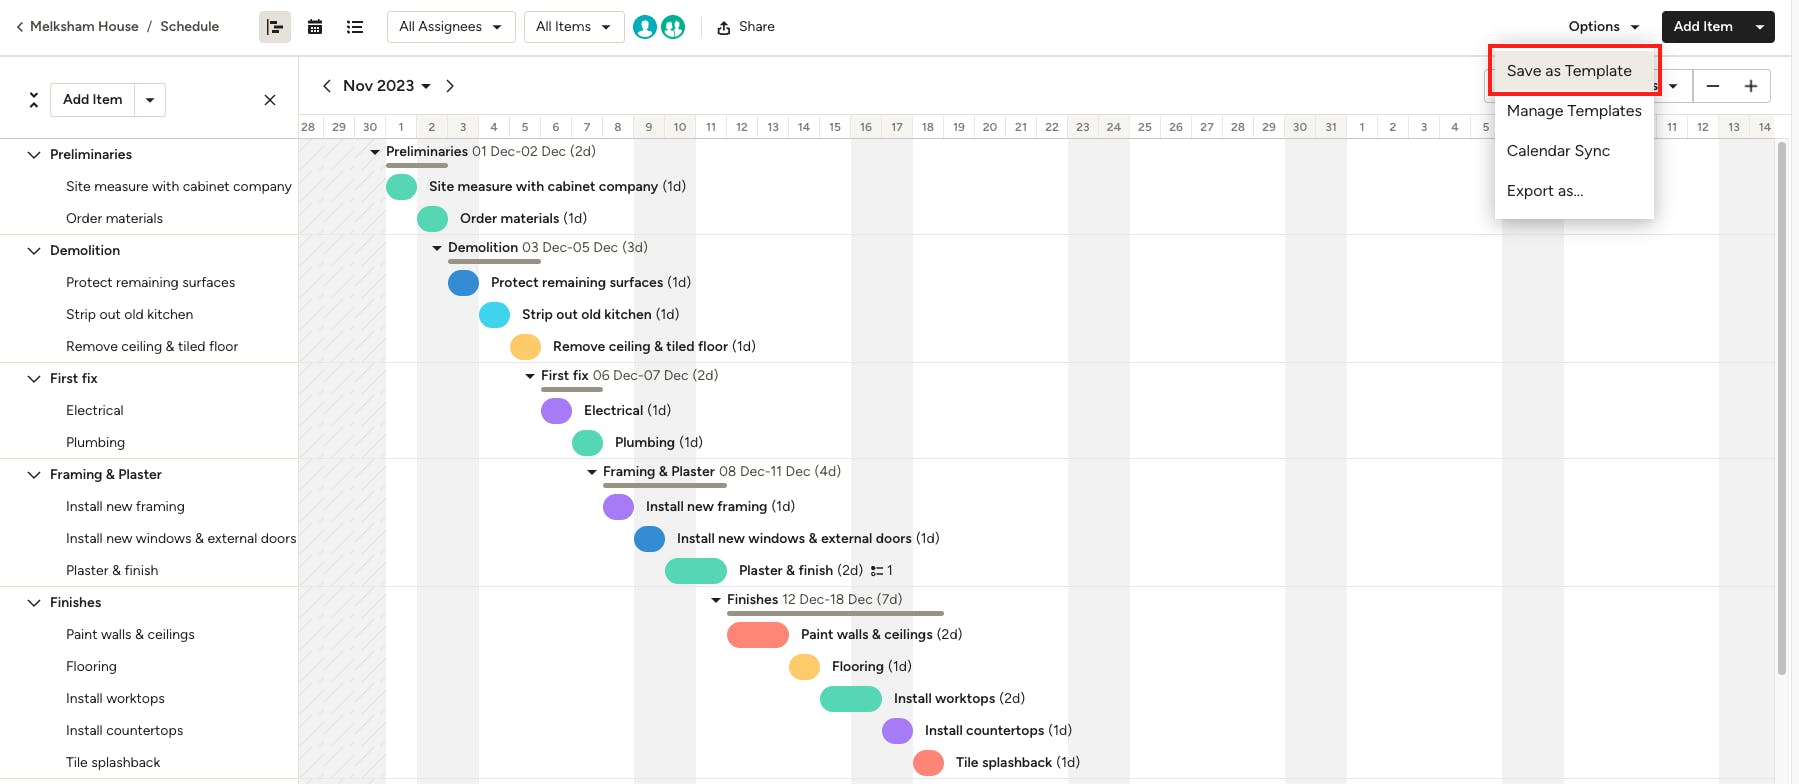
Creating a Schedule Template
Typically we see contractors who work with one, two or even three types of projects. Sure every project has its nuances, but the structure remains the same. So to save you time when starting a new project, you can create and save a schedule template.
It's simple: Once you have created the schedule to your liking, you can click on the Actions button in the top right, and in that dropdown you can choose Save as Template.
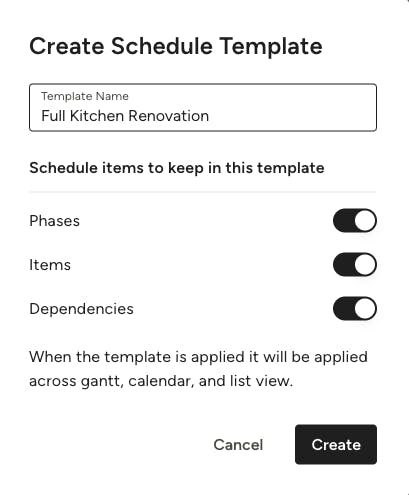
Then you will be given the option to name the template and choose what aspects of the schedule you want to be applied to all the projects you apply the template to. Perhaps the dependencies are impacted on a case-by-case basis, so by toggling this off, only the Phases and Items will be saved to the template.
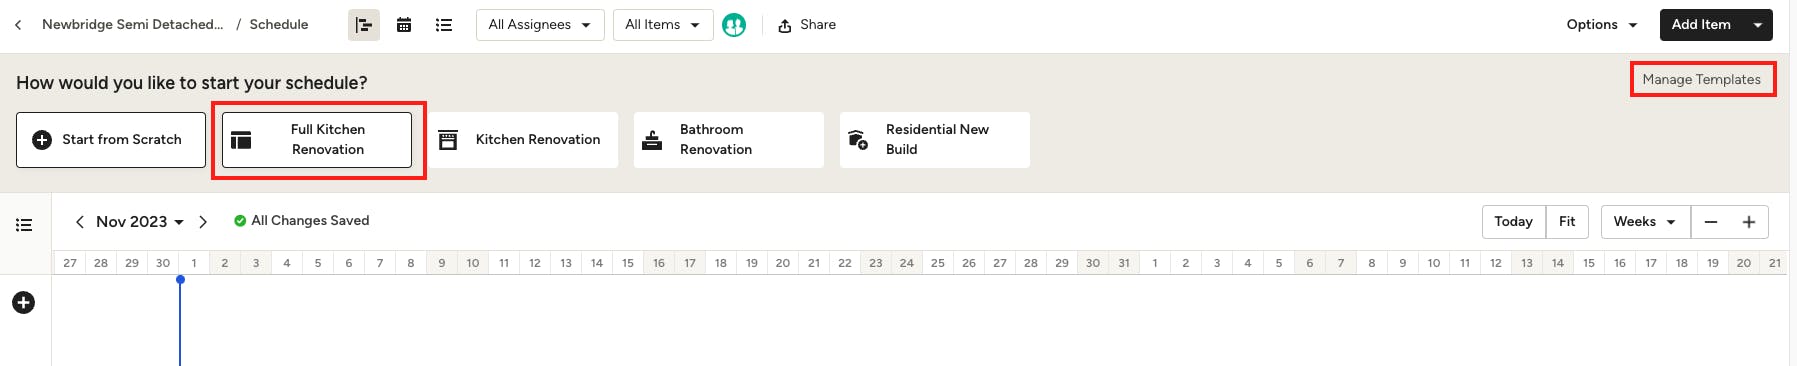
How to Use a Custom Template
If you want to use a custom template you've already created, create a new project (or open an existing project) in the left navigation, and select Schedule from the left-hand menu. You will see all of your saved templates on top of the schedule — your custom templates will always show first.
If you would like to delete or rename custom templates you've created, select the Manage Templates link.
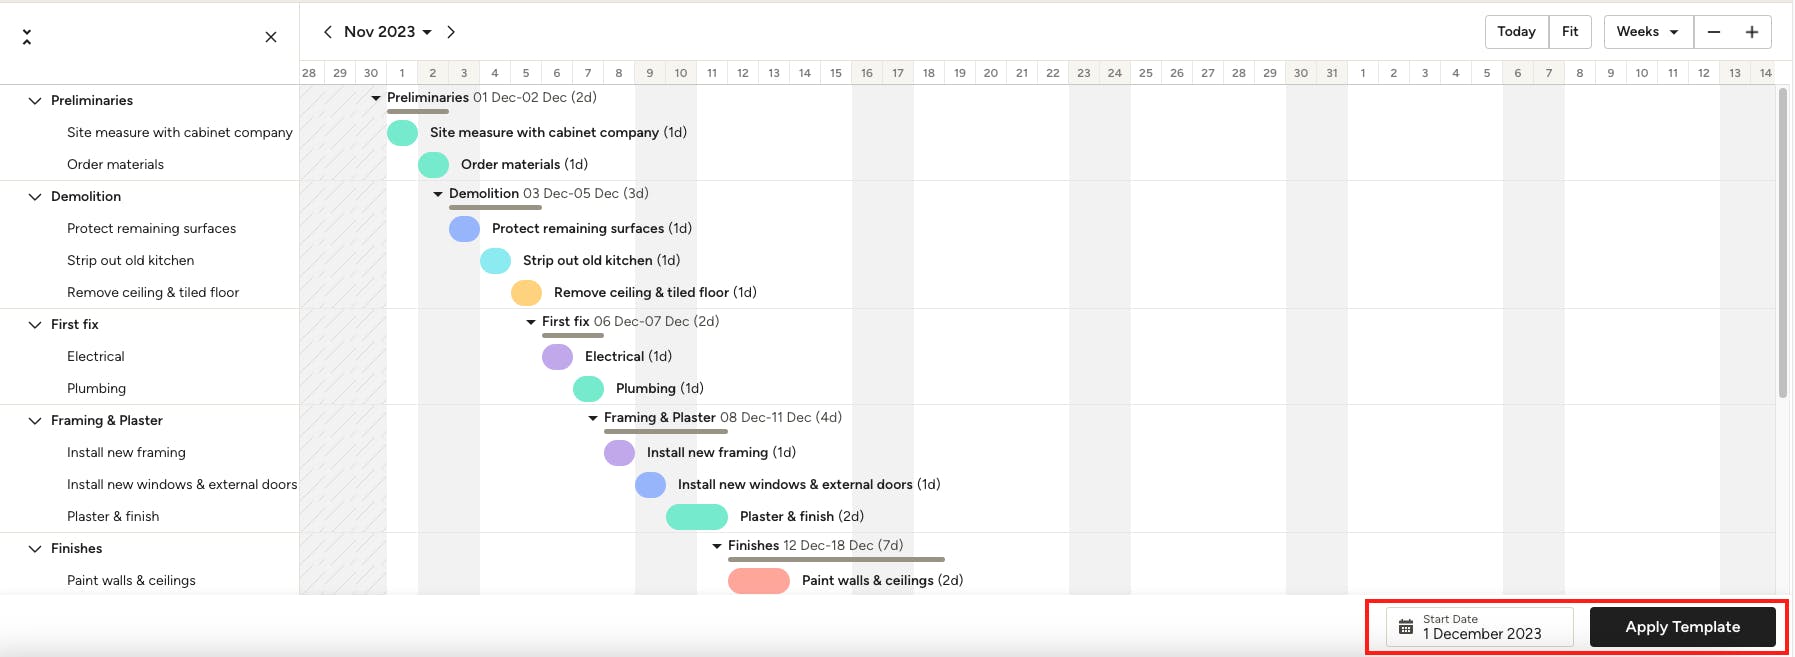
When you select your custom template, you can then select the start date for the project at the bottom of the screen. Go to the proposed start date and select Apply Template. Now, everything you have saved on your previous schedule will be applied to the new project, and you can adjust individual items, tasks, and dependencies to suit that project.

How to Use a Preset Template
Not sure where to start? No problem — we also have several preset templates to choose from. For general contractors/builders, you can select from Kitchen Renovation, Bathroom Renovation, or Residential New Build. For designers, you can select from Interior Design (with construction elements), Interior Design (no construction), or Full Home Renovation.
Preset templates show at the top of your schedule. Your custom templates will show up first, followed by the preset templates. To create your schedule, just select your preferred template, fill out the start date at the bottom of your screen, and click Apply Template. You will then be able to adjust phases and items if needed.
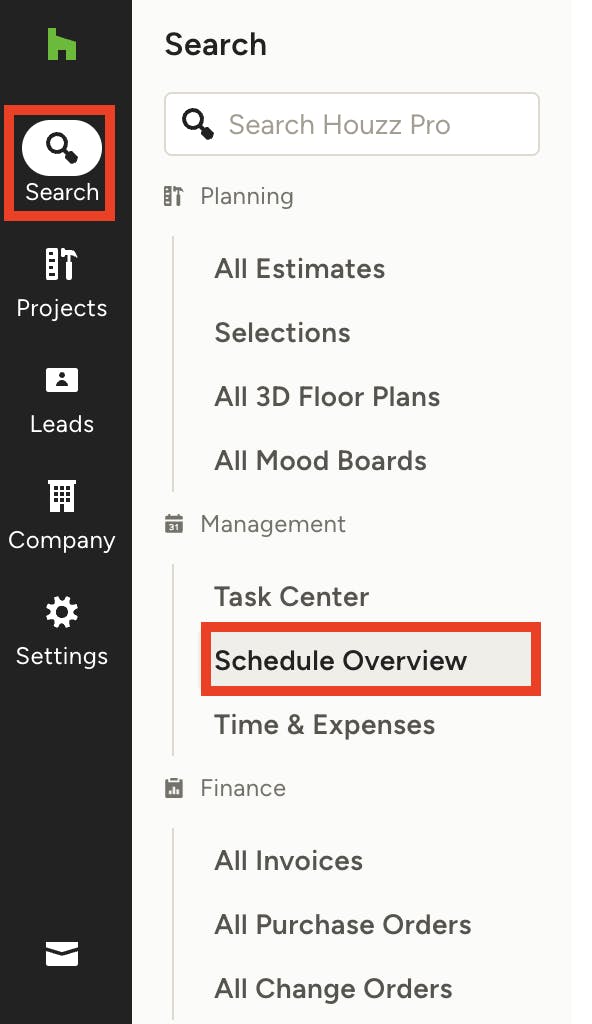
View Schedule Overview
In the Schedule Overview section on desktop, you can view a detailed breakdown of your scheduled items across all your projects. This big picture overview quickly allows you to see the phase each project is in so you can keep everything on track.
To access, select the Search icon in the left-hand navigation, and click on Schedule Overview.
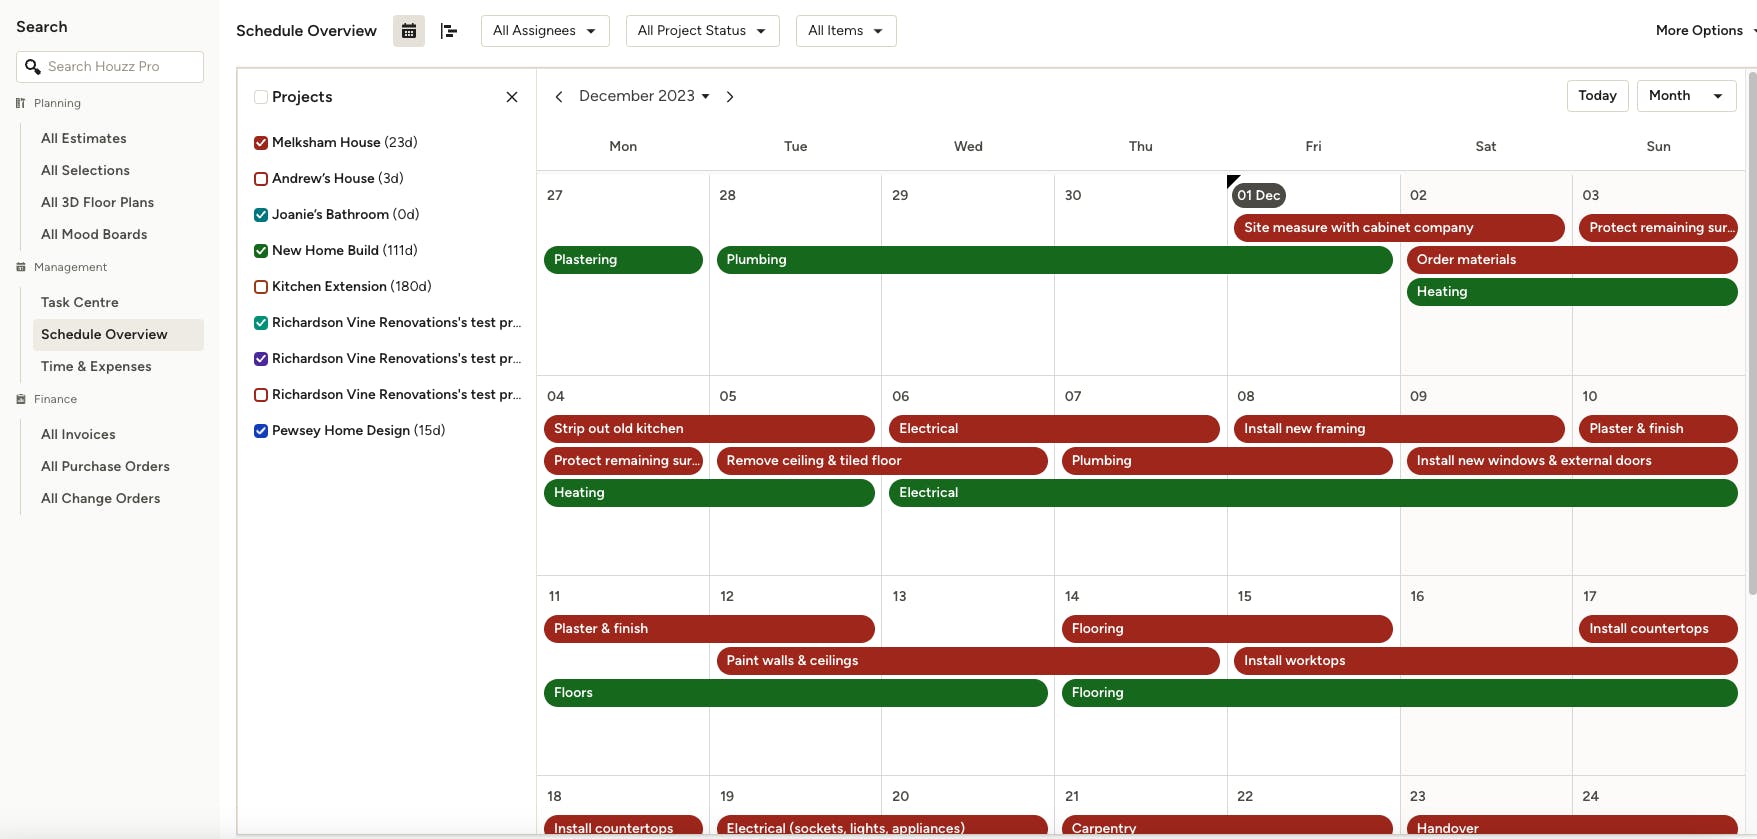
In Schedule Overview, you can easily customise what is shown. On the left, you can turn on and off the projects you see by clicking the check marks. On the top, you can select to view your schedule on a daily, weekly or monthly level. You can also filter by assignees, project status or items.
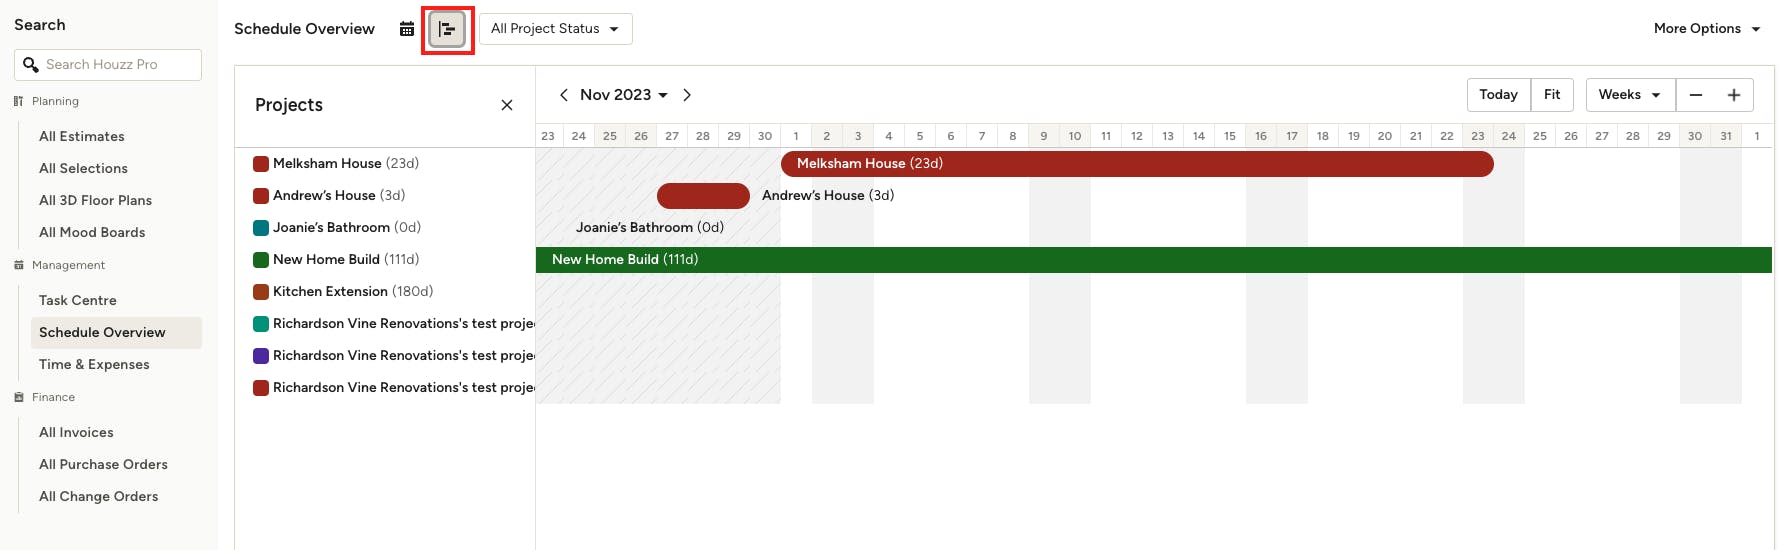
Schedule Overview is also available in the Gantt format, if you prefer. Within this view, you can even view projects on a quarterly or yearly basis for a higher level overview.