Make Your Own Prints for Pillow Covers and More
See how to use the humble potato to make custom patterns that suit your style

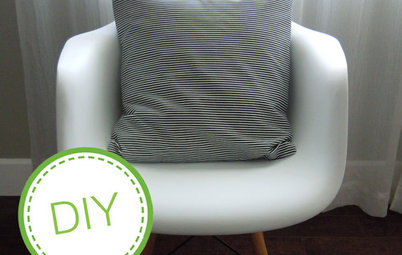
One of the best things about a DIY project is that you get to create the perfect product for you. I love this because I find that a lot of things available in stores are only almost perfect. For example, I searched unsuccessfully for my ideal pillow covers: simple and stripped down but still patterned with darker colors. So I finally decided to make them myself. Follow these four steps to create elegant pillow covers with a simple potato print.
Materials
- Potatoes
- Craft knife or sharp paring knife
- Textile paint (I used two shades of Palett textile paint)
- Plate or other shallow container
- Scrap fabric for testing and pressing
- Paintbrush (optional)
- Newspaper or other padding (optional)
- Natural fabrics such as linen and cotton, or bed and kitchen linens such as pillow shams and dish towels
- Iron
1. To make your potato stamp, cut the potato in half. With a small, sharp knife, shape each potato half however you want. I suggest simple geometric shapes such as triangles, squares or stripes. Always use caution when working with cutting tools.
2. Spread the paint on a plate or other washable, shallow container so that you can easily get an even layer when you dip in the potato stamp.
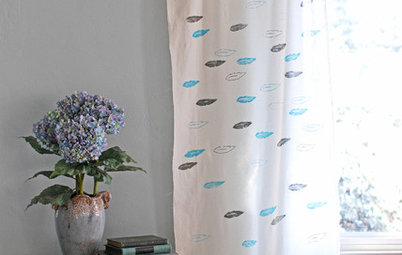
Do a trial run on scrap fabric (or paper). Adjust the amount of paint and pressure you use on your potato stamps to discover the effects you like best. Here you can see how I’ve tried a few techniques before deciding on my favorites: The top left is a striped potato print, the top right is an imprinted leaf, the bottom left is a triangular potato print, and on the bottom right are freehand brushstrokes.
3. If working on a multilayered textile, such as a pillowcase, insert newspaper or other padding between the fabric layers to prevent the paint from bleeding through. Here you can see how I’ve used the same stamp in different directions to create a more interesting pattern.
If you like the look of a regular pattern that fits neatly within a border, adjust the size and spacing of your potato stamps to fit your design.
If you like the look of a regular pattern that fits neatly within a border, adjust the size and spacing of your potato stamps to fit your design.
4. Allow the paint to dry. I think it looks nice when the colors vary in tone due to the different amounts of color left on the stamp as you go. However, this also leads to the paint drying unevenly, so leave the textile lying flat for at least an hour. When the fabric is dry, heat-set the color by ironing the back of the fabric for about three minutes on a fairly high heat setting (the same as for cotton) with a piece of scrap fabric in between. Once the color has set (and unless otherwise noted in the care instructions), you can wash your textile in warm water (104 degrees Fahrenheit, or 40 degrees Celsius).
Done!
The end result is very personal because you are the designer who chose the shapes and colors.
Browse more DIY projects on Houzz
The end result is very personal because you are the designer who chose the shapes and colors.
Browse more DIY projects on Houzz


Sponsored

Sponsored
Once you’ve started making your own prints, you’ll probably find yourself wanting to do more. You can use your favorite shapes and motifs, a personal monogram or invent something new.