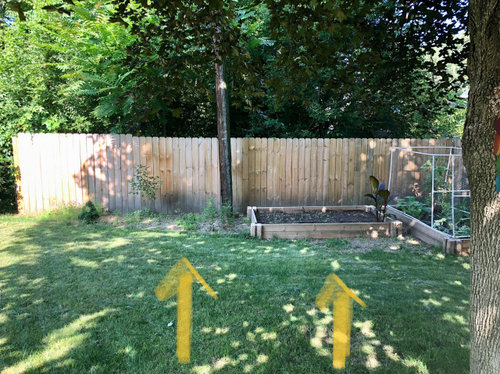
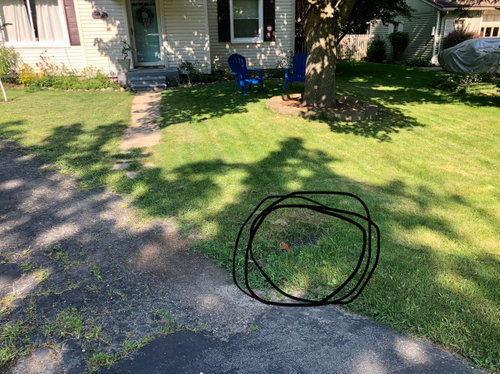
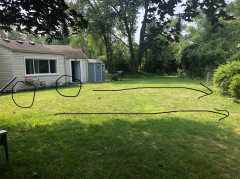
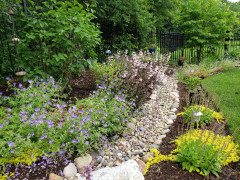
Rain Garden(s) on Shady Lane
Ryan in A2
2 years ago
last modified: 2 years ago


Featured Answer
Sort by:Oldest
Comments (10)

Susan Bryan
2 years agoRelated Discussions
Boring fence... Suggestions please!
Comments (38)Here's what we did to cover a metal fence that surrounded us. We had an ugly (but brand new) Stratco metal fence that borders the rear house, plus down two sides of the house. Everyday that I looked out onto this metal fence from the kitchen window (with the view of the neighbours over the top of this fence) it became more unappealing, the more we dreamt of a vertical garden instead, but we knew that would take time or a lot of expense, and I couldn't wait that long for that fence view to disappear from view. The solution was some wicker fence cladding, we bought it in 1.8m high by 3 metre rolls from Bunnings (big hardware chain in Australia for those OS) for $30 per roll, it came in a variety of sizes, but we needed that to cover our metal fences. You can do this with a brushwood fence, or to create a barrier from the heat of fence to your plants, you can even clad your fence in what my husband calls "blue-board", it's a thin fibreboard, cheap to buy, in almost any size, it can handle any harsh outdoors, & you can render over it in, paint over or colour the render in any colour you like - a light sand or cream colour will look nicer against any green living vertical garden you choose to put in. My husband made a wooden treated-pine frame around each metal fence panel, and screwed the wicker fence covering to it, with a washer so it held on the uneven twigs that formed the wicker cladding. My husband did such a good job of this, we had a small tornado come through our suburb, winds up to 200km/hr -4 of our closest neighbours lost significant parts of their tiled rooves, but all we lost was one of the stratco metal fence panels, but not the twig fence screwed to the frame my husband made! It helped we were nestled with neighbours in rear & front strata subdivided blocks, houses beside & behind us.. but that wicker twig fence covering & the frame did survive our tornado. Here's what we did on the ground - You can see it a little in the photo's above; as ground cover (with some stone you can get delivered or they often loan you a trailer when you buy a load or 2) we had a couple of cubic metres of ord river stone delivered (mixed sizes) brought it out the back by wheelbarrow, laid it over some weed mat on the ground, creating like a dry river bed effect beside the decked paths down the sides that connect the front and back decks. On the far wall behind the cubby and the slow growing variety of bamboo, we planted several cutting of a friends Ivy that was like a green waterfall over her boundry fence. Within a year, with mains watering (on a timer with misted sprinklers for 5mins once a day that does all our potplants and the side & rear gardens too) we had our own green waterfall, we cut it back when it's long green tendrils start growing along the gound towards the house. A fantastic effect that is very hardy, and cost us nothing! We don't have the wicker fence surround down that side of the house as we don't see the ugly metal fence at all now. In the hottest parts of our summer (up to 46-47C degrees), a few of the ivy's leaves get burnt around the edges, but it's easy just to cut these off. We planted a smaller leaf, much slower growing ivy (on the right in the photos) in the ground on the back fence beside the wicker fence surround, and put up some wire horizontal lines for the ivy to grow along. The 2 bottom photo's are taken 1 year apart so you can see how much it's grown. If you put vines in pots, you will limit (or control) their ability to cover your fence. We cut holes in the weed mat, and planted about 4 native violet ground cover plants. The effect is quite beautiful now, in the heat of summer, the native violet wilts when it's thirsty, but always comes back when it's watered and after summer. We've also put several plants in pots along the fence line to create our garden "oasis" out beside the back deck and down the side (creating garden view from each of the bedroom windows as well as from the kitchen window out the back). We cut some lattice & this blocks out the view of the rear neighbours completely, plus with shadecloth backing on the lattice, it also protects the cafe blinds that surround our back patio from sun damage in summer when they are rolled up in summer. So whatever you plant along the fence, you'll need to create a narrow garden bed in the ground for it to grow well from (we bordered our garden beds along the side fence with narrow 25mm wide limestone blocks or perhaps with railway sleepers or you can buy coated tin garden bed border), most plants or creepers will thrive if they room to spread their roots, even if the fence is hot. There is a small leafed creeper (planted in ground), that sticks to the vertical surface, It has completely covered our stone pillars out the front garden, next to our front gate that looks fantastic - Can't recall what it's called though?? It's taken about 5 years to cover the pillar, but we only planted one (wish we'd bought more now, I've looked but can't find any more of it). We put 3 mid sized chinese jasmin's down the side (behind where the first photo was taken), in narrow in-ground garden beds down the other side of the house. It took a couple of years for these to take off and spread out along the fence line (length of our house), but in the beginning of spring this year they were all in bloom and it created a very fragrant as well as visually appealling cover over and through the wicker fence. The horizontal wire helped so we could wind the jasmin along it as it grew for the best coverage. I wouldn't use those barrels as planters for any vines or creepers, just create a narrow garden bed along the fence line (& beef up the soil quality with sheep or other organic fertilizer,) and even some soil wetter or water crytsals thar will hold the water amongst the roots for up to 3 months, helping any young plants make it out of their infancy so they live and thrive. The water crystals do expand into a gel once they absorb water, so make sure they are well mixed into the soil and buried below the surface around the plants roots for their best effect. The barrels would look better painted, with as mldesign0401 suggested, those strappy leafed plants like the Strelizia's (or birds of paradise), or a tree fern in a shady spot. My hubby also put a variety of herb seedlings into one of those half barrels, put some castors on the bottom of the barrel, as a gift for his Mum, and this way she can move her herb garden about, into the sun as it moves from season to season, in & out of the rain, etc, and she loves it!! Don't forget that a good part of the enjoyment of a garden is watching it grow over time, so beware of mass planting and consider what you plant and how much water and sunlight it gets from season to season. Some of the best advice we had, was have a look at what is thriving around your neighbourhood, ask your friends or neighbours for cuttings, don't be afraid to move plants around if they don't like the first spot you put them in, or if they don't look quite right in that spot. We were also quite ruthless with the plants we bought, chopped several into halves and quarters through the potbound roots (the native violet ground cover, the water-plants, several others), before putting them in the ground, so we spent far less that way. Cutting or chopping through the roots with a knife or shovel, cleanly instead of tearing them apart seems to traumatise the plants far less from my experience. We have an Orange Trumpet vine that does very well here in Perth in WA, but as it can handle WA's heat and still thrive, it might be good idea for someone else out there in Houzz reader land.. ,,although, it does take up a lot of real estate when it's completely covered a fence, it needs room or regular haircuts once established. Looks very impressive in bloom though! We have Wisteria along our front wall, we have trained it along the front boundary fences, it's tendrils of new growth need regular haircuts, but even though it prefers horizontal trellis's or an arbour, over a few years, we have succeeded in taming it onto vertical green fencelines. In spring, when the flowers drape like grapes on a vines, it's just gorgeous, even when it's just the green living walls, it's so much nicer to have living walls and to be surrounded in vertical garden (& that's why for me the fences that usually contain us, transform the space to make us feel different about the spaces that surround or contain us). Using lighting will create a different mood & effect after dark, spot lights or those bollard lights at ground level, and if you lay the wiring (or solar if it gets enough sun) when you're making the garden beds, putting in the plants at the same time, you'll be glad you did later on once everything has started to take off. Or you buy enough fairy lights to do the length of the fence line if you have outside power close by or can hide an extension cord somwhere. I love the sharing ideas and the stories side of this site, I need some help with a structure for shading our front deck by the pool; our West Oz summer sun is scorching- I'm sure the houzz community will have some ideas & photo's that will help us......See MoreWhat to do with our massive backyard?
Comments (30)Analysis first, then plan, as Tookoo recommends. Use native plants, as neotoma recommends. Get specific plant recommendations locally, as Terri & sgelade recommend. Here is my two cents worth, for the shortterm. a. Remove and stockpile the lawn edging and most of the mulch back against the fences. b. Take a can of spray paint, or a bundle of surveyor's flag, and mark the largest circular or curved form that will fit within the fenced areas, no matter where the trees stand (inside or outside of the line) to form the temporary edge of your lawn area. See if the entire family agrees on the alignment or just do what looks best to you as the Senior Gardener. c. Add the wood edging to the new edge, or, it will look a lot better if the edge is not visible, using a steel edge whose top edge is down just above the grass roots and no longer visible, and not an impediment to the lawn mower. (when you form the plant beds, you will dig down a couple inches at the edge, where it meets the steel, and then slope the bed up from there, and the mulch will be contained at the level of the lawn, beyond) My recommendation, after you call in your landscape advisor, is to fill the beds totally with ground cover, beneath the shrubs, so no mulch will be seen after the two years of plant growth, using only a finer textured mulch which will become part of the soil bed. (Maybe the bark mulch will smell good in your new fire pit, along with the wood edging.) d. Plant the entire area with grass seed or sod and enjoy the beauty. The curved edge will make the space appear and feel larger and will decrease the maintenance of the smaller bed areas. On the subject of tree placement: analyse first, then plan. Look at all the views beyond your fenceline from all windows of the house, the living/ dining areas, all the bedrooms, to enhance the good views and to block the big, the bad, and the ugly. The large trees on your list will block views from the upper windows, The small horizontally branched trees will be a piece of sculpture in your downstairs view throughout the year, while their flowering and fragrance yet another reason to be alive. For instance, if you have an attractive small tree that has attractive flowers and foliage, PLUS has attractive bark color and has a sculptural quality in the off-season, you won't have to visit the museum quite as often, with a sculpture garden right out your window....See MoreGardening advice
Comments (9)Regarding breaking up clay. I've started many new beds, some on clay. Buying in topsoil is not optimal, because it comes with weeds, so get the best you can afford from a reputable supplier. Order in the first lot of compost, after that make your own. Being in a rural area, get some manure too. Ask around where to get the cheap stuff. Ok. Put gypsum or clay breaker directly on your clay. Here's a link all about that. One guy is not in favour, but my plants grew well with it. Go easy on the manure, for two reasons. Native plants don't like it much. They definitely don't like too much fertilising. Also, this time of year, new growth can be burned by frosts, so Spring is fertilising time. The purpose of the manure is for adding organic matter to the clay, so put it on top of the gypsum. Scatter some sand too, not beach stuff. Scatter a little wood ash, if someone you know has a fire. Then add your soil/compost mixed. Pop some earthworms in too. When you plant your plants, fill the planting hole right up with water and let it drain down. Then plant. Give the plants another watering. Lay thick newspaper in between the plants, as in just open out the whole paper , and lay it as is. This will stop weeds coming up. Don't let it touch your plants. Cover the beds with mulch. If you're in outlying area, go for stone, as it won't add to the fuel load in a fire. Organic mulch is fine in an urban area, and will rot down to improve the soil. https://www.google.com.au/search?q=How+to+break+up+clay%3F&ie=UTF-8&oe=UTF-8&hl=en&client=safari...See MoreCLOSED: Vote & Comment to win a Sheridan Gift Pack (RRP $750)
Comments (111)COMPETITION CLOSED! Thank you all for voting & commenting in our Sheridan Gift Pack Competition! Please see the winner here. Congratulations to our winner & Happy Mother's Day to all our wonderful Houzz mums!...See MoreSusan Bryan
2 years ago
Ryan in A2
2 years agoRyan in A2
2 years agoRyan in A2
2 years agoSusan Bryan
2 years agoSusan Bryan
2 years ago
kimjapinga
2 years ago PRO
PROVan Zelst Inc
2 years ago

Sponsored
l pinkmountain