Project Of The Week
Architecture
Small Moves, Big Impact: A 1970s Brick Home Reborn for $200,000
See how an Adelaide architect reworked a small, awkwardly laid-out home into a haven of gum greens and Californian vibes

In this Q&A series, we turn the spotlight on one thought-provoking renovation, redesign or new build each week. Here, Jon Lowe, architect and principal at Jon Lowe Architect, reveals how he reworked a box-standard brick 1970s brick home with just 20 square metres of extra space and a budget of AU$200,000. The result? More light, extra space, natural airflow and a sense of Californian cool.
Facade before works.
What was the house like originally?
A 1970s single-storey cream brick home.
Need more space but don’t know where to find it? Chat with an architect near you on Houzz
What was the house like originally?
A 1970s single-storey cream brick home.
Need more space but don’t know where to find it? Chat with an architect near you on Houzz
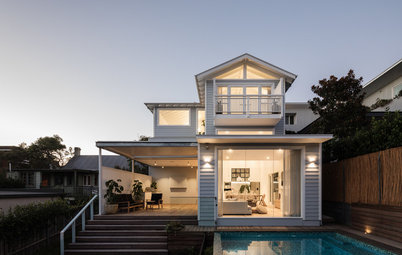
The rear of the house after works.
What wasn’t working for the client?
The kitchen was boxed-in, the dining room faced a cramped gazebo on the western side of the house and there was no connection to the rear yard.
What wasn’t working for the client?
The kitchen was boxed-in, the dining room faced a cramped gazebo on the western side of the house and there was no connection to the rear yard.
The rear of the house before works.
How did the owners want to be able to use the house?
In the father’s words, “We’re a family of four with kids of eight and 10 years, and we like spending equal amounts of time inside and out.
“We wanted to create more space in the house by reconfiguring the internal layout. Knowing that we wanted to stay here for a long time, we decided to alter it to accommodate the kids as they grow”.
Floor plan before works.
What was your brief?
The original brief involved some demolition or alterations of the existing residence, possibly over two stages – an initial minor upgrade and a major renovation/alteration later on.
The project scope included an additional room (infill of the existing carport), modifying the kitchen/dining/living space to create a better connection to the rear yard, opening up the home to the northern aspect for passive heating/cooling, and conversion and relocation of the shed/studio space.
Floor plan after works.
What were the client’s must-haves?
In the mother’s words, “When we saw this house, we thought ‘It’s not perfect, but it wouldn’t take a lot to tweak’. And we didn’t really want to extend because we are both big gardeners and wanted to plant an orchard of trees”.
What were the client’s must-haves?
In the mother’s words, “When we saw this house, we thought ‘It’s not perfect, but it wouldn’t take a lot to tweak’. And we didn’t really want to extend because we are both big gardeners and wanted to plant an orchard of trees”.
The kitchen before works.
Where did most of the AU$200,000 budget go?
On the new addition and kitchen joinery.
How did you keep the budget in check?
By designing a small-footprint extension, working under the existing main roof, and by not touching the bathroom or laundry, which are expensive areas to rebuild.
Where did most of the AU$200,000 budget go?
On the new addition and kitchen joinery.
How did you keep the budget in check?
By designing a small-footprint extension, working under the existing main roof, and by not touching the bathroom or laundry, which are expensive areas to rebuild.
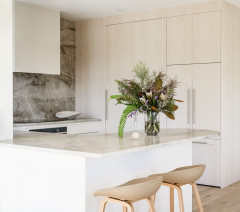
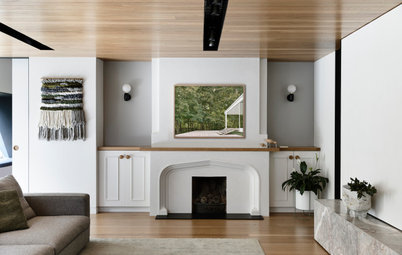
The kitchen after works.
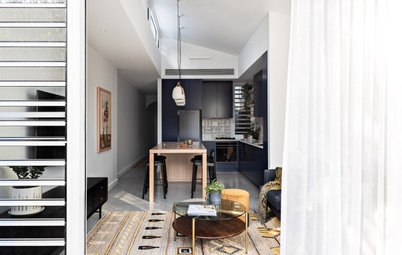
What did you do?
We removed the wall between the kitchen and dining room, created a large new north-facing opening to a new rear deck, and added a window seat in the living room to make it feel bigger without adding floor area, while at the same time massively improving cross ventilation.
We moved the carport to the front driveway and added a second living space under the main roof to give the family extra flexibility.
How much did you add to the footprint?
Around 20 square metres. The extra space is in the new floor area in the second living room – where the original carport was – and the new pop-out window.
Around 20 square metres. The extra space is in the new floor area in the second living room – where the original carport was – and the new pop-out window.
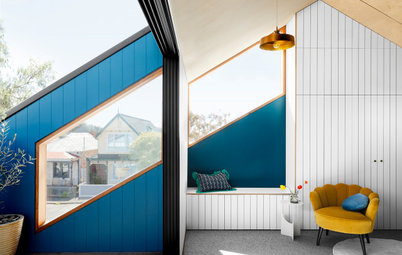
What look and feel did you want to create?
Mid-century Californian.
Mid-century Californian.
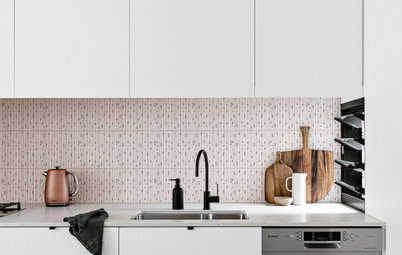
What was your thinking behind the design of the kitchen?
To make the most of the small footprint by locating a large pantry and fridge on the back wall, a sink facing the yard, overhead storage, and a small island to connect the kitchen to the dining area.
To make the most of the small footprint by locating a large pantry and fridge on the back wall, a sink facing the yard, overhead storage, and a small island to connect the kitchen to the dining area.
What was your thinking behind the design for the new carport and deck roof?
They are riffs on retro Californian style, with futuristic curved steel columns, exposed timber purlins and lightweight flowing roofs for the carport design.
They are riffs on retro Californian style, with futuristic curved steel columns, exposed timber purlins and lightweight flowing roofs for the carport design.
What are the main ingredients of the colour and materials palette?
The internal and external materials and finishes we selected both complement the old sandstone and cream brickwork. They also bring the client’s love of native plants to life, with natural hues and gum greens throughout the joinery.
Strawboard internal wall panels and recycled glass benchtops show the client’s commitment to sustainability.
How did you want the palette to look and feel?
Fresh, casual and green.
Fresh, casual and green.
What challenges did you face?
Covid construction delays impacted material and labour supply, but fortunately the project was early enough in the cycle to avoid dramatic price increases.
Covid construction delays impacted material and labour supply, but fortunately the project was early enough in the cycle to avoid dramatic price increases.
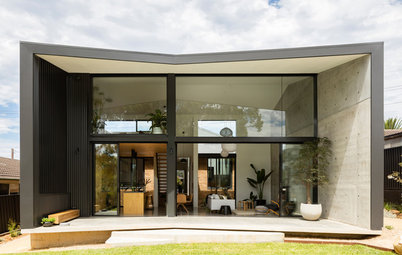
What are the defining features of the house now?
The open-plan living space now connects to both the front and rear yards, with access to northern light for passive heating and cooling.
Why do you think the design works so well?
The new carport and verandah design nods to retro Californian style, while mundane wall cladding such as fibre-cement sheet lining is upgraded with expressed timber battens that contrast well with the original cream brick and sandstone on the facade.
Materials and finishes
Paint colours
- Betta Stone Cairo recycled glass kitchen benchtop.
- Ceramica Tile Jade Zellige tiles on the splashback.
- Hoop-pine veneer kitchen joinery.
- Laminex Green Slate laminate kitchen joinery.
- Spotted-gum decking.
- Pine flooring.
- Painted fibre-cement sheet exterior cladding with timber battens over the joints.
Paint colours
- Dulux Grey Daze on the exterior.
- Dulux Half-Strength Antique White on the interior walls.
Your turn
As you as impressed with this budget-savvy renovation as we are? Tell us in the Comments below. And don’t forget to save these images, like this story and join the conversation.
More
Keen to see another redesign on a budget? Don’t miss this Before & After: A Run-Down Worker’s Cottage Reborn for $100,000


Sponsored

Sponsored
Who lives here: A couple with two children aged eight and 10
Location: Kilkenny, SA
House size before works: 124 square metres
House size after works: 144 square metres
Bedrooms and bathrooms: Three bedrooms, one bathroom
Budget: Around AU$200,000
Architecture and interior design: Jon Lowe, architect and principal at Jon Lowe Architect
Builder: Leske Homes