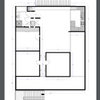
A Personal Elevator Lobby!
Euro Canadian Construction Corp.
6 years ago

Featured Answer
Sort by:Oldest
Comments (13)
 PRO
PROSGDI - Sarah Gallop Design Inc.
6 years agoEuro Canadian Construction Corp. thanked SGDI - Sarah Gallop Design Inc. PRO
PROVerona Home Design
6 years agolast modified: 6 years agoEuro Canadian Construction Corp. thanked Verona Home DesignRelated Discussions
Home lift/elevator advice needed.
Comments (6)First things first, you need to get clarity on the home function and understand the consequences one way or the other, both spatially and financially. If it's about future proofing the function then you can always address this in various ways such as designing in capacity to accomodate lift access, whether it's installed now or later.....the main thing I would be making sure is that either way the home is appropriately balanced from a design point of view, within context and to budget. We regularly address these particular situations/dilemmas via feasibility services that are structured to help resolve the best project direction by demonstrating properly considered viable options and applying hard numbers up to them so people can clearly see/understand one way or the other what is going to be the best approach. Otherwise you're just kind of guessing the big decisions around hypothetical conversations that more often than not are missing other critical/relevant factors or constraints involved. If you're interested in discussing professional assistance with this please get in touch. These projects are significant investments and our advice is make sure you seek good design advice as early as possible in the process. Cheers PD :)...See MoreFloor plan feedback needed
Comments (23)yes on closer look I'd agree with 3D re master layout, but of course it is personal preference......it seems a little strange walking through a robe before accessing a main master space - I think this part of the issue with the upper layout in that you've got master zone directly next to the 2nd (kids) living area and what this is trying to achieve is appropriate separation, which it does, but arguably not managed as well as it could be. I like the lobby idea, but ideally the master should come off the lobby and then maybe then access the ensuite via the WIR if you need.....IMO it's worth considering other layout options in this area - it's like it's a tight site flow solution that's being forced because of the scale, when a master suite for a residence such as this should not feel odd or awkward. but properly balanced....perhaps the answer is something like flipping the master and Bed 3 positioning so the Master access is more direct via a lobby and the Bed 3 is more appropriately zoned like the others...various pro's& cons to weigh up one way or the other...See MoreIssue around Gap between Neighbour Wall and Retaining Wall
Comments (6)oklouise: I appreciate your idea. Sounds good. This is the access which is on the northern side of our lot. Access to the back of the property. The lot is E-W rectangular plot. The access upto the gate would be frequented by meter readers from the front of the property. The gate comes as shown after the down pipe with the hinge on the pole affixed to my wall while the other pole goes butting with the retain wall and as the fencing guy has told me he will put in non expandable grout to hold the pole in place and there would be a bare 5-10mm gap between the neighbour's wall and the pole. The gate would open inwards into our property so as u look into the photo the gate open inwards right. Also I could not gather the concrete bit maybe concrete language is hard for me to understand. i will ask my landscaper but if youcan shed some more detail for the approach that would be very much appeciated kindly. We are not planning to concrete but if that is a way then we can think. We are actually planning to put in thick liimestone steppers and decorative stones. Any other fair ways/ideas for landscaping on this stretch is welcome...See MoreWhy Custom Die Cut Stickers Are Perfect for Your Artistic Journey
Comments (0)When it comes to expressing your artistic vision, nothing quite compares to the versatility and uniqueness of custom die cut stickers. These adhesive wonders allow you to bring your imagination to life and add a touch of magic to any surface. Unlike traditional stickers that come in standard shapes and sizes, custom die cut stickers can be personalized with intricate designs, contours, and patterns that perfectly complement your artistic style. The beauty of custom sticker sheets lies in their ability to enhance the visual impact of your artwork. With their precise cutting technique, these stickers can be tailored to fit any shape or form you desire. Whether you're creating a bold statement piece or adding subtle details to a larger project, custom die cut stickers offer endless possibilities for elevating your artistic journey. They not only serve as eye-catching embellishments but also provide a seamless integration with various surfaces - from canvases and sketchbooks to laptops and mobile phone covers. Step-by-Step Guide: Creating Your Own Custom Holographic Stickers Prepare to embark on a mesmerizing journey as we delve into the enchanting world of creating your very own custom holographic stickers. With a dash of creativity and a sprinkle of inspiration, you'll soon find yourself immersed in the captivating process of designing unique stickers that will add an irresistible sparkle and shine to any surface. 1. Unleash Your Imagination: Begin by envisioning the design you wish to bring to life. Let your mind wander freely, exploring vivid colors, intricate patterns, and whimsical shapes that will make your holographic stickers truly one-of-a-kind. Remember, this is your chance to unleash your inner artist! 2. Sketch Your Vision: Grab a blank canvas or simply a piece of paper and start sketching out your ideas. Allow the pencil to dance across the page as you refine each stroke, bringing your design closer to reality with every line. 3. Embrace Digital Magic: Once satisfied with your sketched masterpiece, transfer it into the digital realm using design software such as Adobe Illustrator or Canva. This step enables you to fine-tune details and experiment with different color palettes before finalizing your design. 4. Select Holographic Materials: Now comes the exciting part – choosing from an array of mesmerizing custom die cut stickers materials! From silver prism foil that radiates celestial vibes to rainbow iridescent film that reflects ethereal hues, let these materials fuel your imagination and elevate your artwork. 5. Print with Precision: Find a trusted printing service equipped with state-of-the-art technology capable Discovering the Magic of Custom Stickers Imagine a world where you can transform any surface into a canvas for self-expression, where the mundane becomes extraordinary with a simple peel and stick. Custom stickers are the enchanting tools that make this creative realm possible, captivating both the young and young at heart. These miniature works of art possess an uncanny ability to bring joy, ignite imagination, and evoke emotions. Whether adorning your laptop with vibrant designs or embellishing your water bottle with witty slogans, custom stickers have an inherent charm that adds personality to the objects they grace. From whimsical illustrations that transport you to fantastical realms to motivational quotes that inspire daily triumphs, these adhesive wonders possess an almost magical quality. They serve as visual storytellers, conveying messages and capturing moments with a single glance. Conclusion: In conclusion, custom holographic stickers open up a world of endless possibilities for unleashing your inner artist. With their sparkling and shining qualities, these stickers have the power to transform any surface into a mesmerizing work of art. By following the step-by-step guide provided and tapping into your creativity, you can truly bring your artistic visions to life. Whether you use them to embellish your sketchbooks, personalize your laptop, or decorate your walls, custom holographic stickers are sure to add a touch of magic and wonder to your artistic journey. So go ahead, let your imagination run wild and make every surface sparkle!...See More PRO
PROEuro Canadian Construction Corp.
6 years ago- PRO
Euro Canadian Construction Corp.
6 years agolast modified: 6 years ago - PRO
Euro Canadian Construction Corp.
6 years ago - PRO
Euro Canadian Construction Corp.
6 years agolast modified: 6 years ago 
User
6 years ago PRO
PROOTM Designs & Remodeling Inc.
6 years agoEuro Canadian Construction Corp. thanked OTM Designs & Remodeling Inc.- PRO
Euro Canadian Construction Corp.
6 years ago


User