Popular Houzz Series
Popular Houzz Series
Appears in
See also
Fun HouzzFrom The ProsHouzz Around The WorldProject Of The WeekStickybeak Of The WeekQuizzesCreatives At HomeAt Home With...Best Of The WeekRoom Of The WeekDesigner Profiles3 Things I Wish My Clients KnewHow Do I...Buyer's GuidesExpert EyeInnovation AlertSo Your Style Is...Spotted!Picture PerfectBefore & AfterBudget BreakdownHome TimeMade Local

How Do I... Paint My Ceiling?
Transform your ceiling with a beautiful colour and a flawless finish – a paint expert reveals exactly how to go about it

In this practical series, we ask experts to answer your burning home and garden questions. Here, Andrea Lucena-Orr, Dulux colour and communications manager, reveals how to paint your ceiling for a professional-looking finish.
What’s good to know when choosing a ceiling colour?
- Darker colours will cosy up a space but tend to show more imperfections in the ceiling’s surface.
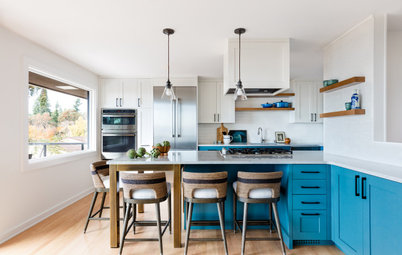
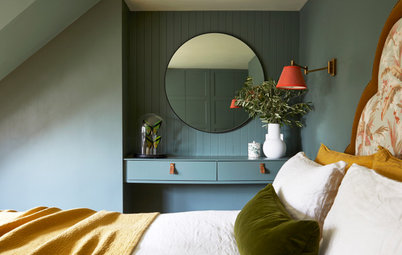
- A dark colour on a ceiling can be incredibly dramatic, working to frame a great view in a way that a white ceiling wouldn’t.
- Lighter colours are more forgiving and will help bounce light around the room and make it feel brighter.
I’ve heard decorators talk about ‘half-strength’ and ‘quarter-strength’ paints – what do they mean?
This relates to the strength or intensity of a colour. Often a decorator will choose a colour for the walls and then specify the same tone, only lighter or less intense, for the ceiling by asking for the colour in half or quarter strength.
You end up with walls and a ceiling that relate to each other colour-wise, but the ceiling is slightly lighter than the walls.
I’m thinking of taking the ceiling down onto the walls – will it work in my room?
I’ve seen this type of feature done many times and it looks really creative and exciting – it can make a wonderful feature in a room, particularly when the ceilings are high.
I’ve seen this type of feature done many times and it looks really creative and exciting – it can make a wonderful feature in a room, particularly when the ceilings are high.
How do I prep for painting a ceiling?
- Remove furniture from the room.
- Lay down a drop sheet or sheets to protect your floors (use proper drop sheets rather than old bed sheets, as paint will often soak through).
- Mask skirting boards, window trims, around light fittings and vents with painter’s tape.
- If the ceiling is already painted and in good condition with no stains or mould, you shouldn’t need an undercoat. Ensure the surface is clean, dry and free from dust, oils and grease before you get going.
- If you are painting a bare, unpainted ceiling, you’ll need to apply one coat of acrylic-sealer undercoat before you apply your paint colour.
- Paint the ceiling first before moving onto walls. This way, you can easily cover any accidental roller splatters or errant brush strokes when you get to the walls.
How should I prep if my walls or ceilings have mould, stains or cracks?
- Remove mould with a mould-killing solution applied to the surface with a scouring pad.
- Leave the solution on the surface for 15 minutes then wash with clean water and wipe dry.
- Several applications may be necessary to remove stubborn mould blooms.
- Remove stains with a specialist stain blocker to prevent them from migrating through your topcoat and reappearing in your new paint job.
- Patch any cracks and holes with a suitable filler or sealant.
- Lightly sand down the surface to a smooth level and dust off.
- Apply one coat of acrylic-sealer undercoat over repairs before you apply your chosen paint colour.
What tools do I need?
- A high-quality synthetic filament brush for cutting in and a medium-nap (10-18 millimetre) synthetic roller.
- A roller tray.
- A roller-extension pole (this will allow you to paint the ceiling without bending your neck back, which can be awkward and uncomfortable).
- Quality painter’s tape.
- A step ladder. This ladder size is generally sufficient if you’re using an extension pole. Just make sure you’re not standing on the top step of the ladder as this can be dangerous. If you are, get a longer ladder. Always check the side of the ladder for the appropriate jobs and weight.
- Safety glasses to protect your eyes.
How many coats do I need and how long will it take?
- If your ceiling is already painted white, is in good condition and has no stains, cracks or mould, you will not require any undercoats. Therefore, two coats of paint, with two hours’ drying time between each coat is recommended.
- The average ceiling takes about 30 minutes to paint (depending on the size of your ceiling), plus drying time between coats.
- A benefit of using a premium ceiling paint is that less coats are required due to higher opacity paint that creates better coverage.
Tell us
What colour would you like to paint your ceiling? Tell us in the Comments below. And remember to like, share and save this story. Join the conversation.
More
Feel nervous about painting your ceiling? Find a local painting professional who can do it for you.
What colour would you like to paint your ceiling? Tell us in the Comments below. And remember to like, share and save this story. Join the conversation.
More
Feel nervous about painting your ceiling? Find a local painting professional who can do it for you.


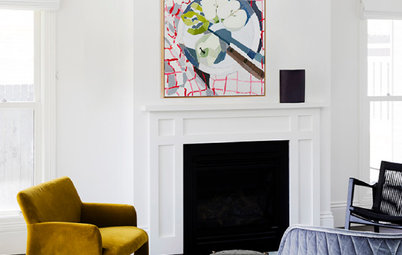


What’s the best paint colour for a ceiling?
Colour is very much a personal choice, but many home enthusiasts will choose a bright white for the ceiling.
If you want to give your room a cohesive look or if it doesn’t have cornices, it can work well to choose the same colour for your ceiling and walls.