Cooktop and downdraft together on counter?
Ignited bot 2.0
3 years ago
Featured Answer
Sort by:Oldest
Comments (12)

siriuskey
3 years ago
dreamer
3 years agoRelated Discussions
HELP! Redesign my kitchen...an afterthought in a 1924 miner's cottage
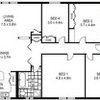
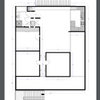
Comments (19)EXAMPLE #1: L-shape, Table & Chairs, Remove Bench for Fridge and More Counter * Your Back Door: where they have large ceiling to floor window. * 1st Counter Along Window Wall: counter top with sink under window, and upper cabinets over counter on either side of the window. * Turn to Right Side and Create 2nd counter: put your full stove where this picture has a cook top. * Removed closed wall so your kitchen is open to the hall. * With this expanded "wider" space that combines with the hall, you can put a round table with four chairs. (Almost where they have their "counter island". * In your diagram, to the left of the door is your bench. If you have a table & chairs in the "wider" space, could you remove the bench? * On the wall where the bench was: a. put a fridge, b. build a counter with cupboards overhead. ********************************************************************************************************************* Example #2: U-shaped Kitchen In this photograph, beginning from the left-side corner: * Back door. * Fridge (theirs is built-in / too expensive for me / just put a fridge with freezer). * 1st Counter: Your sink under window. * Right turn: 2nd Counter: Stove (they have stove-top and built-in own below). * Since a full fridge & freezer is beside the door, you can use a longer counter to the right of the stove. * (Ignore their sink in this picture.) * 3rd Counter with cupboards below and above. * Remove bench. Along the "removed bench" wall: a. buy an "island" on wheels with chairs; b. when you are alone you can use this table-top for large cooking projects; c. use the island and chairs for eating; d. use a chair to change your shoes coming/going into the backyard. ******************************************************************************************************************** EXAMPLE 3: L - SHAPE * Remove lift-top freezer. * Keep sink under window. Have counter on both sides of the sink. * Counter on the right. * On this second counter, put stove (they have a stove-top and built-in oven). * Remove the wall so the kitchen and hallway are combined. * Move the fridge against the Bedroom #1 wall (on the kitchen side). * On the bench wall. Make the bench smaller so it will fit under a kitchen table. Use the table top for food preparation. When you have company, pull the table away from the bench so you can sit on the bench and use the table. With a small bench, you can put a table on this wall. Build the bench in a U-shape. Put baskets or wood boxes underneath to keep your boots and shoes. This table costs $99 at Ikea. When it is folded in, it can be used as a counter-top. So you don't obstruct the back door from opening, you can push this table over the bench. When you have company, you can pull-out the table's sides to make a larger table top. www.ikea.com Table Name: BJURSTA Table Description: Extendable table, birch veneer Size: 19 5/8" wide x 27 1/2" deep (when table is folded) x 35 3/8" height x 35 3/8 " (when table is unfolded). ******************************************************************************************************************** EXAMPLE #4 If you remove: * the lift-top freezer, and * the wall between the kitchen and hallway. * Will you have room to build a counter from where the freezer was into the space that was the hallway? * Move the fridge to the wall against the 1st Bedroom * In this photograph, there are many "fancy extra" to ignore (i.e. built-in ovens). I think your stove would be on the counter where this picture shows just a built-in range top. Hope something from these suggestions is a help to you! - K...See MoreCooktop in island bench good for social interaction?
Comments (50)I'm about to put a cooktop on the 2.3 x 900 peninsular (island with only one free end ( in my new galley kitchen. I am using an induction top so it can be fitted flush with the benchtop surface, allowing me to use the whole area as benchtop when not in use. I intend to have bar stolls on the living room side for entertaining. My joiner has suggested making a beautiful, thin timbercover to go over the glass induction surface for added protection. I just need to decide on down draft induction hob or a ceiling casette. My main aim is to remove the smelly cooking smells from my unit. The smell from one evening of cooking indian chicken curry currently lasts at least a week! Any advice?...See MoreKitchen counter / island bench layout - your thoughts please
Comments (15)Hi Lil, I believe your original plan works much better than the revised version. While the notion of ideal working widths is great, the larger problem here is the post. I worked on a project very similar to this last year where a post could either be connect to, or separate from the island. What we found was that by separating the island the space between island and post became very awkward. It's not enough of a space to comfortably walk through or be seated at the island in front of. Instead of your room feeling open and generous in proportion, it is going to start to feel cramped and awkward. We have a kitchen in our showroom (Kitchen Studio Tauranga NZ) with a 6ft gap between bench and back wall and it works wonderfully. It allows someone to work at the sink and a second at the island with ease. Stick with the original plan. It will feel a lot more spacious, without compromising work flows....See MoreWhich kitchen design would you choose?
Comments (62)Hi SonaandDi, In case you haven't come across it, here is the link to my finished kitchen: https://www.houzz.com.au/discussions/5598603/renovation-of-our-1956-red-brick-triple-fronted-home-all-done This layout has the potential for issues, but I tried to factor those in by noting where the fridge doors came to when fully opened. I should have allowed a little more width for the fridge gap, as the theory didn't quite translate in practice: on the plans I allowed the minimum of 20mm either side of fridge, but ended up with only about 13mm (was not fun getting the fridge in!). So my suggestion is to make sure there is 50mm either side of fridge. eg the fridge space is 1000mm wide for french door fridge around the 900mm mark. Even so, my doors do open fully (vegie drawers slide out unobstructed), as the doors themselves sit forward of the nib wall on the right. If your fridge space is wider, you won't need to sit the fridge out the full thickness of the doors, which may look more streamlined. But make sure you allow for 50mm space at the back of fridge. This will decide the depth of your nib wall. I calculated mine as 50mm plus the depth of the fridge to the start of the doors. You might prefer to make it a bit deeper, as the doors have more room to open due to the extra width of the space. It isn't annoying having the door opening over the pantry entry. It isn't often that someone wants to get to the pantry at the exact moment someone else opens the fridge. Even if that happened, you could get past if you couldn't wait: Good luck with your renovation! Because you can't be on site, I would always factor in more wiggle room. Let me know if I can help with any more info - I could talk about this stuff all day long!...See Moresiriuskey
3 years ago
Peter Taylor
3 years agoUser
2 years agoPeter Taylor
2 years agoPeter Taylor
2 years agoUser
2 years agoPeter Taylor
2 years agoUser
2 years agoUser
2 years ago


Peter Taylor