Before & After
Popular Houzz Series
Popular Houzz Series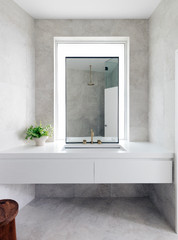
Appears in
See also
Fun HouzzFrom The ProsHouzz Around The WorldProject Of The WeekStickybeak Of The WeekQuizzesCreatives At HomeAt Home With...Best Of The WeekRoom Of The WeekDesigner Profiles3 Things I Wish My Clients KnewHow Do I...Buyer's GuidesExpert EyeInnovation AlertSo Your Style Is...Spotted!Picture PerfectBefore & AfterBudget BreakdownHome TimeMade Local

Renovating
Before & After: A Warehouse Apartment Gets a Dramatic Redo
See how a Melbourne apartment in an old wool warehouse gained more useable space and a reconnection to its past

In this Q&A series, we turn the spotlight on one thought-provoking renovation or makeover each week. This week we speak with Alfie Pezzi, business development manager at interior design firm Studio del Castillo. He reveals how the firm reimagined an inner-city warehouse apartment in Melbourne, creating more practical space and revealing layers of the building’s history along the way.
The kitchen before works.
What is the apartment like?
It’s one of 23 apartments in a warehouse built in the late 1800s.
What state was it in when you came onboard?
It was dated, having last been renovated in the [late] 1900s, and was too small for the owners, with only one bedroom and one bathroom.
What did you do?
We gutted the entire apartment and started with a blank canvas.
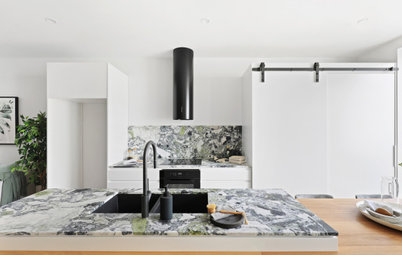
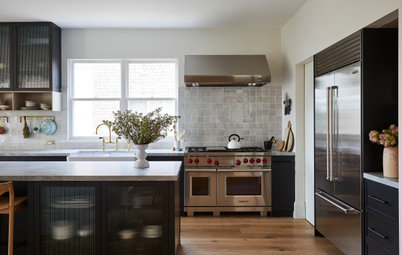
The kitchen after works.
What was your brief?
Searching for an interior designer? Find professionals near you, browse images of their work and read reviews from previous clients
What was your brief?
- Add a second bedroom and an ensuite to the main bedroom.
- Add a functional kitchen.
- Make the home more useable for a young family.
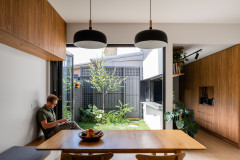
- Create a sense of continuity between the interior and exterior of the dwelling.
- Create an industrial/contemporary aesthetic that harmonises with the property’s aesthetic.
Searching for an interior designer? Find professionals near you, browse images of their work and read reviews from previous clients
The new floor plan.
What were the owners’ must-haves?
What were the owners’ must-haves?
- An ensuite.
- A kitchen that could double as a home office.
- Sheer curtains.
What was the budget?
Around AU$350,000.
Where did most of it go?
On materials and labour (demolition).
Around AU$350,000.
Where did most of it go?
On materials and labour (demolition).
Tell us about the beautiful brick wall
The brick wall had been painted over in white so we had it sandblasted to bring it back to its original state.
The numbers on the wall are original and refer to the street and unit numbers. They were an unexpected discovery we made during the demolition phase. I was thrilled when the sandblaster revealed this ‘artwork’ to me.
The kitchen before works.
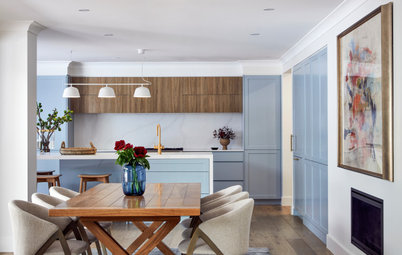
What was your brief for the kitchen?
During several after-hours appointments, it became apparent that the owners have a great love of wine!
This inspired us to keep an open-plan layout that allowed them to create that ‘wine bar’ experience where friends can gather around a raised island bench. We designed the island to accommodate up to eight people.
What was your starting point for the kitchen redesign?
Generous bench space.
What made you choose this benchtop colour?
It was visually arresting and complemented the dark timber tones in the joinery and splashback perfectly.
Also, it was critical for the kitchen colours and textures to create a focal point that offset the sandblasted red brick in the dining area.
The chalkboard wall [next to the fridge] is a great place to write a grocery or wine list and, more recently, for the toddler’s colouring in.
What was your brief for the built-in dining area?
The dining banquette seat created luxurious seating in a relatively tight space, plus a huge amount of drawer storage.
The drawers have been accessorised with handmade leather handles, and the custom-made wall seat padding and scatter cushions add an extra layer of texture and comfort.
The dining banquette seat created luxurious seating in a relatively tight space, plus a huge amount of drawer storage.
The drawers have been accessorised with handmade leather handles, and the custom-made wall seat padding and scatter cushions add an extra layer of texture and comfort.
What was your brief for the living area?
To create an open-plan living space.
What was your starting point for the redesign?
Determining the best location for the TV and entertainment unit; we then worked from there.
We introduced new flooring, furniture and window treatments, along with a new furniture layout.
To create an open-plan living space.
What was your starting point for the redesign?
Determining the best location for the TV and entertainment unit; we then worked from there.
We introduced new flooring, furniture and window treatments, along with a new furniture layout.
Tell us about the room with the glass walls
This is the new second bedroom, which is currently used as a nursery.
We chose glass for the walls and added sheer and blackout curtains (which we did in the main bedroom too) to maintain as much natural light as possible. This solution also allows the rooms’ purposes to remain fluid.
This is the new second bedroom, which is currently used as a nursery.
We chose glass for the walls and added sheer and blackout curtains (which we did in the main bedroom too) to maintain as much natural light as possible. This solution also allows the rooms’ purposes to remain fluid.
The original main bedroom.
What was your brief for the main bedroom?
To create as much natural light as possible.
What was your brief for the main bedroom?
To create as much natural light as possible.
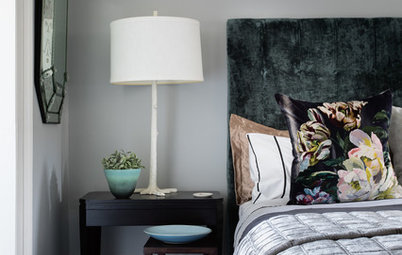
The new main bedroom.
What did you do?
We emphasised the original brickwork, created a new bedhead and added a built-in storage unit, plus a new walk-in wardrobe and ensuite.
What did you do?
We emphasised the original brickwork, created a new bedhead and added a built-in storage unit, plus a new walk-in wardrobe and ensuite.
The second bedroom/nursery.
What was your brief for the nursery?
To make it flow with the main apartment, bring in natural light and create storage.
What did you do?
We created a good-sized room with plenty of natural light and an industrial feel that fits in with the home’s aesthetic, thanks to adding glass and metal-framed walls.
The original main bathroom.
What was your brief for the bathrooms?
To create a second bathroom and give both spaces a contemporary feel.
What was your brief for the bathrooms?
To create a second bathroom and give both spaces a contemporary feel.
The new main bathroom.
What did you do?
We designed two new bathrooms with one accommodating a bathtub. We used black fittings in keeping with the overall industrial direction of the design.
What did you do?
We designed two new bathrooms with one accommodating a bathtub. We used black fittings in keeping with the overall industrial direction of the design.
The walk-in wardrobe in the original main bedroom.
Materials and fixtures
Materials and fixtures
- Polytec Antico Oak Woodmatt laminate on the banquette seating area.
- Polytec Grey Cement Matera on the kitchen island cabinetry.
- Artedomus porcelain panels in Zinc Titanium on the kitchen splashback.
- WK Quantum Quartz Anthracite Six porcelain on the island benchtop.
- Engineered-timber flooring.
- Earp Bros tiles in Gris in the bathrooms.
- Academy Tiles Ice Mosaic tiles in the bathrooms.
- Polytec Venette melamine on the bathroom joinery.
- Reece Bathrooms Roca Inspira basin.
The walk-in wardrobe in the new main bedroom.
Furniture and accessories
Furniture and accessories
- Hail Clear pendants in kitchen from About Space Lighting.
- Temple & Webster bar stools.
- Beacon Lighting Lucci Air ceiling fan.
- Sergio Leather dining chairs from Life Interiors.
- GlobeWest sofa and coffee table.
- La Forma Taniska rocking chair.
- Poulsen bedside table from MRD Home.
- Dulux Whisper White on the walls and ceiling.
- Dulux Domino on the window architraves.
The new ensuite.
Your turn
Which features do you love most in this industrial apartment? Tell us in the Comments below, like this story, save the images for inspiration, and join the conversation.
More
Keen to see another home revamp? Check out this Before & After: A Gentle Modern Makeover for a Queensland Home
Your turn
Which features do you love most in this industrial apartment? Tell us in the Comments below, like this story, save the images for inspiration, and join the conversation.
More
Keen to see another home revamp? Check out this Before & After: A Gentle Modern Makeover for a Queensland Home


Sponsored
Sponsored
Answers by Alfie Pezzi, business development manager at interior design firm Studio del Castillo.
Who lives here: A couple with a toddler
Location: Collingwood, Victoria
Number of bedrooms and bathrooms before works: One bedroom and one bathroom
Number of bedrooms and bathrooms after works: Two bedrooms and two bathrooms
Size of the apartment: Around 140 square metres
Interior design and styling: Penny del Castillo, principal at Studio del Castillo
Builder: Better Bathrooms & Kitchens
Joinery: Seavern Custom Cabinets