Weekend Project: Make a Cool Block-Printed Coat Rack
Hang fall's hats and scarves on great patterned coat hook you can make for less than $40

It’s no secret that crisp breezes and more falling leaves are just around the corner, brushing you toward the cupboard to choose your favourite cardigan. Soon this movement will become routine, and scarves and jackets will be added to the mix.
Personally, it’s pretty rare for me to get these items back on their hangers. My guess is because it requires extra work and setting everything on the table or floor just seems easier: I’m going to wear it again soon, so why not? Well, because soon these piles turn into mountains, and these mountains offer nothing but wrinkled sweaters and lost scarves. I needed a solution.
What I needed were hooks. Hooks in every walkway and room that gathered these piles. But I also needed them to look good. So out came my printing supplies and a table saw and soon I had enough wood to make as many racks as I wanted.
Since I hear similar complaints somewhat frequently, I thought it would be fun to do a block-printed rack tutorial. It only takes about 4-5 hours and can be done in small steps, making it the perfect post-work project. Give this DIY coat hook a try and show us your results in the Comments section!
The first step toward making your own block print is to come up with a design. Since I've gone through the whole trial and error thing, I figured I can share my two cents and hopefully keep you from getting stuck.
My first suggestion is to use a marker with a bold tip when drawing your design. Working with bold marker lines is much easier than brittle pencil lines.
My other tip is to create a shape that is asymmetrical. It took me a long time to figure this one out and I made myself crazy trying to line everything up perfectly when printing. Simple shapes that are organic and asymmetrical are much more forgiving.
Once you have a design you like, you can use a copy machine to re-size it if needed. I find this especially useful if you want to make a print that is fairly large. In my case, I scaled my drawing to 90% so the repeating pattern would fit better on the wood that I had already cut.
Next you can use a pencil to duplicate your design onto tracing paper. After I took this photo, I went over my lines again to make them heavier. At this point, you are preparing to transfer your design onto rubber so you want to be sure that the graphite will easily shift to its surface.
Next you can use a pencil to duplicate your design onto tracing paper. After I took this photo, I went over my lines again to make them heavier. At this point, you are preparing to transfer your design onto rubber so you want to be sure that the graphite will easily shift to its surface.
Now it's time to transfer. Flip your tracing paper upside down so your pencil marks touch the rubber. Use the corners of the rubber to your advantage so you only have to cut off two sides when you remove the extra rubber.
Next it's time to cut. If this is your first time carving, I highly recommend practicing on a separate piece of rubber first. This part of the project tends to take the most patience. I suggest walking away for a bit if you feel like you need to.
Once you finish cutting, trim the edges to make the design as centered as possible. Leave a margin between the design and the edge of the rubber.
Once you finish cutting, trim the edges to make the design as centered as possible. Leave a margin between the design and the edge of the rubber.
So now your block is all carved and you have made sure that the negative spaces are gouged out enough so they don't hold onto any unwanted ink. I always do a test print at this point using a very small amount of ink.
This is a good time to practice rolling ink. Roll it out until you have a thin, even layer of ink. This part can take a little while. Next, roll it onto the rubber as thinly as possible.
This is a good time to practice rolling ink. Roll it out until you have a thin, even layer of ink. This part can take a little while. Next, roll it onto the rubber as thinly as possible.
Turning the rubber upside down, carefully set it on the paper and apply pressure with your palm or fingers. Press firmly enough to transfer the ink, but not so hard that you feel like you're smashing it. After you press a few times, you can slowly pull the block off. Now the test print is complete. At this point you want to look for any unwanted ink lines and carve them away while your block is still inked so you don't miss any spots.
When you are happy with your block, make a hash mark in the center of all four sides. This will help with alignment when you print. Do the same on your wood.
Note: I don't have a photo of the wood-cutting step, but basically you can make yours any size you want and paint it any color you want. Mine is white and measures about 8" x 22". Word of caution: White is tricky because it shows ink smudges.
Note: I don't have a photo of the wood-cutting step, but basically you can make yours any size you want and paint it any color you want. Mine is white and measures about 8" x 22". Word of caution: White is tricky because it shows ink smudges.
By now everything is measured out and you feel good about beginning the printing process. This is the part that you have to work somewhat efficiently so your ink doesn't dry. You can use an ink retardant to slow dry times. Personally, I like to mix my ink to a color I like with a putty knife and put a drinking glass over it to keep it from drying. Roll out a thin layer of ink and get ready to go.
Using my marks as a guide, I always start in the center and work my way out so I can have a straight line to work with throughout the project. When I set the block onto the wood, I put the edge of the block right up to one I already printed. This ensures equal spacing across the entire board.
Be careful not to smudge the drying ink when you're printing! If you find that you're getting ink in places you don't want it, a damp cotton swab can touch it up.
Be careful not to smudge the drying ink when you're printing! If you find that you're getting ink in places you don't want it, a damp cotton swab can touch it up.
And exhale: printing is finished! I have printed nearly 100 of these things (some on a much smaller scale) and I will say that although it gets easier over time, I still get stressed during the entire printing process, but I still love doing it.
You have to work quickly, and I find that I have to wash off my block and brayer a few times during the process because the ink gets gunky. As I mentioned earlier, this can be alleviated a little bit with the use of an ink retardant. Either way, if you find that you have to wash your things, make sure your tools are entirely dry before you resume.
You have to work quickly, and I find that I have to wash off my block and brayer a few times during the process because the ink gets gunky. As I mentioned earlier, this can be alleviated a little bit with the use of an ink retardant. Either way, if you find that you have to wash your things, make sure your tools are entirely dry before you resume.
Once the ink is dry, which can take awhile, you can use a matte spray finish over it so nothing smudges. Since the ink is most likely water-based, it can smear if it gets wet in the future.
When it's dry, add the hangers on the back and then measure the spacing for the hooks.
One suggestion I have is to put the hook on the board, be sure it's level, and use and awl to make a mark in the center of the holes. Then you'll have a nice anchoring point when you pre-drill your screw holes. Attach the hooks and you have a rack. Yay!
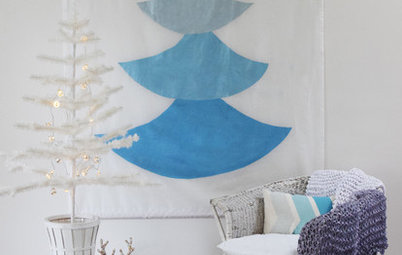
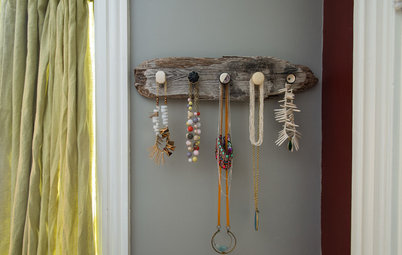
I thought I'd add a couple of other racks I've made just so you can see a variation of the theme. I made this one about four years ago.
This rack isn't block printed but it's painted instead.
I have this rack in my hallway and the items on it seem to rotate quite frequently. The background is stained, and the circles are painted. This one took awhile but I really like the way it turned out.


Materials:
Acrylic paint
Block printing ink
Rubber block
Piece of plexiglass or glass
Wood- craft plywood is the most budget friendly
Hooks
Screws for hooks
Sawtooth hangers
Tracing paper
Marker
Pencil
Supplies:
Brayer (roller)
Carving tool
Yard stick
Hammer
Utility knife
Drill
Screws
Cotton swabs
Paper towels
Matte finishing spray
Dimensions: 1/4” piece of wood cut to 8” x 22”
Approximate cost: $40