
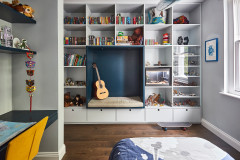

DIY Project: Toy Stash-and-Carry Play Mat
Make this smart activity mat which doubles as an effortless clean-up carryall for small toy pieces

If I could share one thing that I have learnt from being a parent, and maintaining a relatively clutter-free house, it is this: make clean-up fun for kids. If you make it a part of everyday activities, they will want to pitch in and tidy up after themselves. This toy stash-and-carry play mat could be just what you need to teach young’uns the fundamentals of cleaning up.
Step 1: Fold the fabric
Start by folding your cotton duck canvas fabric in half …
Start by folding your cotton duck canvas fabric in half …
… and in half again.
Step 2: Measure up
Find the corner that has no open edges – this is the centre of the circle. Measure 50 centimetres out from the centre and mark it with tailor’s chalk.
Find the corner that has no open edges – this is the centre of the circle. Measure 50 centimetres out from the centre and mark it with tailor’s chalk.
Step 3: Mark the circle
Holding the measuring tape in place at the corner with one hand and the chalk in the other hand at the 50-centimetre point, keep tension on the tape while moving the chalk downward in an arc to mark a quarter-circle on the fabric.
Holding the measuring tape in place at the corner with one hand and the chalk in the other hand at the 50-centimetre point, keep tension on the tape while moving the chalk downward in an arc to mark a quarter-circle on the fabric.
Step 4: Cut it out
With sharp haberdashery scissors, shear through the fabric following the marked line.
With sharp haberdashery scissors, shear through the fabric following the marked line.
Step 5: Cut to the guide
Using the first circle as a guide, cut a second circle with the cotton fabric.
Using the first circle as a guide, cut a second circle with the cotton fabric.
Step 6: Face together
Face the fabric circles right side together. Set aside until step 13.
Face the fabric circles right side together. Set aside until step 13.
Step 7: Begin the trim
Using the metre length of cotton fabric for the casing, measure out 3 x 12-centimetre lengths and mark with a small snip of the scissors.
Using the metre length of cotton fabric for the casing, measure out 3 x 12-centimetre lengths and mark with a small snip of the scissors.
Step 8: Rip it
The fastest and easiest way to cut a straight line from selvage to selvage is to tear the fabric; just find your marked snips and rip downwards.
The fastest and easiest way to cut a straight line from selvage to selvage is to tear the fabric; just find your marked snips and rip downwards.
Step 9: Connect the ends
Sew the narrow ends of the casing together to form a 3-metre long rectangle.
Sew the narrow ends of the casing together to form a 3-metre long rectangle.
Step 10: Fold and Sew
Fold the fabric right side together and sew a 1/2-centimetre hem.
Fold the fabric right side together and sew a 1/2-centimetre hem.
Step 11: Turn it out
Using the same motion as you would to bundle two socks together, unfold the casing making it right side out.
Using the same motion as you would to bundle two socks together, unfold the casing making it right side out.
Step 12: Press seams
It’s a good idea to press the seam to make the next step easier and to achieve a more professional finish.
It’s a good idea to press the seam to make the next step easier and to achieve a more professional finish.
Step 13: Make order
Lay your out fabric so that the pieces sit on top of one another, ordering them cotton, then casing, then canvas. Make sure the casing seam is on the outside edge.
Lay your out fabric so that the pieces sit on top of one another, ordering them cotton, then casing, then canvas. Make sure the casing seam is on the outside edge.
Step 14: Pin it
Pin together the three fabrics all the way around the diameter, leaving a 15-centimetre gap at the ends of the casing.
Pin together the three fabrics all the way around the diameter, leaving a 15-centimetre gap at the ends of the casing.
Step 15: Sew
Sew the layers together with a 1/2-centimetre hem.
Sew the layers together with a 1/2-centimetre hem.
Step 16: Fold it out
Use the same technique you did for the casing, fold the entire mat right side out.
Use the same technique you did for the casing, fold the entire mat right side out.
Step 17: Trim
If the casing overlaps, trim the fabric so there is roughly a 5-10 centimetre gap.
If the casing overlaps, trim the fabric so there is roughly a 5-10 centimetre gap.
Step 18: Close seam
Fold the edges of the open space on the mat inward, and close the gap with your sewing machine. Try to match it to the existing hemline if you can.
Fold the edges of the open space on the mat inward, and close the gap with your sewing machine. Try to match it to the existing hemline if you can.
Step 19: Knot your cord
Tie a knot at the end of the cord and slip through one end of the casing.
TIP: You can insert a safety pin through the knot to make the next step easier.
Tie a knot at the end of the cord and slip through one end of the casing.
TIP: You can insert a safety pin through the knot to make the next step easier.
Step 20: Thread through
Gather the casing fabric down onto the cord, hold the cord above the gathered area and move the fabric down over the cord (or push the safety pin attached to the knotted cord end through the casing). Repeat until the cord comes out the other side of the mat and tie the cord ends together.
TIP: Lightly melt the edges of plastic cord with a lighter to stop fraying.
Step 21: Fill with toys
The best part is giving this to a loved one and watching them play with it.
The best part is giving this to a loved one and watching them play with it.
Step 22: Play time
Open the mat all the way for use as a play mat.
Open the mat all the way for use as a play mat.
Step 23: Pack up
Pull the cords to close the mat up into its own carry bag, making packing up fun!
Pull the cords to close the mat up into its own carry bag, making packing up fun!
Step 24: Stow it
Hang it up in pride of place
YOUR TURN
If you make one of these toy mat-sacks for your child, we’d love to see it. Share it with us by uploading a photo in the Comments below.
MORE
DIY Project: Sew a Circular Play Mat for Baby
10 Creative DIYs to Put Old Gift Wrap to Good Use
DIY Project: Pawsitively Cute Origami Mobile


Sponsored

Sponsored
- 1-metre length of cotton duck canvas fabric
- Measuring tape
- Tailor’s chalk or fabric marker
- Sharp haberdashery scissors
- 1-metre length of cotton fabric
- 1-metre length of cotton/canvas for the casing
- Sewing machine
- Pins
- All-purpose thread
- 3 metres of cord
WARNING: Please remember that any item with a cord attached may present a strangulation hazard for young children. Always ensure they are supervised when playing with this mat.